This is an optional rule for Bold Against Monsters (BAM). Also, heroic actions can replace Weapon Masteries in D&D 5.5 or Weapon Actions in ToV. There are also Tips for the GM that might be useful when running any RPG.
In a combat round your character can move and take an action (or move twice if you don’t take an action). The core rules say, “Your action can be anything that your character can do, or attempt to do, that would normally take no more than 6 seconds.” And goes on to describe the “Attack Action” and the “Magic Action” – the two most common actions.
The “your character can do anything” rule may be intimidating to players, and GMs as well. So here a few examples of things the PCs can attempt and rules for succeeding. I’m calling these “Heroic Actions.”
Any player character can attempt a heroic action. Heroic actions do not do damage per se but may cause damage to be done as a result – dependent on environment or impact – so pushing someone off a cliff doesn’t do damage … it’s the fall that does it! If a heroic action forces a target creature into damaging terrain, such as lava or off a cliff, it can make a STR or DEX (target’s choice) save to avoid the move.
Performing a heroic action. To perform a heroic action requires making an ability check. First name what you intend to do and the effect you want to achieve. Like all other ability checks, the GM chooses the relevant ability and the target number, called a difficulty class (DC). To make an ability check, roll 1d20 and add the relevant ability modifier. If this is something you are proficient at you also add your proficiency bonus (PB). If the total is equal to or greater than the DC, you succeed; otherwise, you fail.
When characters succeed in performing a heroic action with a weapon, rather than doing damage they use the weapon to perform some other function as described.
The guide-lines that follow are only a few examples of how heroic actions are to be resolved. Creative players will certainly come up with new heroic actions.
DISARM (Unarmed) You must have at least one hand free. You specify which weapon, shield, or object you are attempting to make the target creature drop. Make a STR or DEX check (you decide which), adding your PB to the roll. The DC of the ability check is the AC of the target creature. You make the check with disadvantage. (With a light melee weapon) Select a weapon, shield, or object the target is holding. Make an attack roll against the target with a light melee weapon that you are proficient with. You make the attack roll with disadvantage. (On a success) The target drops the item. The item lands in an unoccupied space, chosen by you, within 5 feet of the target. If no unoccupied space is within range, it lands at the target’s feet.
GRAPPLE (Unarmed) You must have at least one hand free. Against a large or smaller creature, make a STR check, adding your PB to the roll. The DC of the ability check is the AC of the target creature. (On a success) The target must succeed on a STR or DEX save (it chooses which), or it has the Grappled condition. The DC for the saving throw and any escape attempts equals 8 plus your STR modifier + your PB. (Ending a Grapple) A Grappled creature can use its action to make a STR or DEX check against the grapple’s escape DC. It also ends if you are incapacitated. You can release the target at any time (no action required). PUSHBACK (Unarmed or with a shield) You must have at least one hand free or be wielding a shield. Make a STR check, adding your PB to the roll. You make the check with disadvantage unless you first move 20 feet in a straight line up to the creature. The DC of the ability check is the AC of the target creature. (With aheavy melee weapon) Make an attack roll with a heavy melee weapon that you are proficient with, against a large or smaller creature. You make the attack roll with disadvantage. (On a success) You push the creature up to 10 feet straight away from you.
TRIP OR THROW (Unarmed) You must have at least one hand free. Against a large or smaller creature, male a STR or DEX check (you decide which), adding your PB to the roll. The DC of the ability check is the AC of the target creature. (With along melee weapon) Make an attack roll with a long melee weaponthat you are proficient with, against a large or smaller creature. You make the attack roll with disadvantage. (On a success) The target falls prone. If the target is mounted, it can make a STR or DEX (target’s choice) save to avoid falling prone.
Tips for the GM:
How to handle it when a player wants to do something not covered in the rules. What if a player wants his character to swinging on a chandelier, jump onto the back of a monster or throw sand in an opponent’s eyes? Game Masters (GMs) have to quickly respond to these and many other unique situations that crop up all of the time in any RPG. This is a skill that GMs develop with experience. For new GMs, or anyone who would appreciate a few pointers, this will walk you through my thought process when faced with unexpected player requests.
Have the player describe the action and what they expect it to accomplish.
This does two things. First, it makes the player visualize the current situation and its environment. Would the action even be possible for the character to do? If not, it is part of your job to occasionally say no to a player. You should explain to the player why the action is impossible. Example: If they want to jump over a pit of lava that is 200 feet wide. Without flight or any kind of magical assistance, this will be impossible. Might it be possible if the rules were loosened? If they could “almost” do it, but the rules don’t allow it, you may want to make an exception in this specific case. It should require an ability check. Example: If they can jump over a 10 foot wide pit and the lava pit is 15 feet wide, I might allow a DC 15 STR check to succeed, but with a dire warning of the consequences of failing the attempt (you fall into the lava pit and take appropriate damage). How exactly will they do it? You may need to have the player explain how the character intends to accomplish what he is wanting to do. I find that the player is often thinking that all their character needs to do to accomplish something is to roll a high enough number on the die. By describing exactly how their character will do it, they often realize that they don’t have any way to accomplish their goal. Example: The player says, “While the others are fighting the monster, I run over to the coffin and remove its lid.” Depending on the specifics of the adventure, you might just describe what happens when he opens the coffin. If they haven’t examined the coffin or you haven’t described it, it might be made of stone and the lid is too heavy for a single PC to remove it. The lid may have been sealed by lead or gold. The coffin may be made of wood and the lid may be nailed shut. Another Example: The action may require a tool that the PC doesn’t possess. Maybe they could remove the lid if they had a crowbar. Does the character have what is needed and maybe the proficiency needed to accomplish the intended action?
Second, it gives you, the GM, a little time to decide how to handle the request.
Setting the difficulty. Always remember, you set the DC and can also require the check to be made with advantage or disadvantage. If they must succeed: If it is important to the story that they succeed, don’t ask for a check. Regardless of how easy you make it, they might fail (it has happened to me!) If they must fail: If it would ruin the story if they do succeed, you must resist the temptation to make it too hard for them. Regardless of the difficulty, they may succeed! It will be much better if you don’t allow a check and just say that they can’t do it. If you make it impossible for them to succeed on a natural 20, then why are you letting them roll at all?
If you feel that you must allow them a chance to succeed, be prepared for them to roll a natural 20. You must allow a natural 20 to succeed. If you allowed them to roll for it, they must have a chance to succeed or what is the point in rolling?
The following rules apply to “unique” actions.
1. A unique action will be your action for a combat round but it can also include some or all of your move for the round. 2. You must describe the action before you roll. 3. The action must be within the reasonable ability of your character to perform, as decided by your GM, given the character’s level and the difficulty of the action. 4. If the action is approved by the GM, they will determine the DC and the result of success or failure. 5. If you roll a natural 1 your attempt fails regardless of any bonuses. 6. A natural 20 is always a success.
Here are a couple of example unique actions.
Action: “I want to swing on the chandelier and land on the ogre’s back.” If the proposed action can’t be done, explain why not. But for this example let’s say that it is possible. You could always say something like, “Make a DC15 DEX check, if you fail you land prone at the ogre’s feet, if you succeed you are on his back.” Or you could make it more interesting. First, you need to visualize the physical layout of the room in 3 dimensions and the location of all the actors. To keep it simple, let’s say this is a large room with a chandelier hanging in the center of the room. It is hanging 10 feet above the floor from a chain attached to the ceiling high above. There is an open staircase on the side of the room with a landing 15 feet above the floor. Let’s also say that the chandelier would reach just above the handrail on the landing, if it were pulled over there. You might say that the character can’t just jump over and grab the chandelier where it is hanging, or if they did they wouldn’t make it swing very far, not far enough to reach the ogre on the other side of the room. For now, we will assume the chandelier is well made and could support the character’s weight. Remember we have already made the assumption that this action is possible. So, assuming the character is standing on the landing, you might ask, “How are you going to move the chandelier over to where you can grab it?” There may be several different options here. He, or another character may have some magic spell they could cast to move the chandelier. He might say he will use his whip, or make a lasso out of his rope and pull it over that way. Most options for retrieving the chandelier will use his action this round, and may also require an ability check. Let’s say at the start of his next round he has retrieved the chandelier and is ready to swing across the room and land on the ogre’s back. When he describes exactly how he will do this, he realizes (perhaps with some prompting from you) that he must have both hands free to hold the chandelier. If you are feeling generous, you may allow him to stow his shield and sheath his sword as part of this action. Where the chandelier is now, the center of the room and the ogre should form a straight line. You, as the GM, could dismiss with this requirement, especially if you are playing a more theater of the mind kind of game. That leaves, how does the character land on the ogre’s back and what happens if he fails? I wouldn’t make it too hard, perhaps a DC 10 DEX check to land on the ogre’s back without falling off. If he fails the check he falls prone within 5 feet of the ogre and takes 1d6 points of damage. At the end of his turn he will either be prone at the ogre’s feet, or hanging on to the ogres back. Either way he is holding no weapon and no shield. But if he succeeds, I would reward him for his creativity by giving him one luck point. And, if he is now on the ogre’s back I would give him advantage on melee attacks he makes against the ogre, and give the ogre disadvantage on attacks against the character. I might add that at the start of each of the characters turns, he must make a STR check to remain on the ogre’s back (The GM sets the DC, maybe 15). I might allow the ogre to use his action to attempt to remove the character from his back. This would be a good place to use a contest comparing a STR check from the ogre to a STR or DEX (player’s choice) check from the character.
You might make different decisions, but the point is that you and the player really need to take a minute to visualize, and analyze the situation. What would it look like if you were actually there? Base your decisions on that and you will do fine. Everyone will have fun.
Action: I want to throw sand in the assassin’s eyes. You could always say something like, “Make a DEX check, adding your PB to the roll. The DC of the check is 8 + the DEX modifier of the target creature. On a success the target is blinded until the end of your next turn.” This would be good if their response to your request to “Describe the action and what you want to accomplish.” Was something like, “The assassin just knocked me prone and you said that the ground there was sandy. I try to keep the assassin from noticing that I close my fist around a handful of sand. As I stand up I fling the sand into his face, trying to blind him.” Or, if the player didn’t make it so easy for you, you could still just make it a DEX check, or there are several things you may want to consider.
You can’t throw a handful of sand very far, so I think the target would need to be within 5 feet of the character.
Also, you would have to be unaware that someone is about to throw sand in your face, or you would instinctively block against it. So the player needs to indicate that he is attempting to be stealthy. Even if they do, you may want them to make a stealth check opposed by the targets perception check for the target to not notice the handful of sand about to be flung in their face.
Preventing sand from going into your eyes is relatively easy. You could turn away; block it with your hand, arm or shield; close your eyes; or all three. So I would either make the DC relatively high, have the PC make the check with disadvantage, or give the target a DEX save to avoid bring blinded.
As you see, there is always a balance between a fast, easy to play game and one that takes longer but is more “realistic.” The decision is up to you as the GM. The trick is to be consistent. Don’t make it easy for one player but more complicated for another player. And don’t get bogged down in all the numbers and the physics of reality. It’s a game, not a physics class. In the end, most of the decisions you make will, in the end, only add or subtract a few numbers from the die roll, and there are a lot of numbers on a 20 sided die. The big secret is that, no matter what ruling the GM makes, it won’t really make much difference! So, if there isn’t a rule for something, make one up! If you feel it is an important rule, make a note of it and, before the next gaming session, do some research and see if you feel a need to change the rule you just made. White that down and tell the group at the beginning of the next gaming session.
Let me know what you think in the comments below .
Here is the form fillable ToV Character Sheet you have been waiting for!
In 2015 Wizards of the Coast published the current version of Dungeons and Dragons (D&D 5E). Last year they published an update to the game that they refer to as the 2025 version (I call it D&D 5.5). Last year Kobold Press published “Tales of the Valiant” (ToV). It is also based on D&D 5E and is also an update to that game. If you aren’t familiar with it you should go over to koboldpress.com and get a free copy of the 385 page “Black Flag Reference Document” PDF. It contains everything you need to play ToV. If you like it you can get their equivalent to WotC’s “Player’s Handbook” (PHB), “Dungeon Master’s Guide” (DMG), and “Monster Manual” (MM). ToV calls them the “Player’s Guide” (PG), “Game Master’s Guide” (GMG), and “Monster Vault” (MV).
Last month I posted my updated character sheet for D&D 5.5. This is a similar character sheet specifically for “Tales of the Valiant”.
This incorporates the changes to D&D 5E found in ToV’s “Players Guide”. It is 4 pages, 2 sheets if printed on both sides. (Note that I will be referring to the set of all 4 pages in the singular, as the “character sheet”.) Page one has all of your character’s basic information and all you need for combat other than your spells. Page two is just for equipment and treasure. Page three is Character background and notes. Page four is for magic spells. It can be printed blank and filled out with a pencil, or you can fill in the forms on your device and most of the calculations will be done for you. It automatically calculates; ability and saving throw modifiers, carrying capacity and jump distances, Armor Class, Proficiency Bonus, Passive Perception, Skill check modifiers, Weapon attack bonus and damage, Equipment cost and weight, and more. It can fill in all the adventuring gear you get if you select an equipment pack (such as an “Explorer’s Pack”). In addition to that, it contains a new Autofill option that can fill in all the standard information based on your class, Lineage, Heritage, and Background.
Update #1: 2/9/2025 Minor item cost display fix for Adobe Acrobat For items whose cost is in copper pieces or silver pieces it was displaying their cost in fractions of a gold piece. It now displays their cost in cp or sp if their total cost is less than the next more valuable coin. Adobe Acrobat wasn’t displaying this correctly.
Filling in the ToV Character Sheet
These instructions are for use with the character sheet you can download above. You can print a blank Character Sheet and fill it out by hand. If you fill it out on your device, many boxes will be filled in for you. There is information at the end of this on how to use this sheet for multi-class characters.
PAGE 1
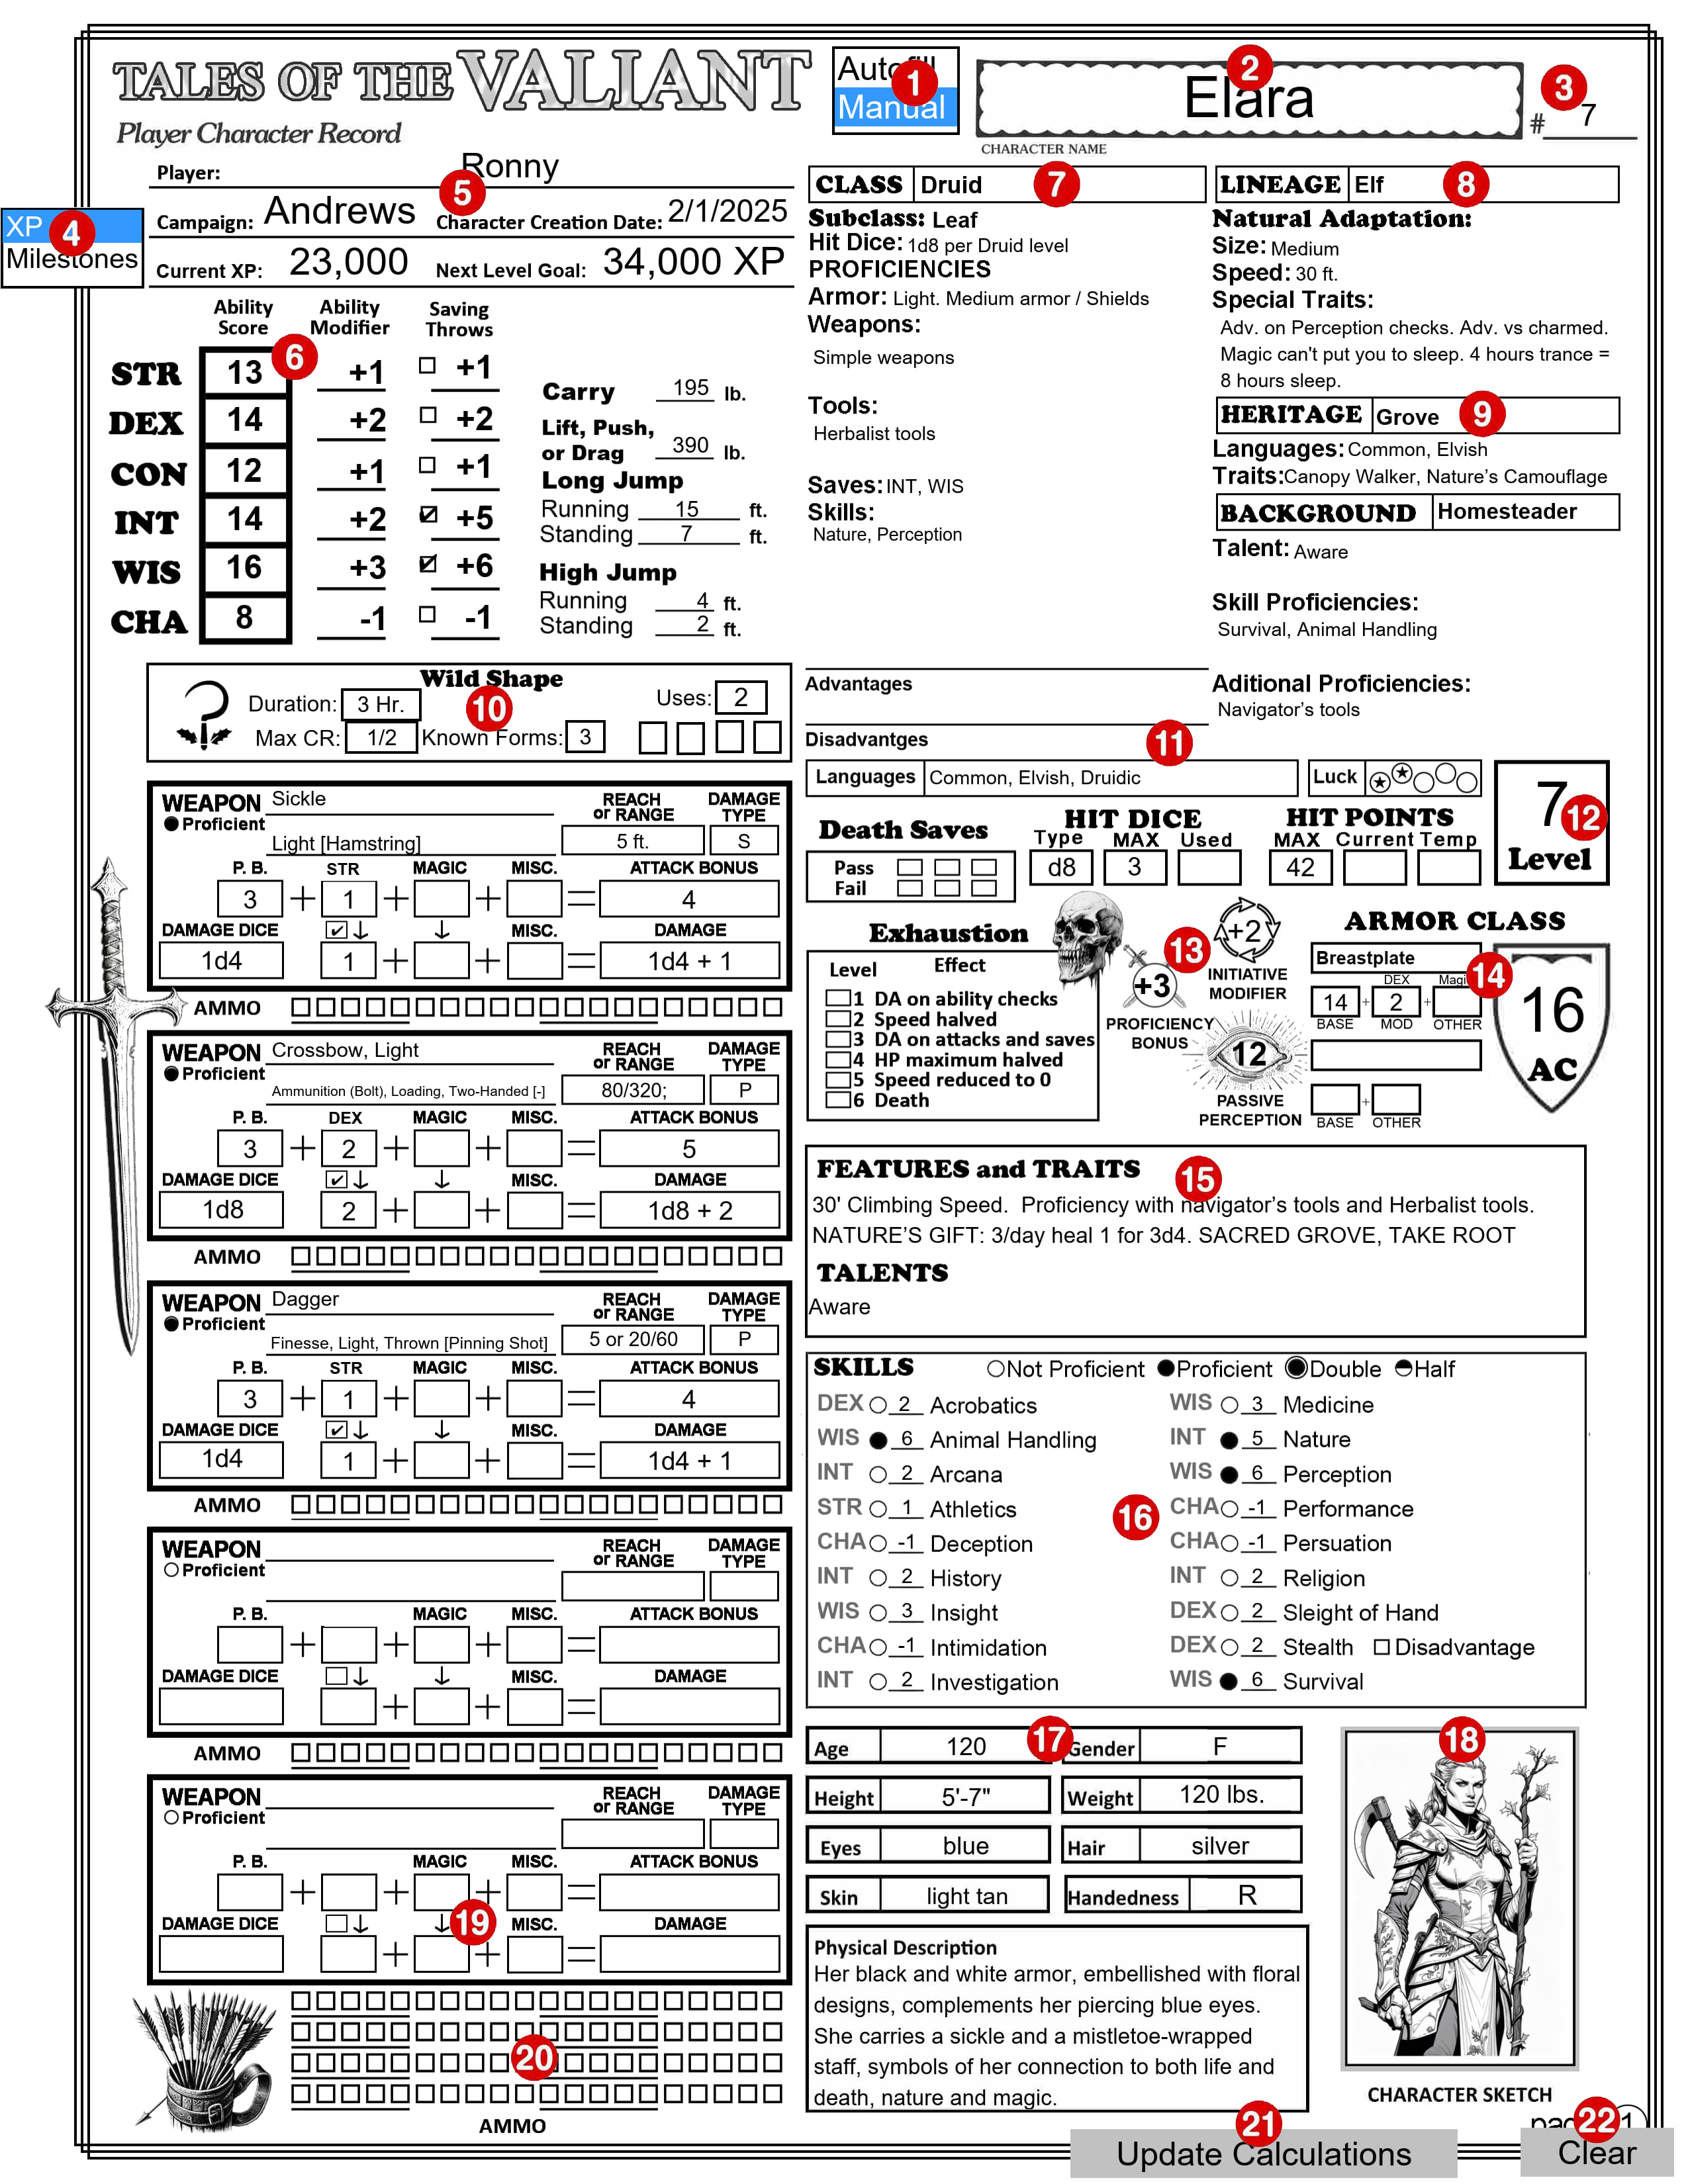
1 – Autofill/Manual Selection Box
This selection box is independent of the similar one on page 4. Be aware that one page might be set to Autofill and the other one set to Manual. Select ‘Autofill’ mode to automatically fill in portions of this page based on your choices, as described below. Choose ‘Manual’ mode to keep existing information unchanged and make your own edits. CAUTION: If you switch to ‘Manual’ mode to make a few changes and then switch back to ‘Autofill’ mode, all your changes will be lost, replaced by the ‘Autofill’ information. I recommend you leave it in ‘Autofill’ mode until you are finished with Page 1, including your weapons and armor. You can then safely change to ‘Manual’ mode and make changes and additions. You may want to make a backup copy of your sheet before making changes. Each of the numbered sections below where this selection makes a difference will include a description for both Autofill mode and Manual mode. Note: This selection box will not appear on the printed page.
2 – Your Character’s Name
The text you enter here will also appear in the same location on the other pages. The text can be entered or changed on any page.
3 – #____
Character sheet version. If you make multiple copies of your character sheet enter the version number here. Like the Character Name, this text will also appear on the other pages.
4 – XP/Milestones Selection Box
If ‘XP’ is selected the Next Level Goal will be calculated and entered for you here based on your current character level (see below). If “Milestones” is selected the text on this line will be replaced by a “Notes” section. Note: This selection box will not appear on printed pages
5 – Campaign Information
This is where you enter your name, the name of the campaign you are in and the date this character was created. Trust me, if you look back at this years from now, you will appreciate having this information.
6 – Ability Sores
Enter your ability scores in the boxes. All the data to the right of the ability scores will be filled in for you based on the ability scores, including your carrying and jumping stats based on your strength score. Because your long jump distances are based on your walking speed, and there are several ways it might change, I don’t calculate that for you. Check the little box next to the Saving Throw modifier to indicate that you are proficient in that Save.
7 – Class
Select your Class from the drop-down box. The Class Feature box (number 10 below) will display information relevant to this class. Subclass: You can select a subclass from the drop-down menu. Autofill mode: All the information from the Class Features section in the PG for this Class will be filled in, down to (but not including) Starting Equipment. If there is any current text in any of these areas it will be removed. You can also type text into this ‘Class’ box, but if it differs in any way from one of the selections in the drop-down box any text below will be removed. Manual mode: No matter what you select or enter into the “Class’ box, existing text in this section will remain unchanged. You can change or add any text in the ‘Class’ box or any of the information below it.
8 – Lineage
Select your Lineage from the drop-down box. Natural Adaption: Some call this a Sub Lineage. Some lineages (such as the Dwarf) don’t have one. You can type in the name of a Natural Adaption or select one from the drop-down. Autofill mode: An abbreviated version of the size, speed, and special traits for this lineage will be filled in. If there is any current text in any of these areas it will be removed. You can also type text into the ‘Lineage’ box, but if it differs in any way from one of the selections in the drop-down box any text below will be removed. Manual mode: No matter what you select or enter into the ‘Lineage’ box, existing text in this section will remain unchanged. You can change or add any text in the ‘Lineage’ box or any of the information below it.
9 – Heritage and Background
Select your Heritage and Background from the drop-down boxes. Autofill mode: The Languages and Traits for your Heritage will be filled in. Your Talent, Skill Proficiencies and Additional Proficiencies from your Background will be filled in. Manual mode: No matter what you select or enter into the ‘Heritage’ or ‘Background’ box, existing text in these sections will remain unchanged. You can change or add any text in either box or any of the information below them.
10 – Class Feature box
The content of this box will change depending on your character’s Class (number 7). It shows certain traits for the selected class that change based on class level and/or abilities and provides check boxes to track uses of limited use features. If no class is selected, or anything is entered into the Class box (number 7) other than what can be selected from its drop-down box, this will show the default Class Feature box which only shows a stylized die and contains an empty text box where you can enter any notes you may want.
11 – Advantages, Disadvantages, Languages and Luck Points
Enter any types of checks where you get advantage or disadvantage on the role, your known languages and track your luck points.
12 – Level
You must enter your character’s current level in this box.
13 – Proficiency Bonus, Initiative Modifier, Heroic Inspiration, Passive Perception, Death Saves, and Exhaustion, Hit Dice, and Hit Points
Hit Dice Type, Proficiency Bonus, Initiative Modifier and Passive Perception will be calculated and filled in for you. The check boxes in Heroic Inspiration, Death Saves, and Exhaustion are for you to check off as needed during play. You should enter your MAX Hit Dice. The Used Hit Dice, Current and Temp Hit points are for you to use to track them during play.
14 – Armor Class
Select the type of armor you are wearing, or “Unarmored” and select “Shield” or “No Shield”. Your Armor Class (AC) is displayed in the shield symbol. It is your Basic AC + the bonus you get if you have a Shield. The Basic AC is calculated by adding together the values in the three boxes under your armor type (or “No Armor”). Your shield bonus is +2 but if you have a magic shield you can select the bonus from the drop-down menu in the OTHER box under the Shield/No Shield box. Autofill mode: Armor: When you select an armor type the BASE value will be entered in the first box. The MOD value will be filled in with your DEX Modifier if it is Light armor, and your DEX Modifier (max 2) if it is Medium armor, and “None” if it is Heavy armor. The OTHER box is for you to enter any magical + it may have. Unarmored: If you have selected “Unarmored” the BASE will be 10 and MOD will be your DEX Modifier. If your Class is Barbarian the BASE will be 13 and MOD will be your CON Modifier. If your Class is Monk the BASE will be 10, MOD will be your DEX Modifier and OTHER will be your WIS Modifier. If not used otherwise, you can use the OTHER box to enter any other modifier you may get to your AC when unarmored. (If your character is a Sorcerer, the third level feature “Draconic Resilience” gives you an unarmored AC of 13 + your DEX Modifier. This is the only one that isn’t done for you. You will need to switch to Manual Mode to enter that. CAUTION: later switching back to Autofill Mode will replace anything you have entered anywhere on this page while in Manual Mode back to its autofill status. Manual mode: All of these boxes are to be filled in by you. The totals are still added up and show as your AC in the big armor class shield.
15 – Features, Traits and Talents
You can enter any information you want in these text boxes. They are intended for you to list your characters Features, Traits, Talents and any reminders you may want to include.
16 – Skills
The ability modifier to use for each different skill check is listed here. Empty circles indicate your character is not proficient in that skill. Click once on an empty circle to fill that circle, indicating that you are proficient in that skill. Your Proficiency Bonus will be added to your ability modifier for that skill check. Click on the filled circle and a slightly larger circle will be added around the filled one, indicating that you can add double your proficiency bonus to this skill check, and the number will change to reflect this change. Click on this same circle again and it will change to a half-filled circle, indicating that you add only half your proficiency bonus to this skill check and the number will change again. Click on it one more time and it will change back to not proficient. Stealth: To the right of the stealth skill is a checkbox in front of the word “Disadvantage”. This box will automatically be checked as a reminder to you if the type of armor you are wearing gives you Disadvantage on DEX (Stealth) checks. It will automatically be checked if your armor has the “Noisy” property.
17 – Physical Description
Refer to the information on your Lineage, but within those general guidelines your character can look any way that you want.
18 – Character Sketch
If your PDF reader supports it, you can click on the image area and it will pop-up a “Select Icon” menu where you can select an image you have access to. Or just draw a picture of your character in the frame.
19 – Weapons
Select a weapon from the drop-down menu.
Select an Ability from the drop-down above the second column of boxes to will apply that ability’s modifier to the attack bonus. This should typically be STR for melee weapons and DEX for ranged weapons.
Click on the check box between the two boxes below that to also apply that modifier to the damage calculation. You don’t add your ability modifier to the damage when attacking with second weapon in your other hand unless the modifier is negative.
If you have proficiency in the use of this weapon, click on the circle next to “Proficient”. (This will fill in the circle and replace the word “None” in the attack bonus row with the value of your Proficiency Bonus.)
If this is a magic weapon select the magical bonus from either of the drop-downs in that column. The magic bonus will show up in both boxes and be applied to the attack bonus and to the damage.
To add additional modifiers to the attack bonus or to the damage select the modifier from the box in the MISC. column. Autofill mode: The Weapon Properties, Reach and/or Range, and Damage Dice will be filled in for you. On the line under the weapons name, it will list the weapon’s properties and the weapon options (if any) in square brackets. Manual mode: You will have to fill in the Weapon Properties, Reach and/or Range, Damage Type, and Damage Dice boxes.
20 – Ammo Check boxes
For weapons that use ammunition, you can use these boxes to check off your ammunition as it is used.
21 – Update Calculations
All of the information filled in automatically for you should update whenever you make any change. Sometimes it doesn’t. You can press this button to force the form to update all of the calculated fields. Note: This selection box will not appear on the printed page.
22 – Clear
Be careful to not press this unless you want to erase everything from all of the fields on all pages. If you press it by accident, you may be able to recover the lost information if you press CTRL Z. This button is useful for clearing all fields and starting over, or before printing a blank form to fill out by hand. Note: This selection box will not appear on the printed page.
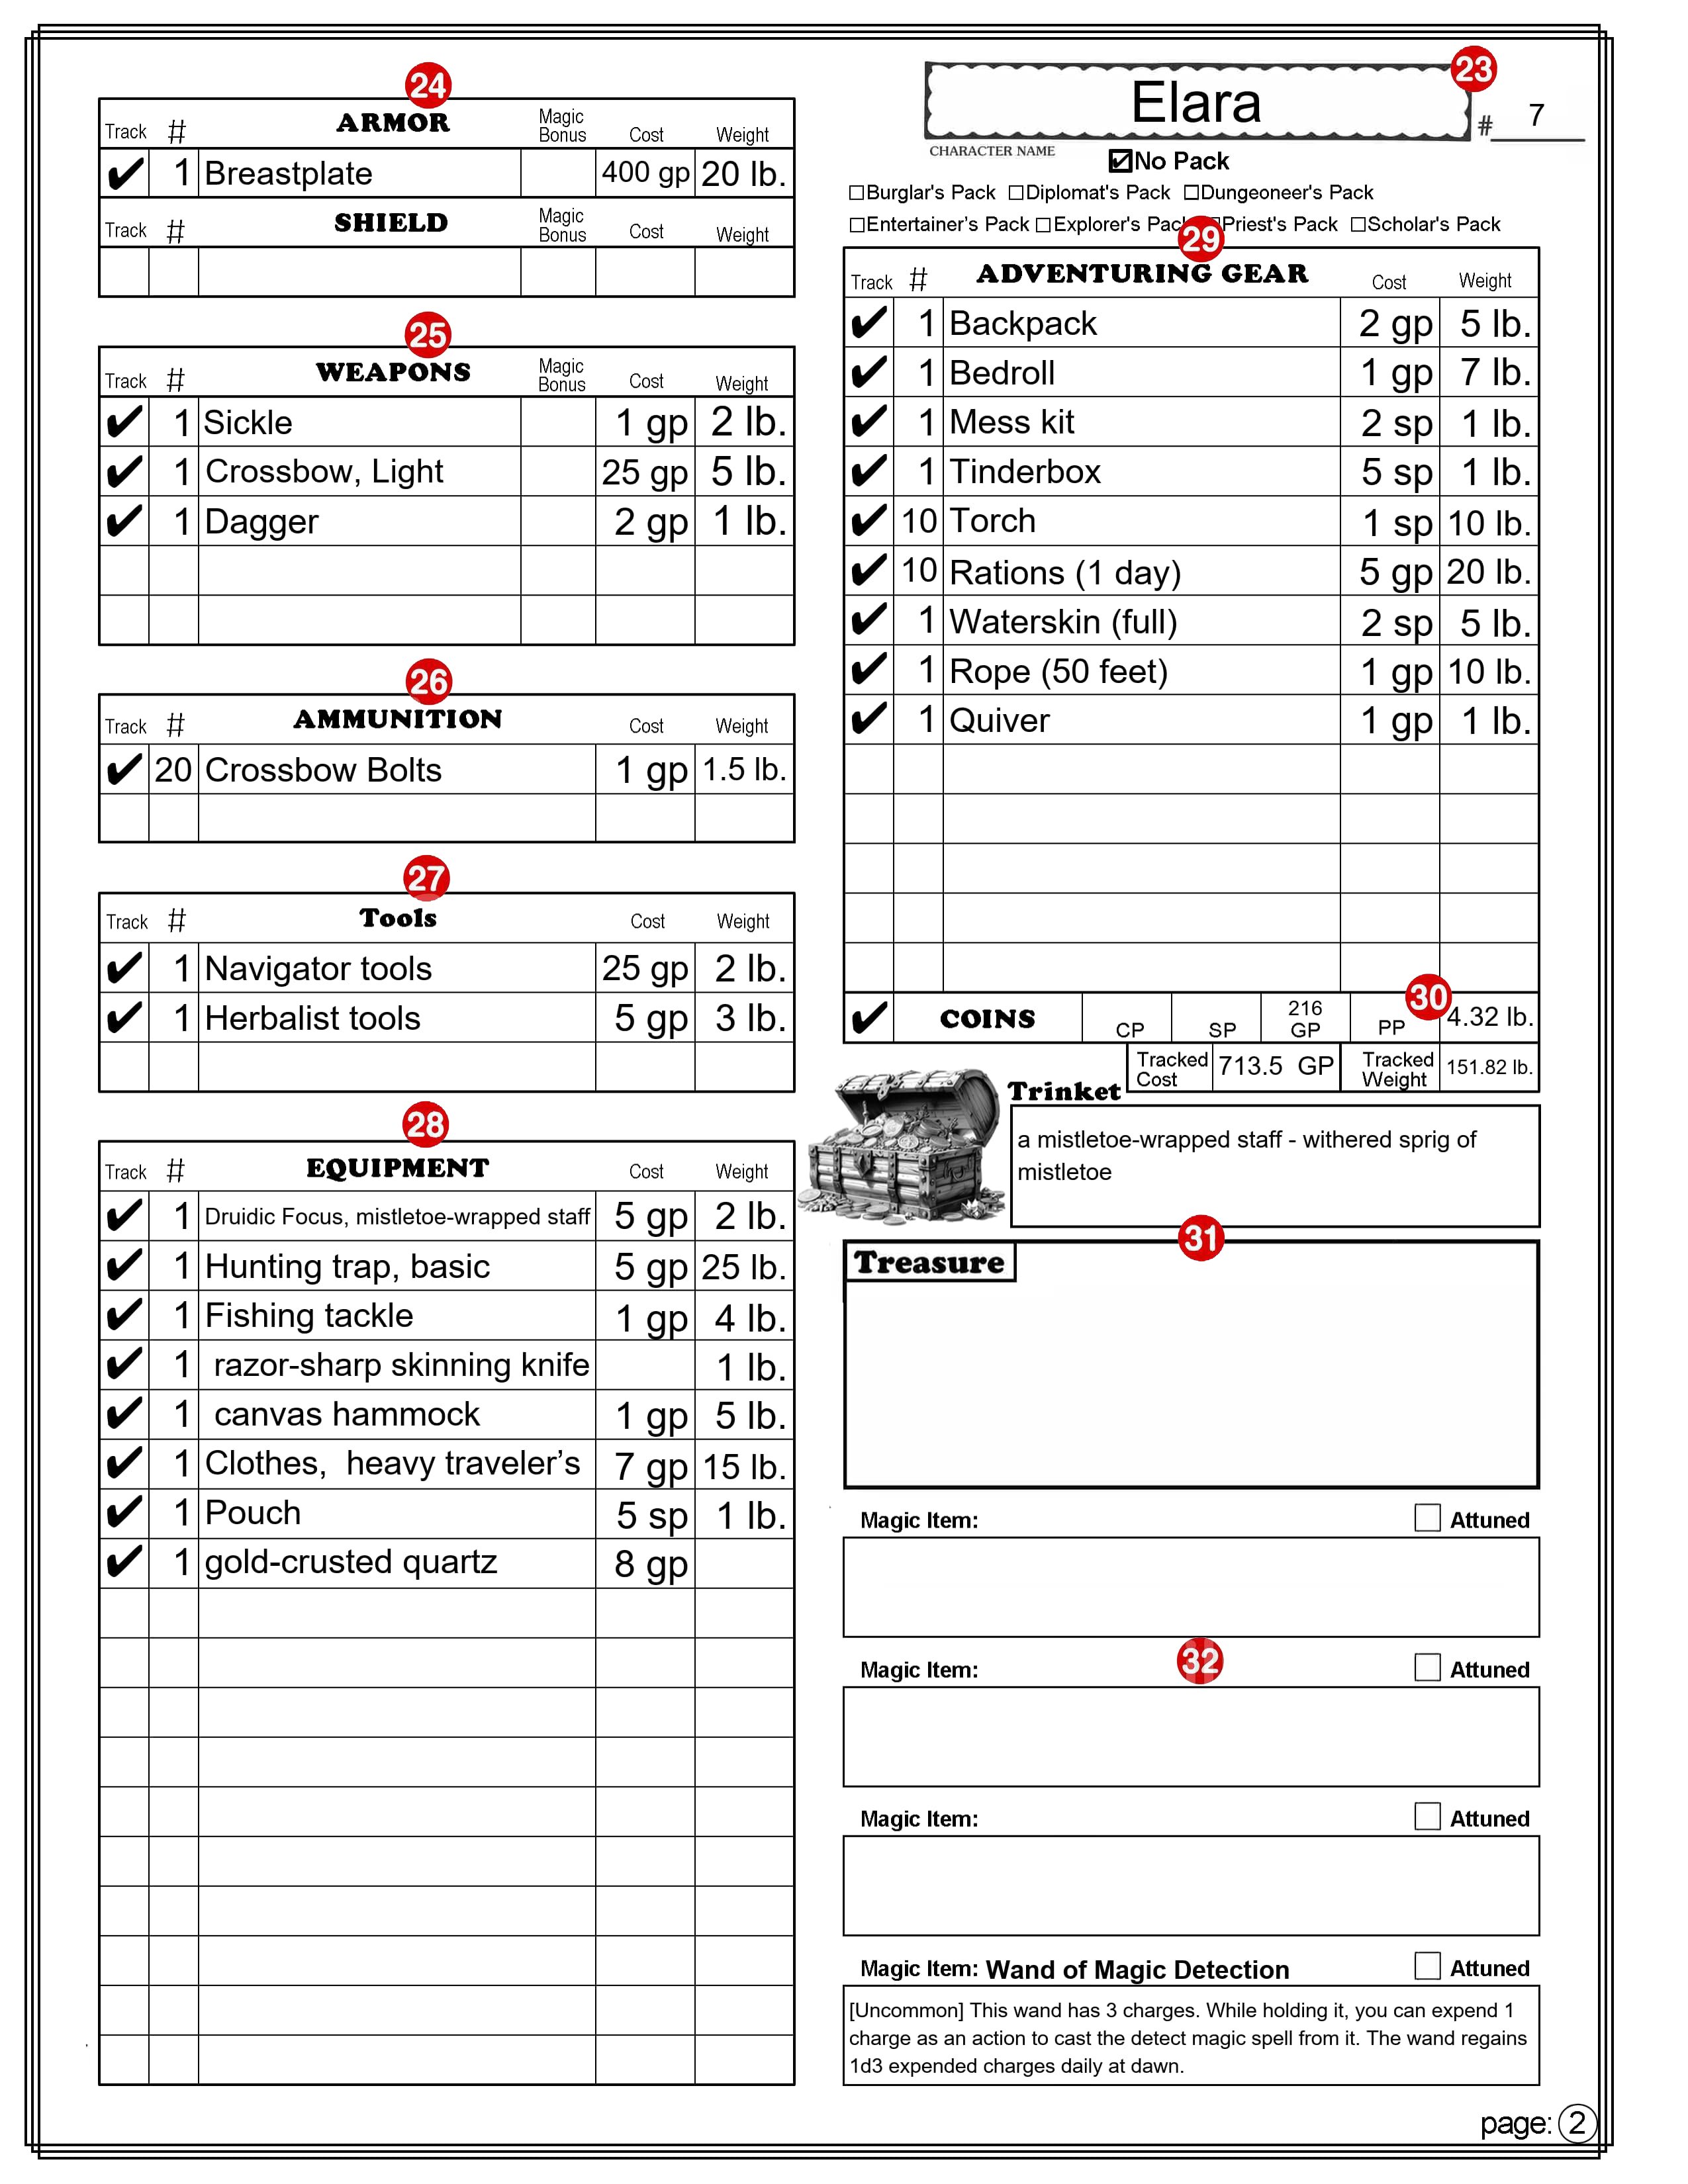
PAGE 2
Note: There is no Autofill or Manual mode for this sheet, although the Adventuring Gear section (number 29) has a “No Pack” option that is similar to Manual mode that only applies to the Adventuring Gear section.
All Equipment Lists
For all items in the Armor, Shield, Weapons, Ammunition, Equipment, and Adventuring Gear sections.
Item Selection: The drop-down will only lists items of the appropriate type. For example: Item selection in the Tools section will only list tools. If you have an item that is not on the drop-down menu, or you want to modify a name, you can type anything you want in the box. (Refer to number 29 for exceptions.) Track: If this box is selected a check mark will appear in the box and the cost and weight of this item will be included in the boxes labeled “Tracked Cost” and “Tracked Weight,” found at the bottom of the “Adventuring Gear” section. #: Number, or quantity. You will need to enter a number in this box for how many of this item you have. If you leave this box empty (it will not display the number 0) the Cost and Weight boxes will remain empty. Magic Bonus: (Only found on the Armor, Shield, and Weapons sections.) You can select a magic modifier to apply to the item from the drop-down menu. Cost: This box will contain the cost of the item. It takes the cost from the PG and multiplies that by the number of items. If the text in the item box doesn’t match exactly any option on the drop-down, no calculations are made and you can enter or change the cost. You can’t enter the cost in cp, sp, or pp. You will need to convert the cost into its value in gold pieces, or fractions of a gp. 1 CP = 0.01 GP, 1 SP = 0.1 GP , 1 PP = 10 GP. Note: If the text in the item box isn’t on the drop-down list, the cost you enter here will ignore the number in the # column. Also note that this is the price of the item. If you later sell the item you will typically only be able to sell it for a maximum of 1/2 its original value. There are some exceptions, such as for gems and coins. Weight: This box will contain the weight of the item (in pounds). It takes the weight from the PHB and multiplies that by the number of items. If the text in the item box doesn’t match exactly any option on the drop-down, no calculations are made and you can enter or change the weight. Note: If the text in the item box isn’t on the drop-down list, it will ignore the number in the # column.
23 – Character’s Name and #____
Character’s Name and Character sheet version (see 2 & 3 on page 1).
24 – Armor & Shield
ARMOR: Select the armor you are wearing (or select “No Armor”). The text here will also appear on page 1 (number 14), and used to calculate your armor class. The text can be entered or changed on either page. If the text here doesn’t match exactly what is on the drop-down menu the AC calculation on Page 1 may be inaccurate. Magic Bonus: This will appear on page 1 as a magic + for any armor, or as OTHER if unarmored. Exception: This value will be ignored when unarmored if your class is Monk. SHIELD: Select “Shield” or “No Shield”. The text here will also appear on page 1 (number 14), and used to calculate your armor class. The text can be entered or changed on either page. If the text here doesn’t match exactly what is on the drop-down menu the AC calculation on Page 1 may be inaccurate. Magic Bonus: This is added as a bonus to your armor class with or without a shield. (It can be changed here or on page 1.)
25 – Weapons
Select your Weapons from the drop down menu. They will appear in the same order here and on page 1 (number 19). The text can be entered or changed on either page. If the text here doesn’t match exactly what is on the drop-down menu the Attack Bonus and Damage for this weapon on Page 1 may be inaccurate. Magic Bonus: This will appear on page 1 as a magic + for the weapon and can be selected on either page.
26 – Ammunition
Select your Ammunition from the drop down menu. Note that the Cost and Weight are calculated based on the cost and weight of one item and most ammunition is sold in bundles of multiple items. So if, for example, you purchase 20 arrows, be sure to enter 20 in the number column to get an accurate cost and weight calculation.
27 – Tools
Select any Tools from the drop down menu.
28 – Equipment
Select Equipment from the drop down menu. You may want to first enter your starting Equipment in the Adventuring Gear section. Both sections contain the same drop-down list of items.
29 – Adventuring Gear
This section is to automate the selection of bundles of items that are available as “Equipment Packs” in the PG, many of which are available options with your chosen background. Selecting a Pack: When you select a pack (by checking the box by the name of the pack) all of the Number, Name, Cost, and Weight boxes in this section will be cleared and replaced with the items available in that pack. As long as one of the packs is selected you can’t make any changes to this list. Selecting “No Pack”: When you select “No Pack” the “Adventuring Gear” section will function exactly the same as the “Equipment” section. It is important to note that this does not clear any of the current information in this section so you could, for example, select the Explorer’s Pack and then select No Pack, leaving all the items that came with the Explorer’s Pack. You could then remove, add or change items as you choose. COINS: The coins section at the bottom of the “Adventuring Gear” section is unaffected by the selection of any Pack. This row is where you can track your money, in the form of CP (Coper Pieces), SP (Silver Pieces), GP (Gold Pieces), and PP (Platinum Pieces). Tracked Cost & Tracked Weight: These show the Totals (in GP and pounds) of all the items you have checked for tracking. This is an easy way to see how much weight you are carrying. You could easily choose to not track items that you have in a bag of holding for example, or items you own but are not currently carrying. Another tip; if you are on a shopping spree, you can select the items you are thinking of buying and only select them to track. That will give you a quick cost total.
30 – Trinket
This is a section where you may want to enter the description of a unique item. It’s cost and quantity will not be tracked.
31 – Treasure
This has two text fields, one for a name like “Treasure from the Dragon’s hoard.” And a largr area for listing multiple items. These will not be tracked.
32 – Magic Items
There is space here to list 4 magic items. There is a field above the box for the item’s name and a larger text field in the box for a description. The check box beside the word “Attuned” can be checked if you are attuned to the magic item. (You can be attuned to no more than a number of items equal to its proficiency bonus (PB) at any one time.)
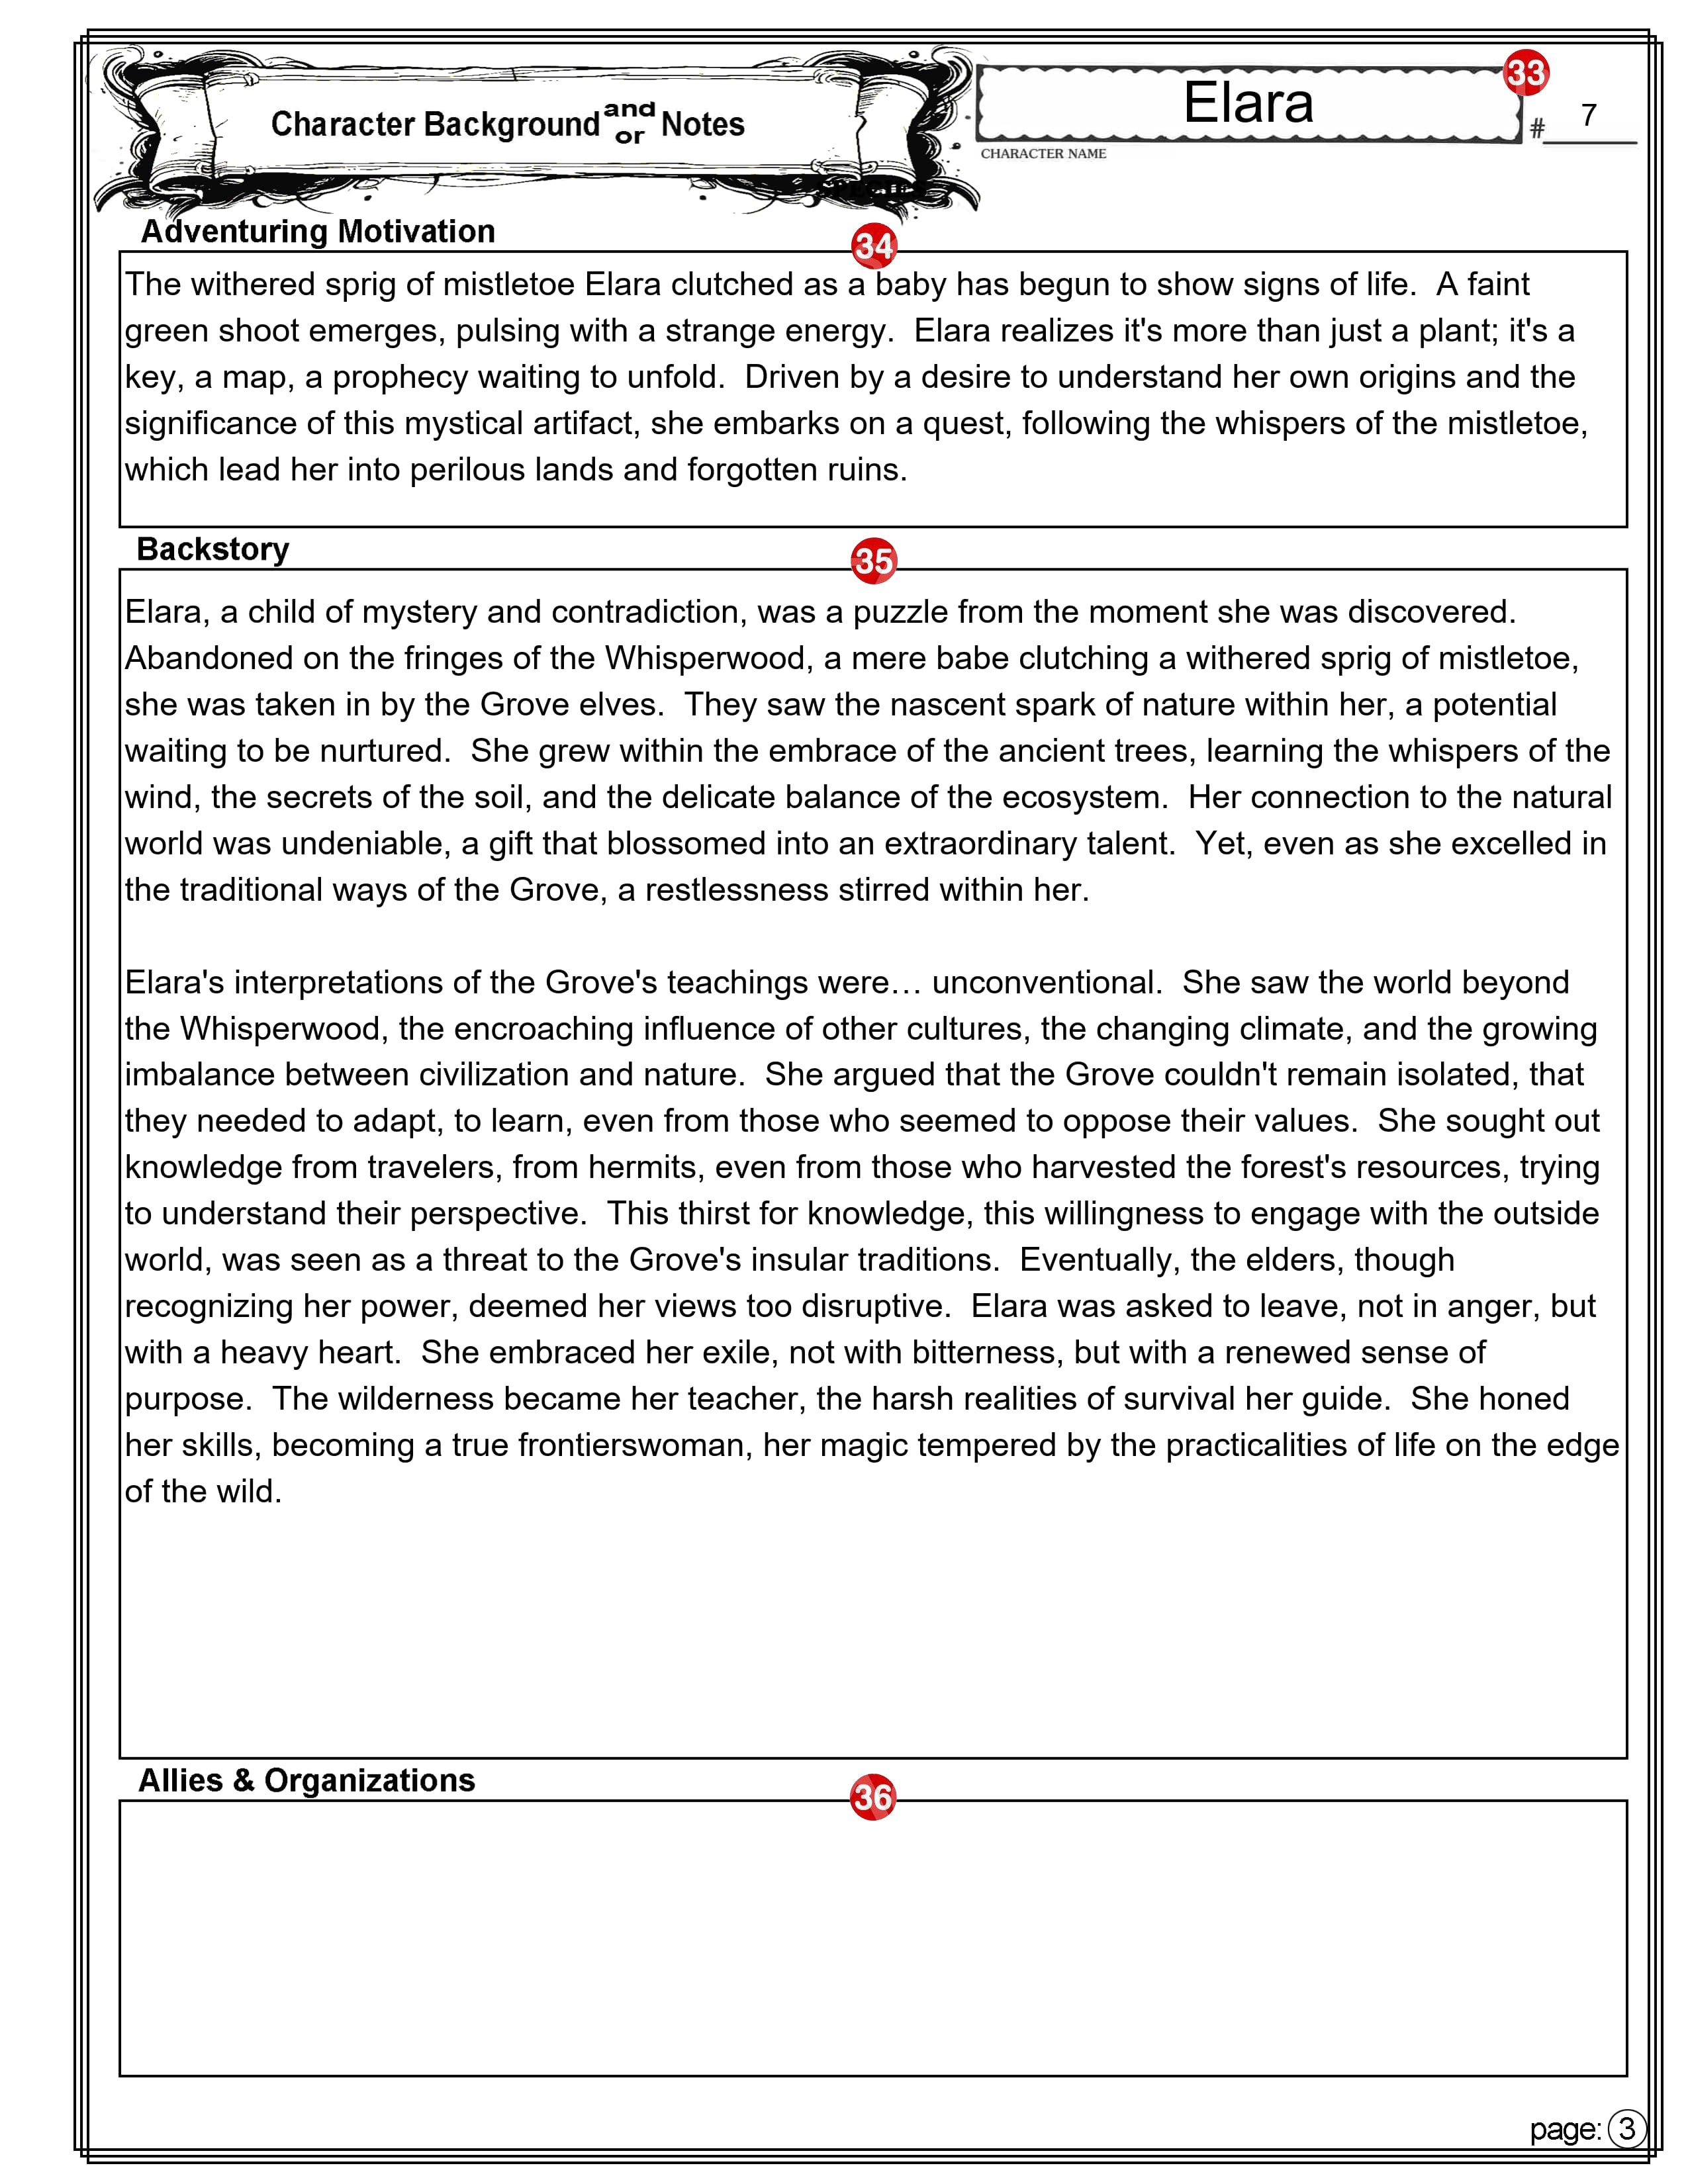
PAGE 3
33 – Character’s Name and #____
Character’s Name and Character sheet version (see numbers 2 & 3).
34 – Adventure Motivation
This is where you can enter the Adventuring Motivation you selected from those suggested by your background, for one you created.
35 – Backstory
Many players like (and some GMs require you) to come up with a character backstory. Players create backstories for their D&D characters to add depth, motivation, and personality to their roles in the game. A well-crafted backstory can enhance roleplaying, provide plot hooks for the GM, and make the character more engaging for both the player and the party.
There is plenty of room here to also add any notes about your character that don’t easily fit elsewhere on the character sheet.
36 – Allies and Organizations
A place to list the names and something about the other Player Characters (PCs) in the game, along with who the character belongs to. There may be organizations in the game world that you want to remember. Some may be friendly and some not.
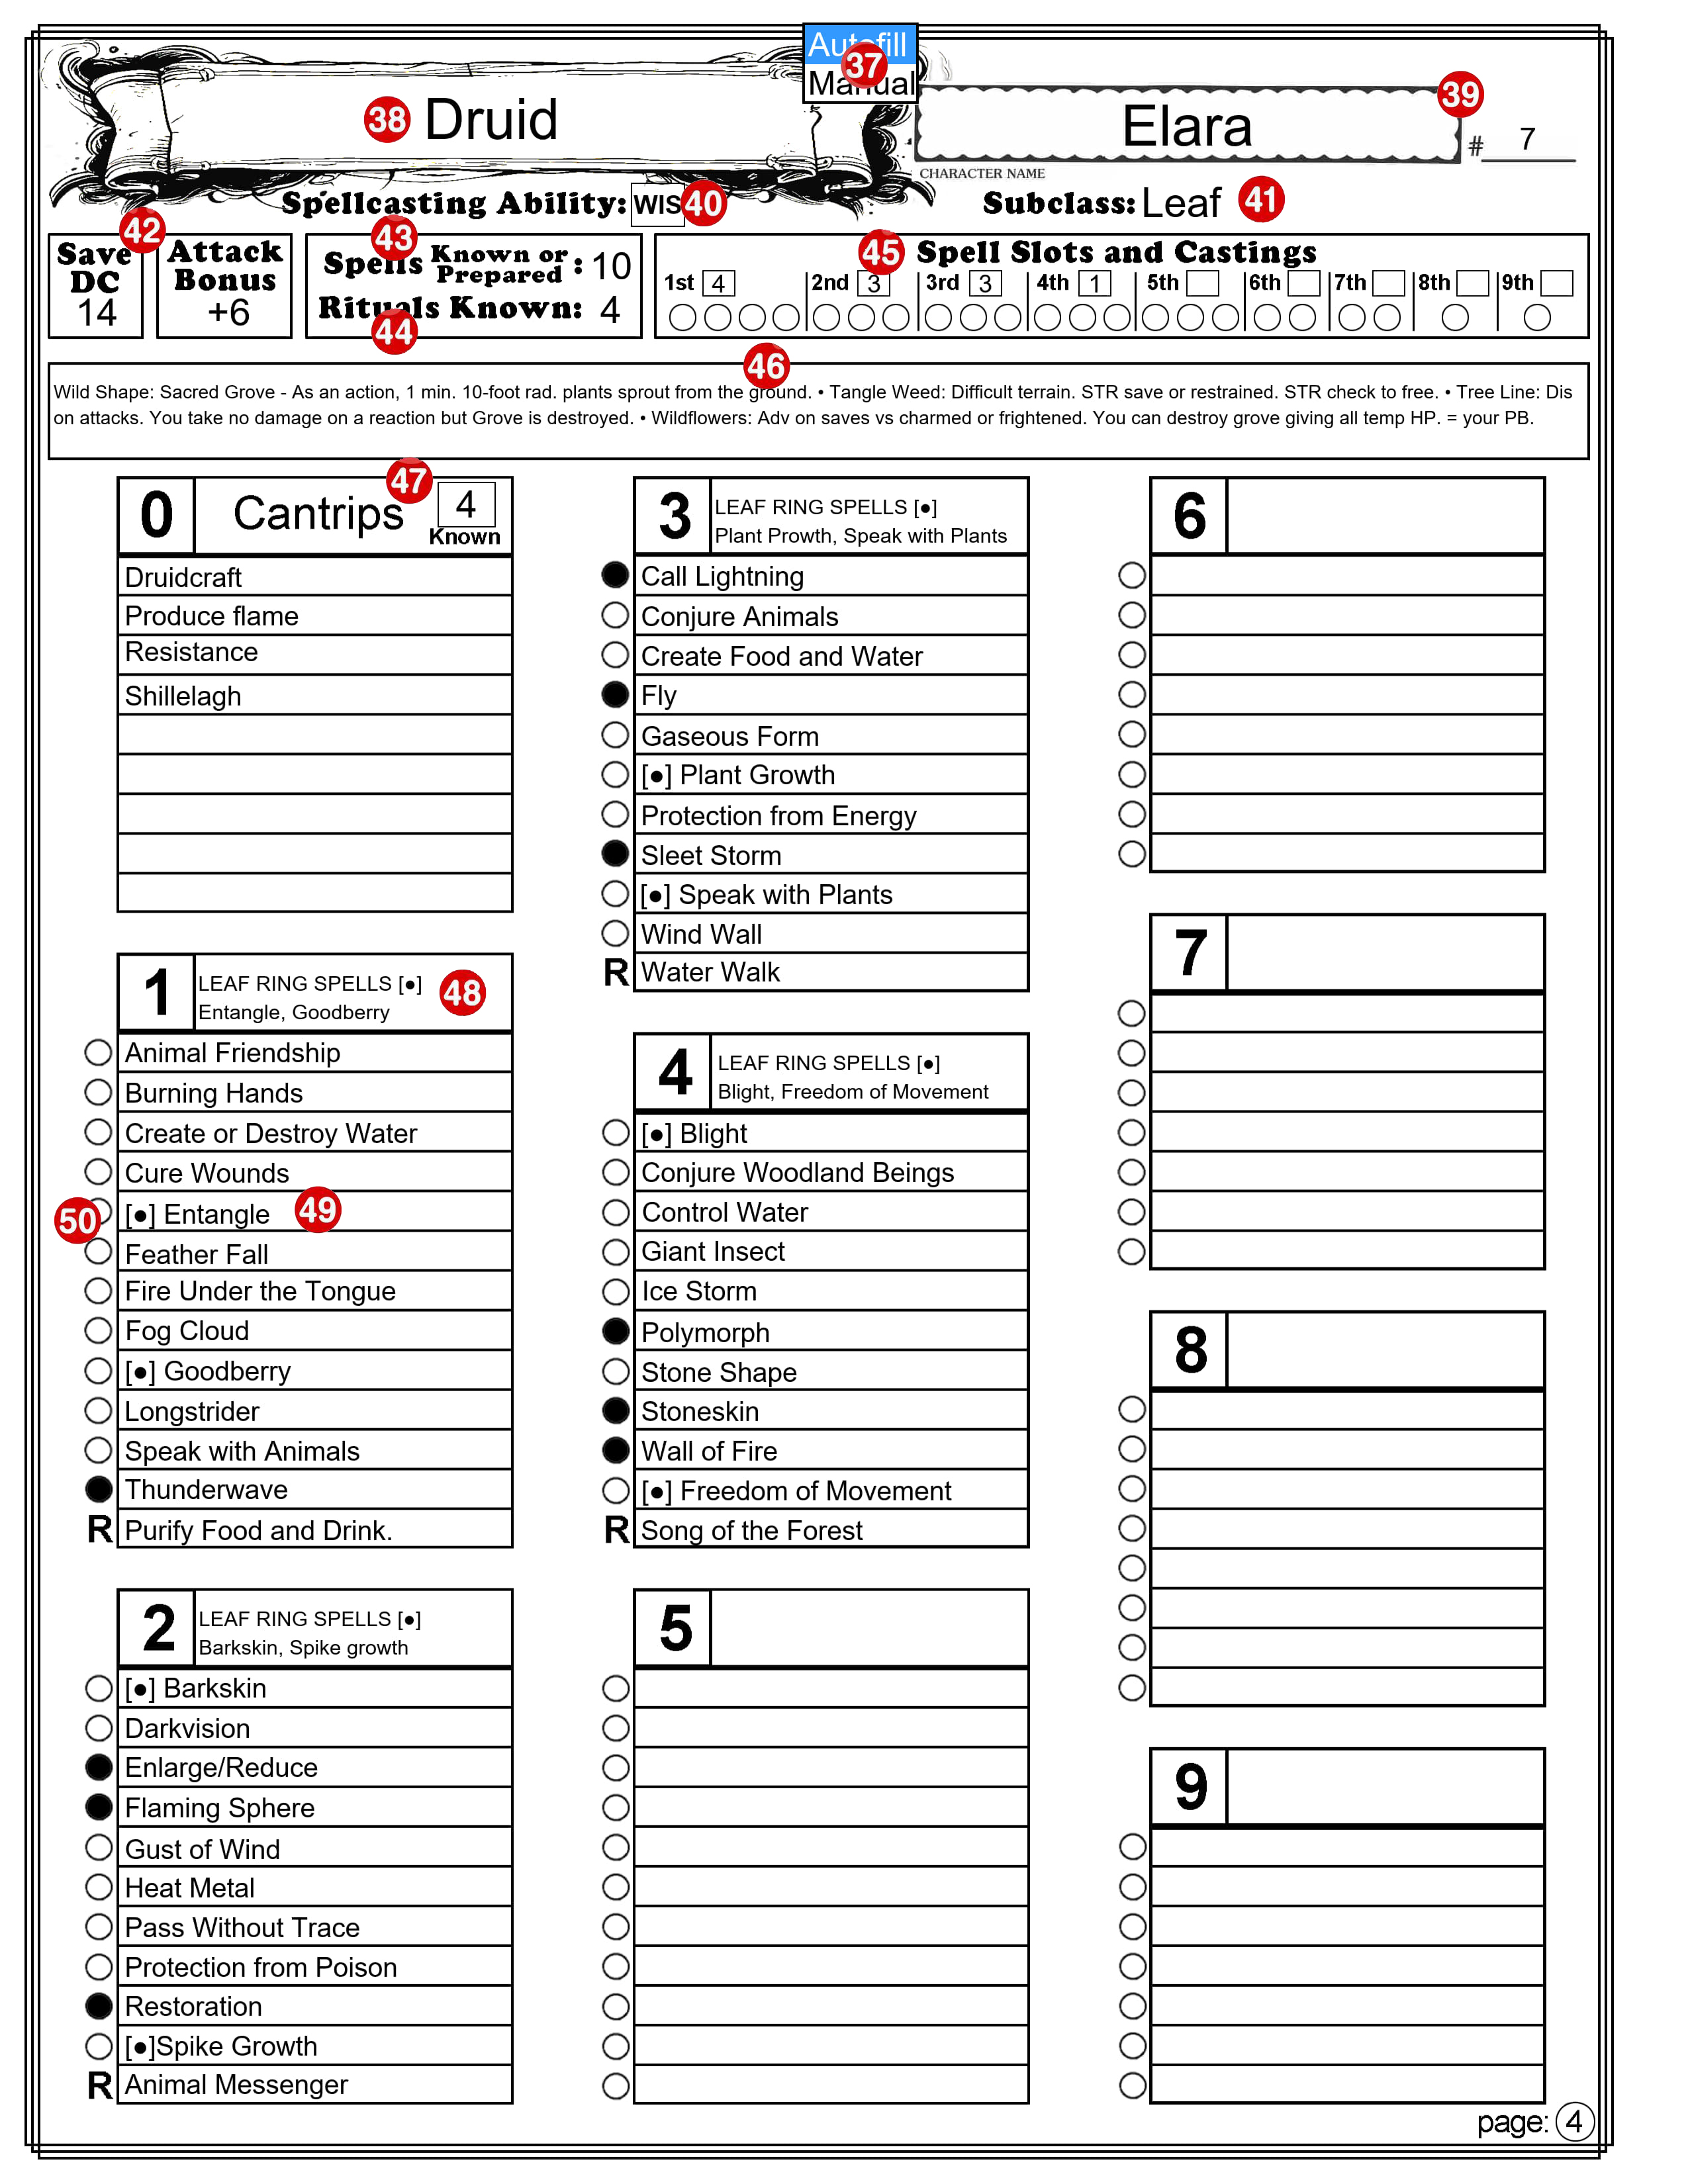
PAGE 4
37 – Autofill/Manual Selection Box
This selection box is independent of the similar one on page 1. Be aware that one page might be set to Autofill and the other one set to Manual. Select ‘Autofill’ mode to automatically fill in portions of this page based on your choices, as described below. Choose ‘Manual’ mode to keep existing information unchanged and make your own edits. Note: This selection box will not appear on the printed page.
38 – Your Character’s Class
Autofill mode: Your Character’s Class as it appears on page 1, will be copied here. Manual mode: When you switch this to Manual mode, any text here remains, but you can edit, delete or change it.
39 – Character’s Name and #____
Character’s Name and Character sheet version (see numbers 2 & 3).
40 – Spellcasting Ability
Autofill mode: This will show the ability used by this class of spellcaster. You can’t change the text. Manual mode: You can change the text,
41 – Subclass
Autofill mode: This will reflect the sub-class that is on page 1. Manual mode: The text in this field is fully editable.
42 – Save DC and Attack Bonus
Autofill mode: The spellcaster’s save DC and attack bonus is calculated and displayed here. Manual mode: You can change the number.
43 – Spells Known or Prepared
Autofill mode: If the spellcaster has a limited number of spells they know or that they can prepare, that number is displayed here. You cannot change the number. Manual mode: You can change the number.
44 – Rituals Known
Autofill mode: If the spellcaster can cast Rituals, the number they have available is displayed here. You cannot change the number. Manual mode: You can change the number.
45 – Spell Slots and Castings
Autofill mode: The spellcaster’s number of spell slots is calculated for each spell level and displayed here. You cannot change the numbers. Manual mode: You can change the numbers. Castings: The check boxes are for you to use during your game to check off the spell slots as you use them.
46 – A space for notes
This area is where you can enter notes specific to your spellcasting features and abilities.
47 – Known Cantrips
Autofill mode: The number of cantrips you can know is calculated based on your class level is calculated and displayed here. You cannot change this number. Manual mode: You can change the number.
48 – Another space for notes
This space at the top of the list of spells of each level is for any notes you may want to keep regarding spells of this level.
49 – Spell List
You can enter the name of the spells you have access to for each spell level. You can enter anything you want here. You might want to include the page number where the spell can be found in the PG. I like to include things [C] for concentration. Note: The example character sheet is for a Druid that can cast Leaf Ring spells without preparing them. I have indicated that with this symbol: [●]. This is a standard text filled circle, feel free to copy it from here and past it into any text field on this character sheet.
50 – Prepared Spells
If your Class has you prepare a certain number of spells from your list of spells, you can indicate the prepared spells by filling in the circle (by clicking on it). If you click on it a second time it will be replaced by the letter “R” Use this to indicate a Ritual spell that you know. You don’t have to have a Ritual Spell prepared to cast it. Clicking it a third time returns it to a circle.
Multiclass
To use this character sheet for a multiclass character there are two options.
Option 1. One way is to simply switch to Manual mode and enter everything any way you want. Option 2. To take full advantage of the features available on this character sheet I recommend the following:
Create a level 1 character in Autofill mode. Enter all its weapons, armor, and equipment.
When you are ready to add a second class switch to Manualmode (if you haven’t already).
In the Class box (number 7) add the level for the current class and the name of the second class and its level. For example, if you have a third level Barbarian and add two levels of Sorcerer you might enter its class as: Barbarian,3 Sorcerer,2.
Make changes as required to the other class related features on this section. You can delete anything that no longer applies or that you don’t need to reference.
The Class Feature box (number 11) will change to allow several lines of text. You can use this area to enter information you want to keep track of, or that won’t easily fit in other places on the sheet.
Enter the combined level of all of your classes in the “Level” box (number 12). This is important because many calculated values are based on this.
On page 4, select “Manual” mode and make any needed changes.
Final Comments
The main thing to remember is that the character sheet is yours. Use it in any way that makes sense to you. You can write outside the boxes, use circles and arrows, scribble in the margins, or use it in any way that you choose. Also, you don’t have to completely fill out every box before you start playing. If you never decide on your character’s eye color, it won’t affect the game. [As a DM, I do strongly recommend that you give your character a name before your second gaming session. I have played too many times with one or more “no name” characters. This can be a distraction.]
Here are a couple of tips. First, if you are using a printed character sheet, use pencil instead of ink. Many things can happen during an adventure that can cause things to change so keep an eraser handy. Second, if you can cast spells, you might want to use one or more weapon boxes on page 1 for quick reference to your favorite offensive spells.
Having problems? Occasionally users of my previous Character Sheet would report issues with getting everything to work. The problem has typically been with the PDF reader they are using. Problems with the PDF reader in their browser were common. If you have access to a desktop computer running Windows, I recommend you first download a copy of the file to your hard drive. Then open the file using your preferred PDF reader. The most popular one is the free “Adobe Acrobat” PDF Reader. This Character Sheet has been tested on that and it all appears to work. If you are curious, I created this using PDF-XChange Editor.
Call to action. I’m always looking to improve my resources for the D&D community! I would love to hear your feedback on this new character sheet. Let me know what you think in the comments below. If you encounter any issues using the sheet, please report them so I can address them. And if you have any suggestions for improvement, I’m all ears! Your input helps me create the best possible tools for fellow Dungeon Masters and players.
This is one of several reviews I am doing this year of various table top roll playing games. I am specifically comparing them to D&D 5e. I am doing this with the assumption that my readers are already familiar with D&D 5e. The following review is based only upon my reading of the rulebook. I haven’t played this yet, but I will be posting my opinion after I get a chance to play test it.
Tails of the Valiant is scheduled to release early in 2024. I am basing this comparison on the Tails of the ValiantPreview (that they have labeled final) that I downloaded from their site on July 7, 2023. I may update this when the final version is released. When the 2024 version of Dungeons and Dragons is available I will post a comparison of that with 5E.
I am referring here to the fifth edition of Dungeons and Dragons as 5E and to Tales of the Valiant as ToV. This information is for evaluation purposes, it should not be considered official rules of the game. You can assume things that I don’t list here are basically like 5E with only minor differences.
In ToV the Dungeon Master is called the Game Master.
Summary of the game system
Kobold Press is creating Tales of the Valiant to be compatible with 5E. From their Kickstarter page: “It combines the Creative Commons foundation of 5th Edition with new elements to create a powerful Kobold-style 5E with teeth.” If you know how to play 5E you know how to play ToV, with only a few differences – most of which I will try to summarize here.
Primary differences between Tails of the Valiant and D&D 5e
Character Creation
Choose a Class
Note your Hit Die size
If you have spellcasting, mark your available spell slots and spells known (if applicable)
Any skills you are proficient in
Any equipment and tools you are proficient with
Saves you are proficient with
Your Proficiency Bonus (PB)
Your starting equipment [you may also get additional equipment based on your background]
Determine Ability Scores and use them to calculate the following:
Your hit-point total
Your spell save DC and your spellcasting attack modifier (if applicable)
Choose your lineage and heritage, including:
Your size
Your senses
Your base movement speed (or speeds, if applicable)
Any additional proficiencies
Select or create a background, including:
Any skill or tool proficiencies
Your languages
Your talent
Any additional starting equipment
Your adventuring motivation
Set your Luck points to 0
Come up with a name and basic description
Classes
The rules preview includes the iconic Cleric, Fighter, Rogue, and Wizard. When released, ToV should include the 12 core 5e classes plus the Mechanist. It will also include more subclasses and all classes get their subclass at 3rd level. The preview only includes the class progression through 5th level. As an example, here are the major differences in the Rogue Class between ToV and 5E. These are still in beta testing and may change before the final version is published.
Rogue
Hit Points: Same as 5E, except 1d8 (or 4) + your CON modifier per fighter level after 1st [in 5E it is 1d8(or 5).]
Proficiencies, Weapons, Tools, Skills, Saves, and Starting Equipment: Same as 5E
1st Level Features
Expertise: Same as 5E
Sneak Attack: Same as 5E
Thieves’ Cant: Same as 5E
2nd Level Feature
Cunning Action: Same as 5E
3rd Level Feature
Roguish Specialty: called “Roguish Archetype” in 5E – select one form the following:
Enforcer: You get the following features if you choose “Enforcer”:
Ambush: During the first round of combat, you have advantage on the first attack roll you make against any creature involved in the combat. Additionally, whenever you make a successful attack roll against a creature with the surprised condition, that attack is automatically considered a critical hit.
Cold-Blooded: Once per turn when you reduce a creature to 0 hp with a weapon attack, you can use the same weapon to immediately make a weapon attack against a different creature you can see within your weapon’s range. You can’t add Sneak Attack damage to this additional attack.
Expanded Talent List: When you gain a new talent, you can select that talent from the Martial or Technical Talent list. (Refer to Talents)
Thief: You get the following features if you choose “Thief::
Fast Hands: You can use the bonus action granted by your Cunning Action to do any of the following:
Make a DEX (Sleight of Hand) check
Use thieves’ tools to attempt to disarm a trap or open a lock
Take the Use an Object action
Second-Story Work: gives you the following features
You gain a climb speed equal to your base movement speed. If you already have a climb speed when you gain this feature, it increases by 10 feet.
When you make a long jump, you cover a number of feet equal to your walking speed if you move at least 10 feet on foot immediately before the jump. When you make a standing long jump, you can leap half your walking speed. Either way, each foot you clear on the jump costs a foot of movement.
In the event a STR (Athletics) check is required to clear or extend a jump, you can choose to make a DEX (Acrobatics) check instead.
4th Level Feature
Improvement: Add 1 point to any ability and get a Talent. (Refer to Talents)
5th Level Feature
Uncanny Dodge: Same as 5E
Talents (Called Feats in 5E)
Talents are not an optional rule in ToV.
Talent Categories: Talents are divided into three categories: magic, martial, and technical.
At Level 1: Your background gives you one Talent.
At Class Ability Score Improvement: When your class level gives you an Ability Score Improvement you improve an ability by one point and choose a talent from a specified list.
Ability Scores
Abilities and Modifiers
Same 6 abilities, and the modifiers are the same as 5E.
Player Characters can’t have an ability score higher than 20.
Ability Scores start out slightly higher in ToV
The standard array numbers are 16, 15, 13, 12, 10, and 8. (They are 15, 14, 13, 12, 10, and 8 in 5E)
Point buy works the same as 5E but you start with 32 points rather than 27 and you can purchase a score of 16, 17, or 18 at the cost of 11, 13, or 16 points respectively.
Roll 4 d6’s and discard the lowest, is just like in 5E but when you have finished, add 2 to one score of your choice that is 16 or below and add 1 to one score of your choice that is 17 or below.
Lineage and Heritage (Race in 5E)
ToV splits what would be your Race in 5E into the traits you get from your biological parents (your Lineage) and those you get from upbringing (your Heritage). You select both your Lineage and your Heritage separately. You could have a dwarf who was raised by elves, for instance.
Lineage
Among other traits, your Lineage affects your age, size and speed.
The Lineages in the preview packet are Beastkin (like a half man/half beast of some kind), Dwarf, Elf, and Human. We know there will be all of the races that are in 5E plus Kobold and perhaps more.
If you want a character that reflects common fantasy archetypes, each Lineage has a couple of recommended Heritages.
Heritage
The languages you know are determined by your Heritage, not your Race as in 5E.
Many of the traits and features you get from your background in 5E – you get from your Heritage in ToV.
Your Heritage affects your cultural elements, such as folklore, traditions, and natural environment.
Background
Different from your Background in 5E, this is a backstory explaining why your character has chosen to become an adventurer.
They have omitted personality traits, ideals, bonds, and flaws.
You can select one of the provided Backgrounds, with advice on customizing it to better fit your character or campaign.
Each Background includes an Adventuring Motivation. You are encouraged to modify it, or create your own. Your Adventuring Motivation provides you with the following:
Proficiency in two skills
Proficiency with one or more tools or additional languages.
Starting equipment
One talent.
Luck (replaces 5E’s Inspiration)
You receive one luck point when you fail an attack roll or save and the GM can give you a luck point whenever he chooses.
You can have a maximum of 5 Luck points.
If you have 5 Luck points and would gain a sixth, you roll a d4 and reset your Luck points to that number.
Unless you have rolled a natural 1, you can spend one of more of your Luck points to add to any d20 roll you make. Or you can spend 3 Luck points to re-roll a d20.
Luck can’t create a natural 20.
Spells
Spell Circles: There is not a separate list of spells for each class. Instead the spells are divided into Circles (arcane, divine, primordial and wyrd). A few spells are included in two or more circles. Your classes will get spells from a specific circle.
Spell Rings: This is just a name change. ToV calls spell levels spell rings instead. [I can see where this will be less confusing to new players.]
Ritual Spells: In 5E certain spells can be cast as a ritual if your class allows you to cast rituals. In Tov they have been moved into a separate type of spell, a Ritual Spell.
For each spell circle, rituals are listed separately from the other spells.
Ritual spells take 1 minute or longer to cast.
Ritual spells don’t use spell slots and can’t be cast at higher rings.
When applicable, your class progression table will have columns for: cantrips known, spells known, rituals known, 1st ring spell slots, 2nd ring spells slots, etc.
Monsters
The Preview includes a few monsters that will be in the ToV Monster’s Vault. I am showing the ToV and 5E stat block for the Goblin side by side for you to see how they differ.
Challenge Rating and XP: ToV shows these at the top – to the right of the monster’s name.
Alignment: The Tov preview doesn’t mention alignment. It appears that they will not be using it for monsters or PCs.
Hit Points: ToV lists the monster’s hit points. 5E shows this as the average number and also shows the die expression used to generate a range of hit points.
Stealth: Tov lists a stealth number for all monsters (15 for the Goblin). Your character must make a Perception check of this or higher to notice the monster if it is trying to hide. 5E lists this as one of the monster’s skills (+6 for the Goblin).
Perception: Tov lists this for every monster (9 for the Goblin). Your character must make a Stealth check of this or higher to sneak past it. 5E lists this as passive Perception for one of the monster’s Senses. [Notice that this changes from the monster doing a perception check to the PC making a Stealth check. In my 5E games I have the player make a stealth check when his PC can hide and later have the monster make a perception check when it might possibly notice him. Doing it the ToV way simplifies and should speed up play.]
Proficiency Bonus: This is not included in the monster stat block in the 5E Monster Manual. [Wizards has started including this in their more recent publications.]
Ability Modifiers: ToV only lists the ability modifier and does not also include the ability score. [This may take a little getting used to but I understand simplifying the stat block. Also, ToV is using the stat modifier to do more.]
For any save or ability check, roll a d20 and add the relevant ability modifier.
Bonus Actions: ToV moves anything the Monster can do with a bonus action to this section. (Nimble Escape in the case of a Goblin.)
Reactions: ToV moves anything the Monster can do with a reaction to this section. (ToV has added Frantic Reflexes to their version of the Goblin.)
Immunities, Resistances, and Vulnerabilities: ToV doesn’t use multiple lines that separate out damage and conditions. For example if a creature is immune to fire damage and the charmed condition, both appear in the Immune line.
Immune
A monster that is immune to a kind of damage takes no damage from it.
A monster that is immune to a condition can’t be affected by it.
Resistant
A monster that is resistant to a kind of damage takes half the damage (rounded down) from it.
A monster that is resistant to a condition has advantage on saves to avoid it.
Vulnerable
A monster that is vulnerable to a kind of damage takes double damage from it.
A monster that is vulnerable to a condition has disadvantage on saves to avoid it.
What you need to get started
All you will need will be the Tales of the Valiant Player’s Guide. The Game Master may also want to have the Tales of the Valiant Monsters Vault. There will be no required Game Master’s Guide. Their CFR (Core Fantasy Roleplaying) rules will contain all the basic rules and will always be available as a free download.
Final Thoughts
Quoting from their web site: “ToV moves the independent 5th Edition community forward with a system that is open and available to all … Our goal is to keep 5E products vibrant, both in print and on VTT partner platforms, by keeping a set of rules available under an open, perpetual, and irrevocable license.” Where Wizards of the Coast has their SRD (System Reference Document), Kobold Press will have their CFR (Core Fantasy Roleplaying) rules, which will contain the basic ToV rules. They have also indicated that they intend to be publishing their CFR under the ORC (Open RPG Creative) license, rather than Wizards of the Coast’s OGL (Open Game License). The ORC and the OGL are both public copyright license systems. Where the OGL was created by Wizards of the Coast for publishers to use when using elements of their SRD, the ORC is an agnostic, perpetual, irrevocable open gaming license created and made available to all by Paizo. Wizard’s attempt to change their OGL (in a very bad way) earlier this year prompted Kobold Press to create Tales of the Valiant.
I am a big fan of Kobold Press. I have several of their books. I fully expect their Tales of the Valiant to be at least as good, and most likely better, than Wizards of the Coast’s new version of D&D (that they now say they will be calling D&D 2024). For one thing, Kobald Press isn’t hampered by WotC’s need to keep all the rules basically the same as the current version with “enhancements”, where Kobold Press is making a brand new RPG that will be compatible with 5E. This allows them to re-think the way “Races” work and come up with new ones. The same is true with Classes and sub-classes, the spells, and all of the rules. They don’t need to make theirs compatible with all of the sourcebooks that WotC has published. Their goal isn’t to keep all the rules the same, but to make them “better” where they can and try to make everything so that it can still be used with their published adventures and campaign settings. There are no game designers that I think are better up to this task than Kobold Press.
Kobold Press successfully ended their ToV Kickstarter (June 23, 2023) with over $1,000,000.00 pledged. Congratulations! I’m looking forward to receiving my stuff early in 2024.