D&D 5E’s rules for hiding are a mess. I previously posted my thoughts on this in my post D&D 5E – Stealth and Hiding. In a similar vein I posted D&D 5E – House Rule – Pop-up Archer. I was hoping that the 2014 update would improve on the hiding rules, but I was disappointed. Also, I am a fan of Tales of the Valiant, but they left the hiding rules pretty much unchanged. So I decided to replace the rules on hiding in 5E with my own house rules and here they are.
This replaces everything I said on those previous posts.
In the house rules below, every rule applies equally to PCs and other creatures.
The first thing I did was create a new condition called “Hidden.”
The Hidden Condition
Hidden: The creature or creatures that you are hiding from are unaware of your location.
Clarification:
The terms “you are hiding” and “you are hidden” or “you have the Hidden condition” are synonymous.
Being “stealthy” is trying to remain undetected which is the same as trying to hide.
You are hidden if the creature you are hiding from is unable to determine your location by sight, hearing, smell or any other sense it possesses.
This is the most common situation. The Creature is trying to determine where you are.
It may be wanting to attack you, but it can’t see or hear you.
An example could be when you are invisible (it can’t see you) and you are being very quiet (it can’t hear you).
Another example would be when you move to a position behind total cover, such as behind a tree or a barrel and try to remain unseen and unheard.
You are hidden if the creature you are hiding from doesn’t notice you.
This is typically when a creature you are trying to sneak up on is currently unaware of your presence. They may be distracted or simply looking the other way. You attempt to both quickly and silently sneak up from behind.
Another example might be if you are attending a royal party and attempt to pick the pocket of a noble. You try to avoid attracting his attention while you get close enough to pick his pocket without being noticed.
A third example would be if you transformed into a small spider and are simply there to gather information while observing from the ceiling in the corner of the room.
You are hidden if the creature you are hiding from can’t distinguish you from others.
In this case they can see you and they may know that you are near and a possible threat, but you are among others and it doesn’t know which one you are.
You may be trying to blend in with the crowd, or you might be attempting to hide while disguised as (or transformed into) a sheep in a flock of sheep.
Benefits to Being Hidden
If you are hidden from all your opponents before the first round of combat you will surprise them and get a free round to attack them before they can react. (You are no longer hidden after you attack.)
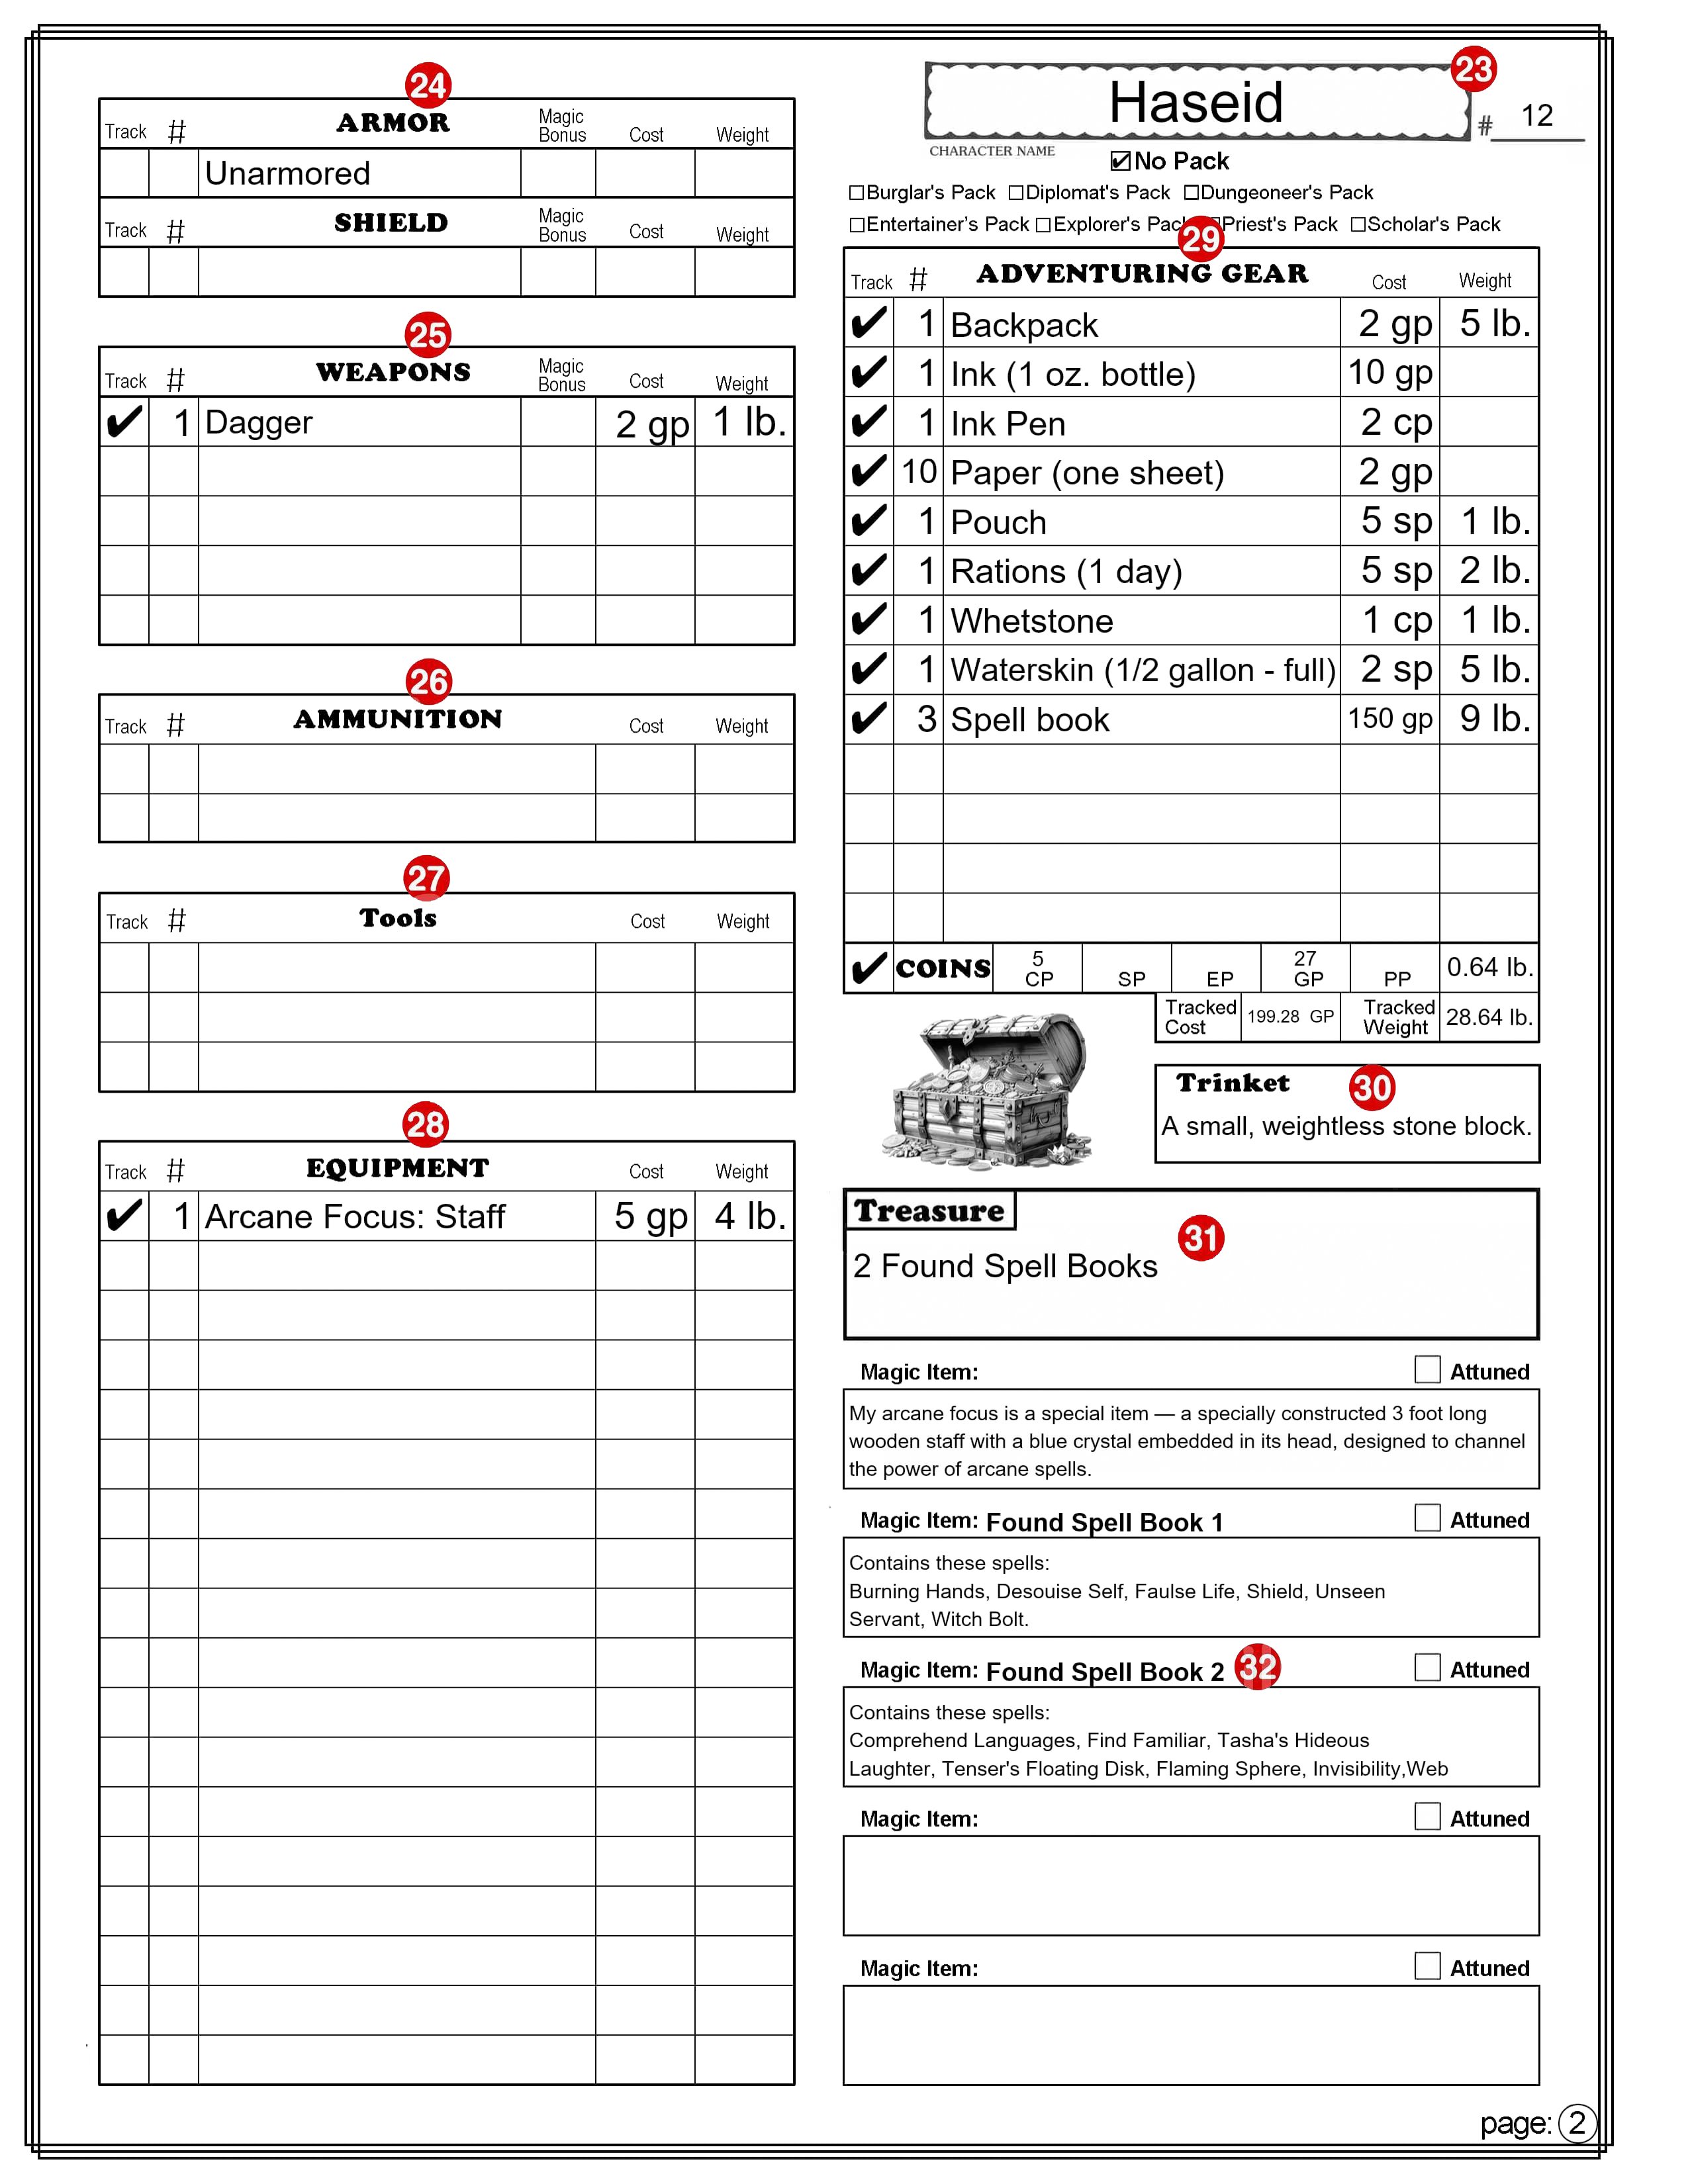
On all targeted attacks against you, the attacker must first identify where he thinks you are located. The attack will automatically miss if you are not in that 5 foot area. The attack is made with disadvantage, even if you are not in the targeted area, and the DM simply tells the attacker if his attack missed.
If you are hidden you make attacks with advantage if you can see the target. However, you will no longer be hidden if the attack hits or misses.
When can you hide?
During combat, hiding is an action.
In combat or not, you can’t hide from a creature that can perceive your location.
Clarification:
The DM determines when conditions are right for making a hide check, including in the following examples.
You can attempt to hide from one or more creatures if they do not currently see you clearly or perceive your location by any special senses they might have such as darkvision, blindsight, tremorsense, or truesight.
Another situation where you can attempt to hide is when the creature you are trying to hide from is distracted or looking away from your location.
How do you hide?
You make a Hide check [a Dexterity (Stealth) check].
Make a note of the results of that check to be used later.
Unless you indicate one or more specific creatures that you are attempting to hide from, it will be assumed that you are attempting to hide from your foes and not from your allies.
When are you no longer hidden?
Until you are discovered or you stop hiding, the hide check you made is contested by the Wisdom (Perception) check of any creature that might notice you or that actively searches for signs of your presence. You are discovered and no longer hidden from creatures that win the contest. The DM may choose to use the creature’s Passive Perception score rather than making a Perception check.
You are no longer hidden from a creature that can hear you if you make noise.
You are no longer hidden from a creature that can hear you if you speak louder than a whisper or cast a spell with a verbal component.
You are no longer hidden if you make an attack of any kind if it hits or misses.
Difference between hidden and invisible
Invisible: Being invisible means you can’t be seen by normal sight or darkvision but creatures might still locate you by sounds you make, tracks you leave, your smell, the way the air or plants move around you, or some other way. Hidden: If a creature can’t perceive your location by seeing you, or by any special senses, you can attempt to hide from it. So if a creature is dependent on sight alone to perceive your location, you can attempt to hide from it if you are invisible.
Clarification:
If you are invisible and hidden, when a creature locates you, you will no longer be hidden from it but you will still be invisible.
If a creature can’t be detected by using any of your senses then you can only guess at its location.
If you can notice some clue as to its location you must succeed in a Perception check to locate it.
You can make this check with advantage if you use the Search action.
If it has attempted to hide, your Perception check will be against its hide check.
Advantage and Disadvantage
Here is a summary of situations where your character might have advantage or disadvantage based on hidden or invisible conditions.
Attacks you make against a creature you can’t see are made with disadvantage.
If you are hidden or invisible, attacks you make against a creature you can see are made with advantage.
If you attack a creature that is hidden from you, you must guess at its location (identify the square you think it is in) before you make the attack and the attack is made with disadvantage. The DM will tell you if the attack hit or missed. If it missed you will not know if the creature was in that square or not.
If you attack a creature that is invisible but not hidden, you may first make a perception check to see if you can notice some indication of where it is located. If you determine the creature’s location, your attack is made with disadvantage. Failing the perception check, proceed as you would if it were hidden.
Handling Total Cover
Have you ever had a player that wanted to stay behind total cover during combat and just step out and fire his arrow on his turn and then step back? I don’t like this. It doesn’t make for cinematic, or heroic combat. Here are a couple of house rules I have implemented to address this and other similar situations.
If you are behind total cover and hidden, if you move out from behind that cover, you are no longer hidden to creatures who can see you. However, the first attack you make the round you come out from cover is made with advantage.
This is to reward you for being stealthy.
If you are behind total cover but are not hidden and cannot see your target, if you move out from behind total cover and attack, the first attack you make that round is made with disadvantage.
This is because you will have to locate your target visually and do not have time to take careful aim.
If, during your turn, you move from an exposed location to a location behind total cover, one creature that can see you can take a reaction to make an attack with disadvantage against you with a ranged weapon it is holding.
This assumes of course that the attacker hasn’t used its reaction this round and meets any other requirements for making the attack. For example, if it has a longbow in hand, it must have the other hand free and access to an arrow it can draw and fire.
The attack will necessarily be rushed. That is why it is made with disadvantage.
The attack is made when you are in the last exposed 5 foot space that the creature can see before you enter total cover.
The limit of one creature taking the reaction is imposed to prevent a deluge of arrow attacks against a character seeking refuge.
Remember that you can now only attempt to hide this round by taking the hide action. If you have already taken an action (to attack for example) you might not have another action available.
If, during combat, you move from an exposed location to a location behind total cover it is assumed that your opponents are taking note of where you are hiding. Therefore, if you then take the hide action, unless you move at least 15 feet while remaining behind total cover before moving out into the open, the Wisdom (Perception) check of any creature that might notice you is made with advantage.
Note that this will typically mean that they will have advantage on noticing when you re-appear if you have stepped behind a tree or barrel for example and can’t move 15 feet or more before leaving an area of total cover.
If they succeed in their perception check, you are not hidden from them so your first attack after revealing yourself is made with disadvantage instead of with advantage (refer to the Advantage Disadvantage section above).
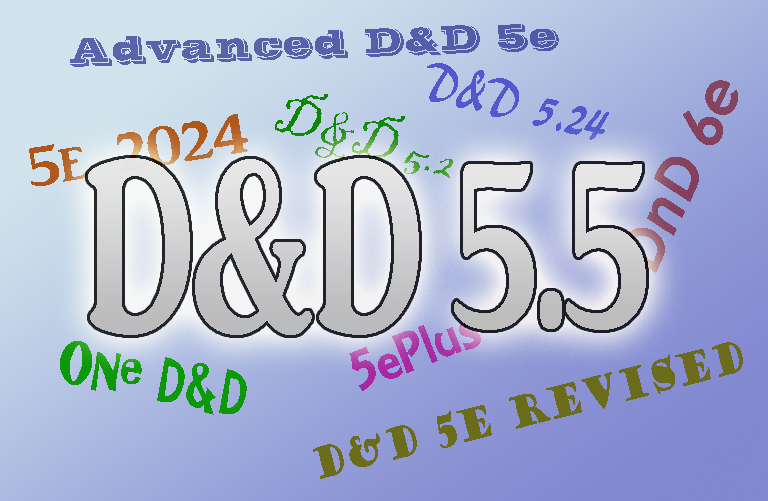
Mike Mearls, one of the lead designers of D&D 5E and later its Creative Director, was laid off from WotC in 2023. He is now Executive Producer of roleplaying games at Chaosium, the publisher of Call of Chulhu. He is calling the 2024 version “D&D 5.5” and that’s good enough for me.
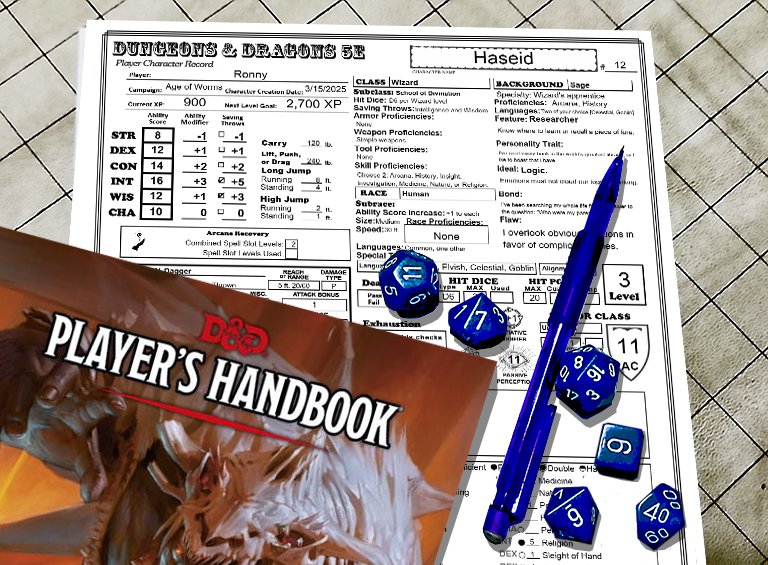
Many D&D fans are not switching from the previous version (D&D 5e) to the 2024 version (that I call D&D 5.5) and they could use a new, improved version of their character sheet. This is it.
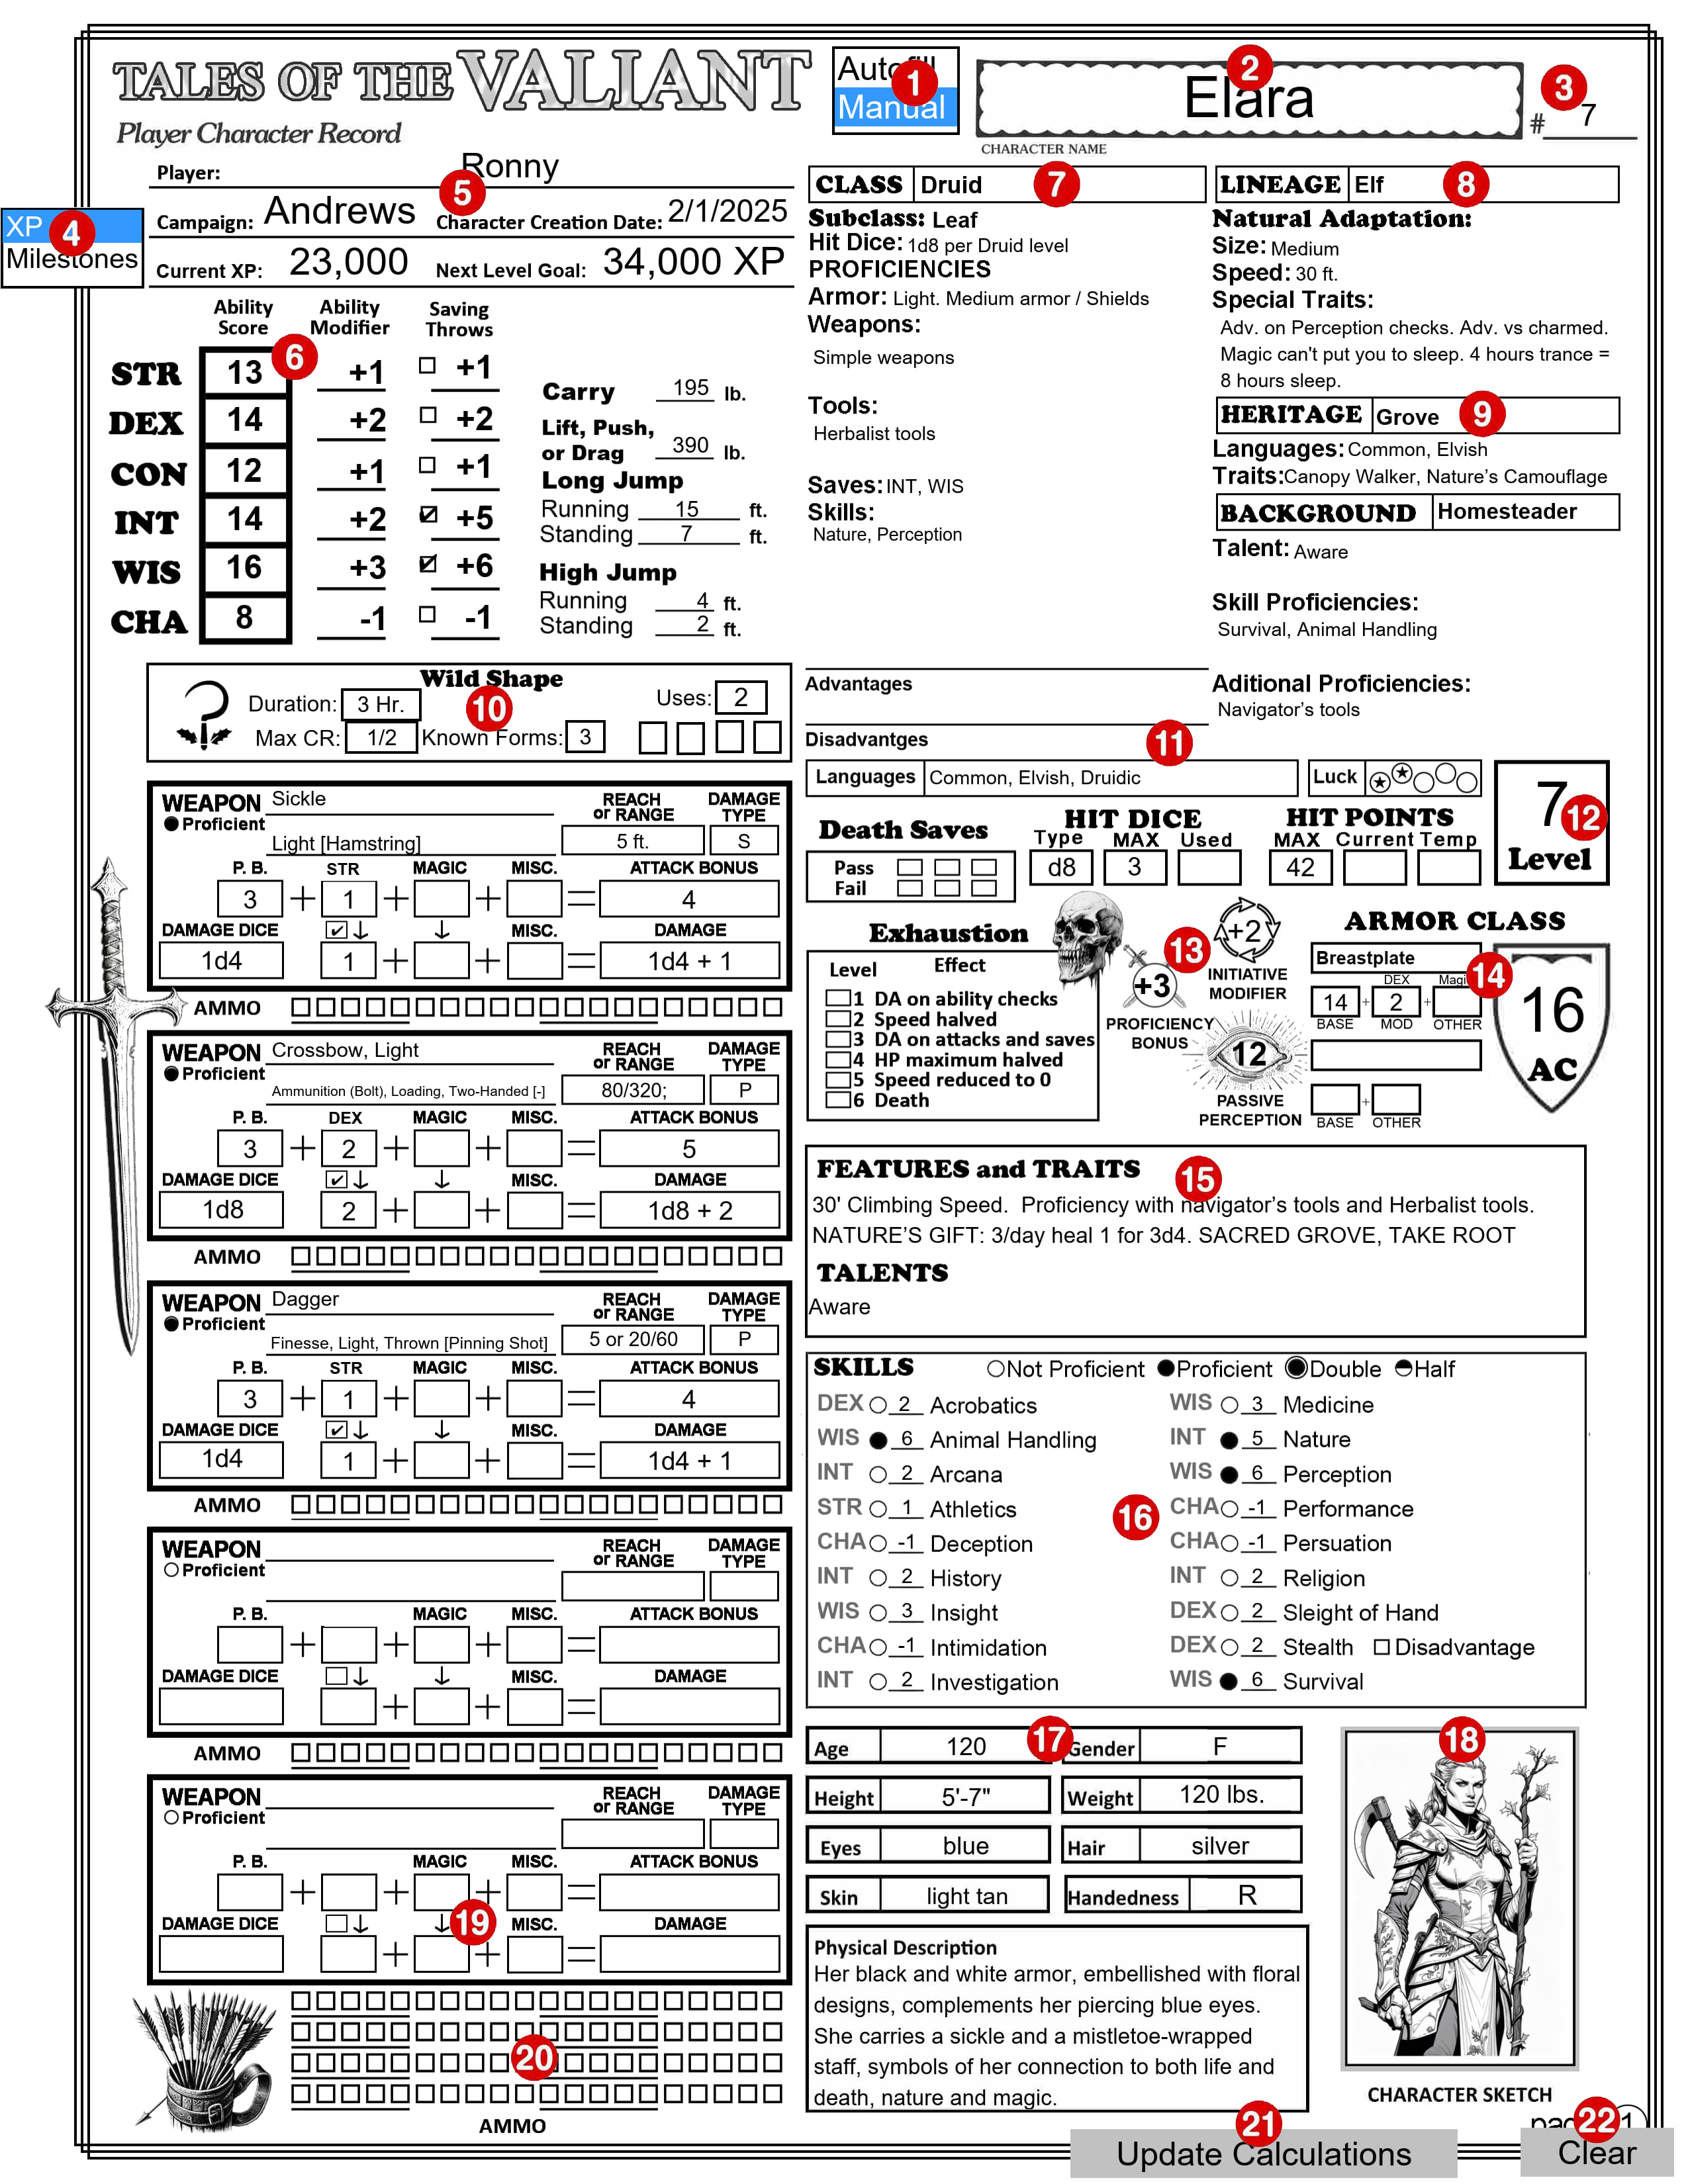
It has 4 pages, 2 sheets if printed on both sides. (Note that I will be referring to the set of all 4 pages in the singular, as the “character sheet”.) Page one has all of your character’s basic information and all you need for combat other than your spells. Page two is just for equipment and treasure. Page three is Character background and notes. Page four is for magic spells. It can be printed blank and filled out with a pencil, or you can fill in the forms on your device and most of the calculations will be done for you. It automatically calculates; ability and saving throw modifiers, carrying capacity and jump distances, Armor Class, Proficiency Bonus, Passive Perception, Skill check modifiers, Weapon attack bonus and damage, Equipment cost and weight, and more. It can fill in all the adventuring gear you get if you select an equipment pack (such as an “Explorer’s Pack”). In addition to that, it contains a new Autofill option that can fill in all the standard information based on your Class, Race, and Sub-race.
These instructions are for use with the character sheet you can download above. You can print a blank Character Sheet and fill it out by hand. If you fill it out on your device, many boxes will be filled in for you. There is information at the end of this on how to use this sheet for multi-class characters.
PAGE 1
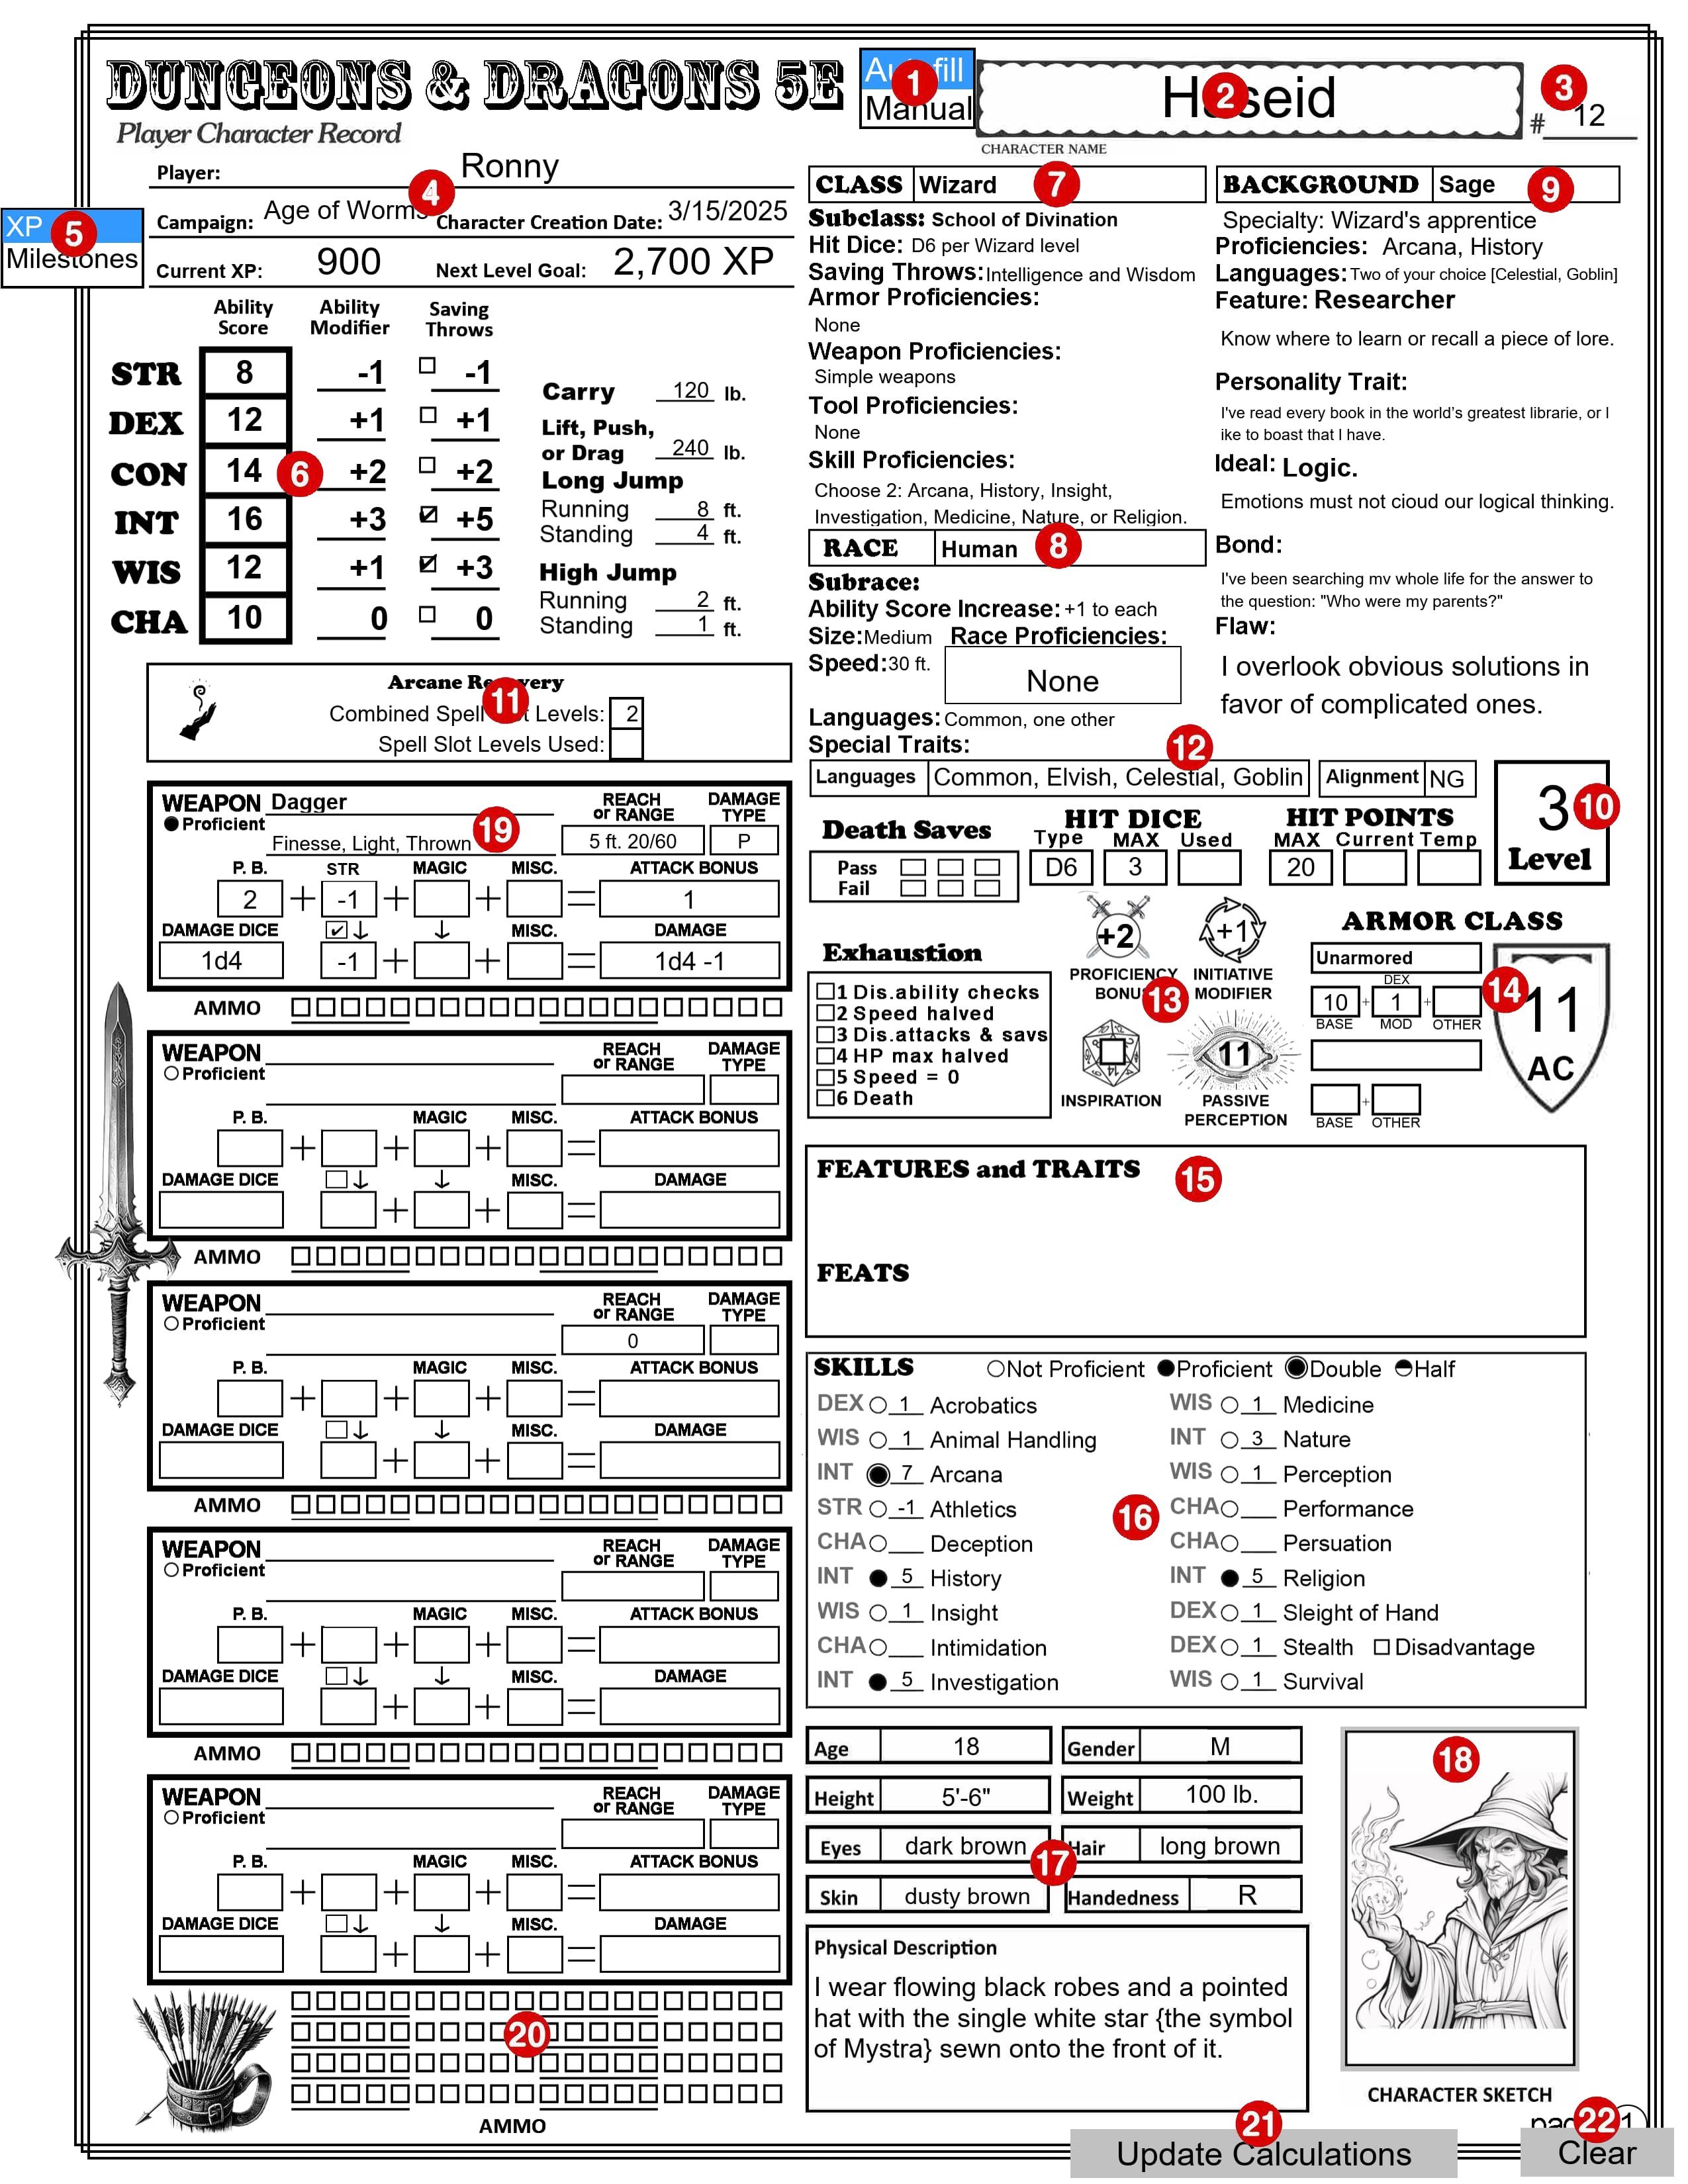
1 – Autofill/Manual Selection Box
While in ‘Autofill’ mode all of the information regarding each of the Races and Classes in the PHB will be entered on this sheet in an abbreviated format. Switching to “Manual’ mode will allow you to make changes to any of that information. You will also need to be in ‘Manual’ mode to enter information regarding any Race or Class that isn’t found in the PHB. This selection box is independent of the similar one on page 4. Be aware that one page might be set to Autofill and the other one set to Manual. Select ‘Autofill’ mode to automatically fill in portions of this page based on your choices, as described below. Choose ‘Manual’ mode to keep existing information unchanged and make your own edits. CAUTION: If you switch to ‘Manual’ mode to make a few changes and then switch back to ‘Autofill’ mode, all your changes will be lost, replaced by the ‘Autofill’ information. I recommend you leave it in ‘Autofill’ mode until you are finished with Page 1, including your weapons and armor. You can then safely change to ‘Manual’ mode and make changes and additions. You may want to make a backup copy of your sheet before making changes. Each of the numbered sections below where this selection makes a difference will include a description for both Autofill mode and Manual mode. Note: This selection box will not appear on the printed page.
2 – Your Character’s Name
The text you enter here will also appear in the same location on the other pages. The text can be entered or changed on any page.
3 – #____
Character sheet version. If you make multiple copies of your character sheet enter the version number here. Like the Character Name, this text will also appear on the other pages.
4 – XP/Milestones Selection Box
If ‘XP’ is selected the Next Level Goal will be calculated and entered for you here based on your current character level (number 10 below). If “Milestones” is selected the text on this line will be replaced by a “Notes” section. Note: This selection box will not appear on printed pages
5 – Campaign Information
This is where you enter your name, the name of the campaign you are in and the date this character was created. Trust me, if you look back at this years from now, you will appreciate having this information.
6 – Ability Sores
Enter your ability scores in the boxes. All the data to the right of the ability scores will be filled in for you based on the ability scores, including your carrying and jumping stats based on your strength score. Check the little box next to the Saving Throw modifier to indicate that you are proficient in that Save.
7 – Class
Enter your Class or select it from the drop-down menu. The Class Feature box (number 11) will display information relevant to this class. Subclass: Enter the name of your subclass or select it from the drop-down menu. Autofill mode: All the information from the Class Features section in the PHB for this Class will be filled in, except for Starting Equipment. If there is any current text in any of these areas it will be removed and replaced if you select a different class. If you enter a Class name that doesn’t exactly match one of the selections on the drop-down box, all the class information below will be removed. Manual mode: No matter what you select or enter into the “Class’ box, existing text in this section will remain unchanged. You can change or add any text in the ‘Class’ box or any of the information below it.
8 – Race
Enter your Race or select it form from the drop-down menu. Subrace: Enter your Subrace or select it from the drop-down menu. Autofill mode: An abbreviated version of all the information in the PHB regarding your Race and Subrace will be filled in for you. If you enter a Race name that doesn’t exactly match one of the selections on the drop=down box, all the race information below will be removed. Manual mode: No matter what you select or enter into the ‘Race’ box, existing text in this section will remain unchanged. You can change or add any text in the ‘Race’ box or any of the information below it.
9 – Background
Enter your Background or select one from the drop-down menu. The drop-down menu contains all the Backgrounds from the PHB. All of the Backgrounds are sample backgrounds, and you are encouraged to create your own. Because of this and of all the different options that are presented, none of the information in this section or the Character Sheet will be filled in for you.
10 – Level
You must enter your character’s current level in this box.
11 – Class Feature box
The content of this box will change depending on your character’s Class (number 7). It shows certain traits for the selected class that change based on class level and/or abilities and provides check boxes to track uses of limited use features. If no class is selected, or anything is entered into the Class box (number 7) other than what can be selected from its drop-down box, this will show the default Class Feature box which only shows a stylized die and contains an empty text box where you can enter any notes you may want.
12 – Languages and Alignment
Enter all languages your character knows and their Alignment.
13 – Proficiency Bonus, Initiative Modifier, Inspiration, Passive Perception, Death Saves, Exhaustion, Hit Dice, and Hit Points
Hit Dice Type, Proficiency Bonus, Initiative Modifier and Passive Perception will be calculated and filled in for you. The check boxes in Inspiration, Death Saves, and Exhaustion are for you to check off as needed during play. You should enter your MAX Hit Dice. The Used Hit Dice, Current and Temp Hit points are for you to use to track them during play.
14 – Armor Class
Select the type of armor you are wearing, or “Unarmored” and select “Shield” or “No Shield” from the drop-down menus. Your Armor Class (AC) is displayed in the shield symbol. It is your Basic AC + the bonus you get if you have a Shield. The Basic AC is calculated by adding together the values in the three boxes under your armor type (or “No Armor”). Your shield bonus is +2 but if you have a magic shield you can select the bonus from the drop-down menu in the OTHER box under the Shield/No Shield box. Autofill mode: Armor: When you select an armor type the BASE value will be entered in the first box. The MOD value will be filled in with your DEX Modifier if it is Light armor, and your DEX Modifier (max 2) if it is Medium armor, and “None” if it is Heavy armor. The OTHER box is for you to enter any magical + it may have. Unarmored: If you have selected “Unarmored” the BASE will be 10 and MOD will be your DEX Modifier. If your Class is Barbarian the BASE will be 10 and MOD will be your DEX Modifier and OTHER will be your CON modifier. If your Class is Monk the BASE will be 10, MOD will be your DEX Modifier and OTHER will be your WIS Modifier. If not used otherwise, you can use the OTHER box to enter any other modifier you may get to your AC when unarmored. Manual mode: All of these boxes are to be filled in by you. The totals are still added up and show as your AC in the big armor class shield.
15 – Features, Traits and Feats
You can enter any information you want in these text boxes. They are intended for you to list your characters Features, Traits, Feats and any reminders you may want to include.
16 – Skills
The ability modifier to use for each different skill check is listed here. Empty circles indicate your character is not proficient in that skill. Click once on an empty circle to fill that circle, indicating that you are proficient in that skill. Your Proficiency Bonus will be added to your ability modifier for that skill check. Click on the filled circle and a slightly larger circle will be added around the filled one, indicating that you can add double your proficiency bonus to this skill check, and the number will change to reflect this change. Click on this same circle again and it will change to a half-filled circle, indicating that you add only half your proficiency bonus to this skill check and the number will change again. Click on it one more time and it will change back to not proficient. Stealth: To the right of the stealth skill is a checkbox in front of the word “Disadvantage”. This box will automatically be checked as a reminder to you if the type of armor you are wearing gives you Disadvantage on DEX (Stealth) checks.
17 – Physical Description
Refer to the information on your Race, but within those general guidelines your character can look any way that you want.
18 – Character Sketch
If your PDF reader supports it, you can click on the image area and it will pop-up a “Select Icon” menu where you can select an image you have access to. Or just draw a picture of your character on your printed charter sheet.
19 – Weapons
Select a weapon from the drop-down menu.
Select an Ability from the drop-down above the second column of boxes to will apply that ability’s modifier to the attack bonus. This should typically be STR for melee weapons and DEX for ranged weapons.
Click on the check box between the two boxes below that to also apply that modifier to the damage calculation. You don’t add your ability modifier to the damage when attacking with second weapon in your other hand unless the modifier is negative.
If you have proficiency in the use of this weapon, click on the circle next to “Proficient”. (This will fill in the circle and replace the word “None” in the attack bonus row with the value of your Proficiency Bonus.)
If this is a magic weapon select the magical bonus from either of the drop-downs in that column. The magic bonus will show up in both boxes and be applied to the attack bonus and to the damage.
To add additional modifiers to the attack bonus or to the damage select the modifier from the box in the MISC. column. Autofill mode: The Weapon Properties, Reach and/or Range, and Damage Dice will be filled in for you. On the line under the weapons name, it will list the weapon’s properties. Manual mode: You will have to fill in the Weapon Properties, Reach and/or Range, Damage Type, and Damage Dice boxes.
20 – Ammo Check boxes
For weapons that use ammunition, you can use these boxes to check off your ammunition as it is used.
21 – Update Calculations
All of the information filled in automatically for you should update whenever you make any change. Sometimes it doesn’t. You can press this button to force the form to update all of the calculated fields on all pages. Note: This selection box will not appear on the printed page.
22 – Clear
Be careful to not press this unless you want to erase everything from all of the fields on all pages. If you press it by accident, you may be able to recover the lost information if you press CTRL Z. This button is useful for clearing all fields and starting over, or before printing a blank form to fill out by hand. Note: This selection box will not appear on the printed page.
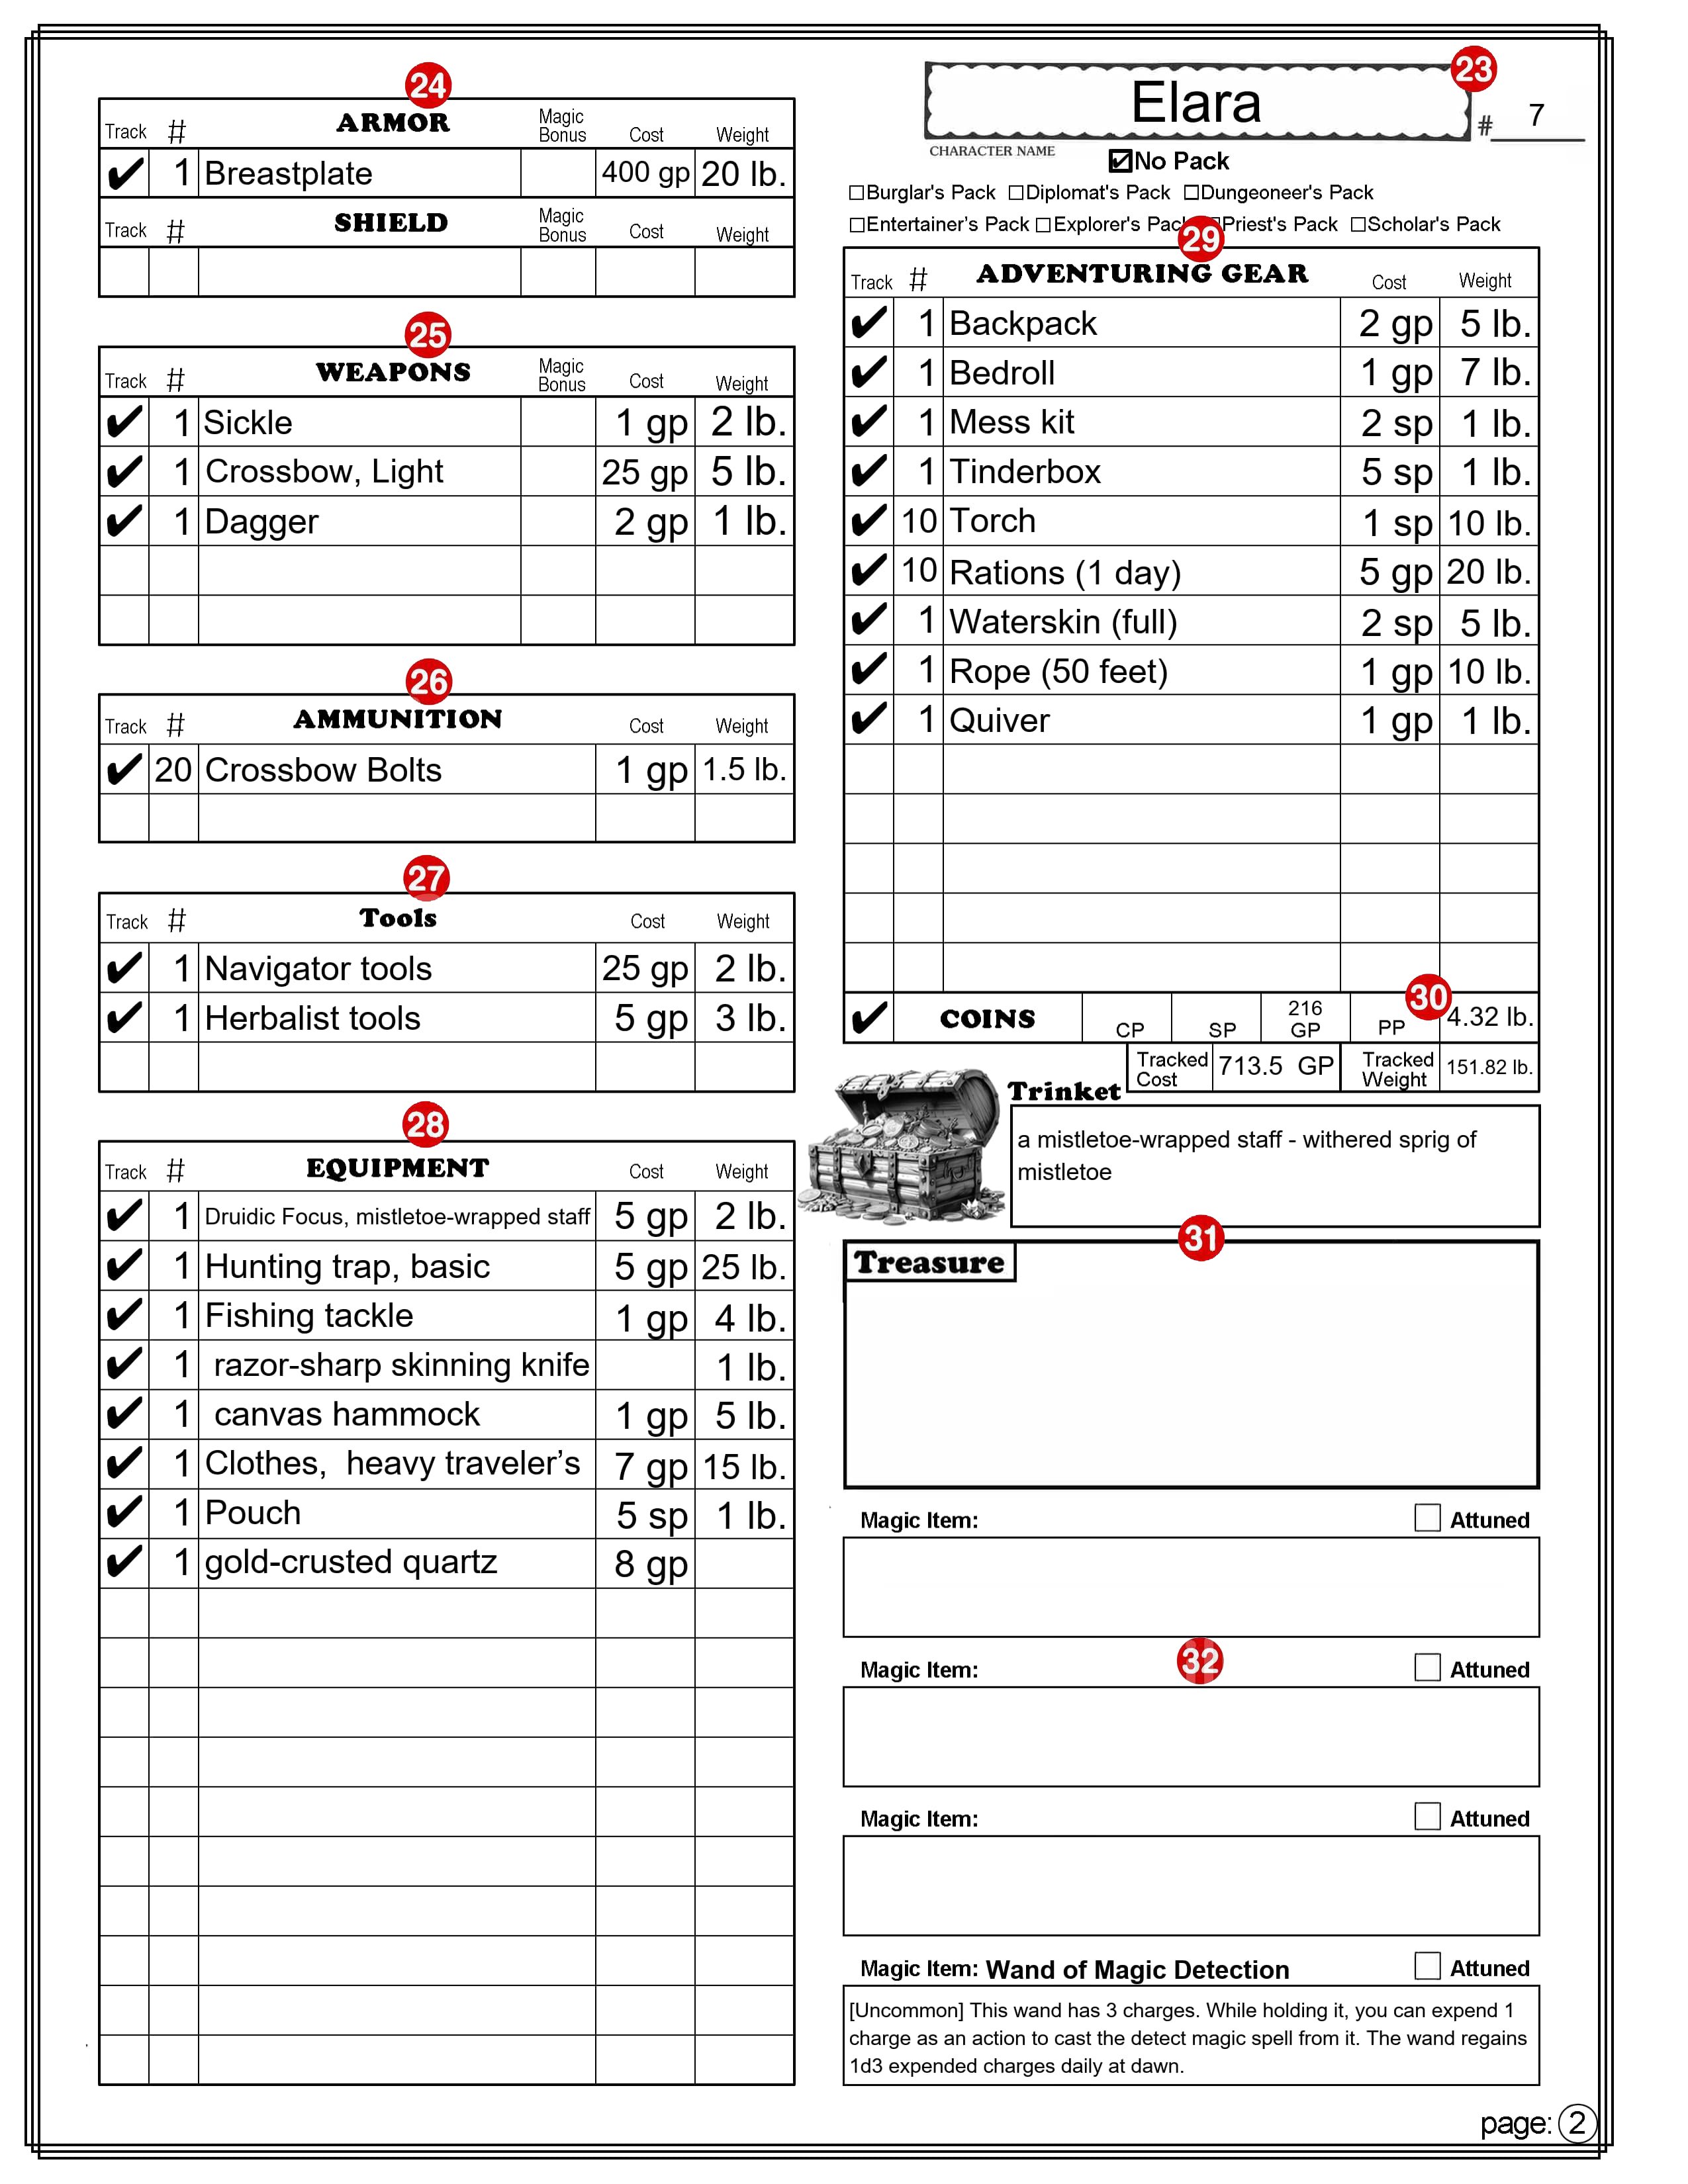
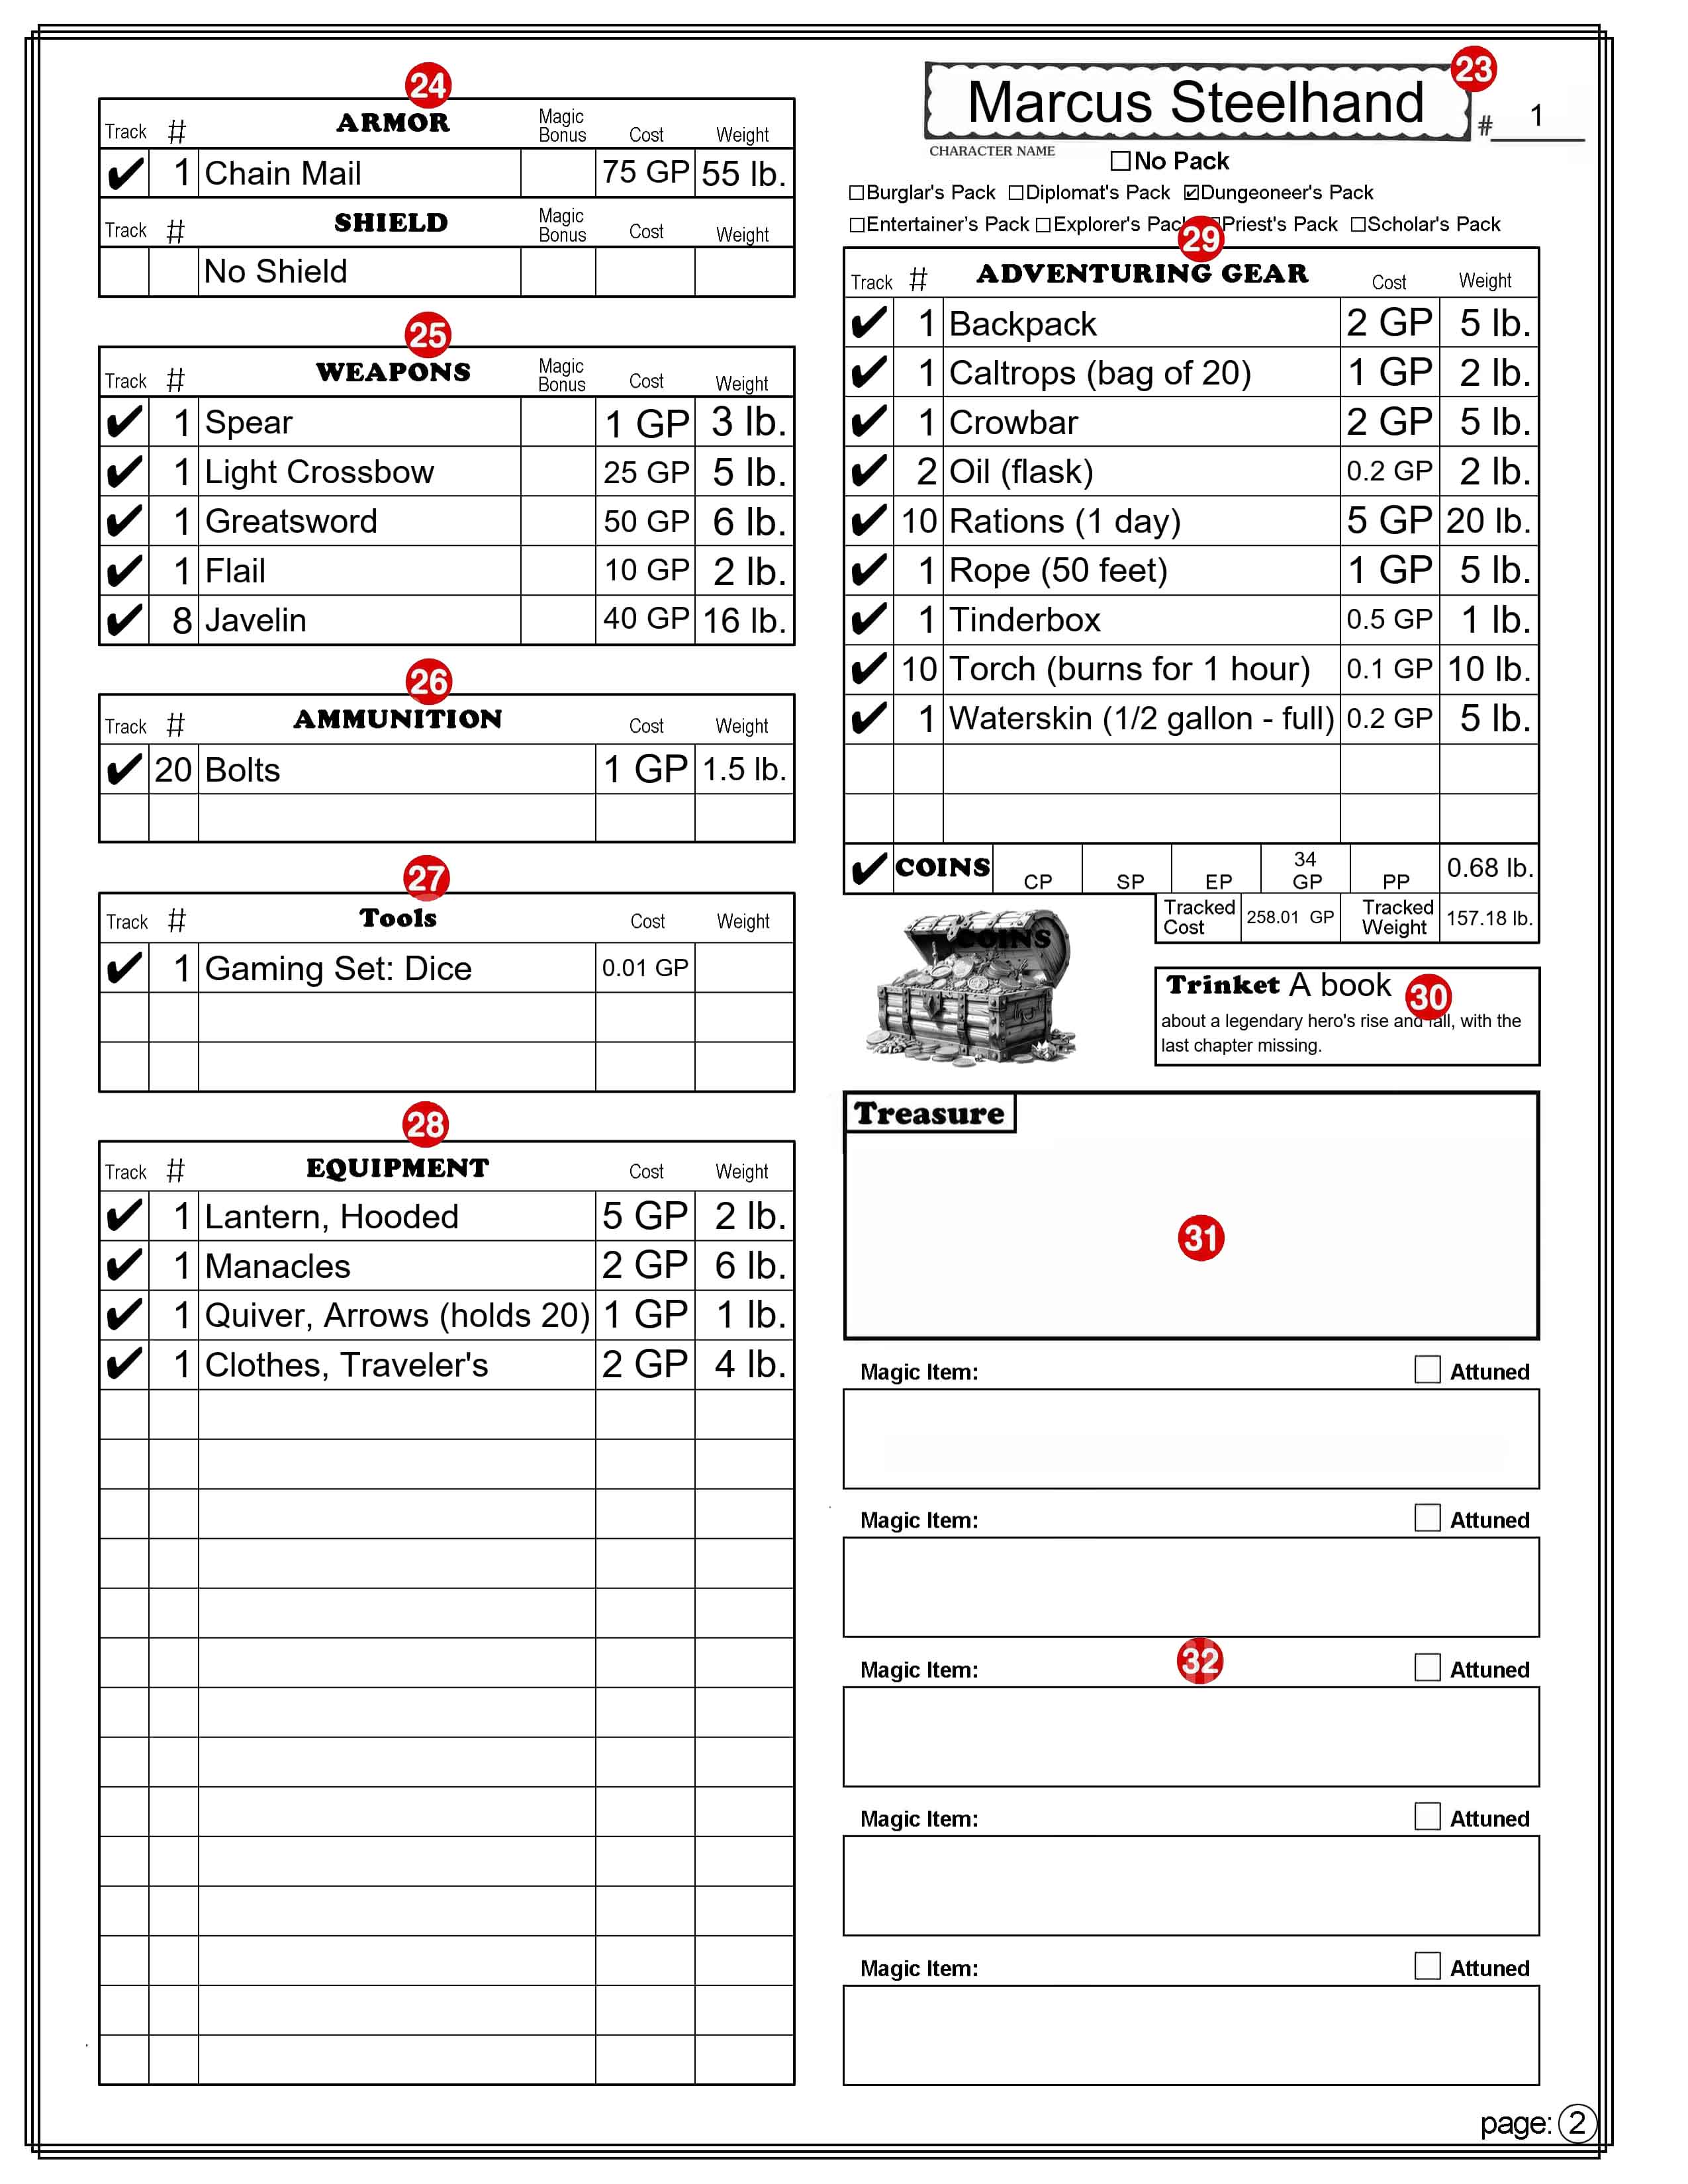
PAGE 2
Note: There is no Autofill or Manual mode for this sheet, although the Adventuring Gear section (number 29) has a “No Pack” option that is similar to Manual mode that only applies to the Adventuring Gear section.
All Equipment Lists
For all items in the Armor, Shield, Weapons, Ammunition, Equipment, and Adventuring Gear sections.
Item Selection: The drop-down will only lists items of the appropriate type. For example: Item selection in the Tools section will only list tools. If you have an item that is not on the drop-down menu, or you want to modify a name, you can type anything you want in the box. (Refer to number 29 for exceptions.) Track: If this box is selected a check mark will appear in the box and the cost and weight of this item will be included in the boxes labeled “Tracked Cost” and “Tracked Weight,” found at the bottom of the “Adventuring Gear” section. #: Number, or quantity. You will need to enter a number in this box for how many of this item you have. If you leave this box empty (it will not display the number 0) the Cost and Weight boxes will remain empty. Magic Bonus: (Only found on the Armor, Shield, and Weapons sections.) You can select a magic modifier to apply to the item from the drop-down menu. Cost: This box will contain the cost of the item. It takes the cost from the PHB and multiplies that by the number of items. If the text in the item box doesn’t match exactly any option on the drop-down, no calculations are made and you can enter or change the cost. You can’t enter the cost in cp, sp, or pp. You will need to convert the cost into its value in gold pieces, or fractions of a gp. 1 CP = 0.01 GP, 1 SP = 0.1 GP , 1 PP = 10 GP. Note: If the text in the item box isn’t on the drop-down list, the cost you enter here will ignore the number in the # column. Also note that this is the price of the item. If you later sell the item you will typically only be able to sell it for a maximum of 1/2 its original value. There are some exceptions, such as for gems and coins. Weight: This box will contain the weight of the item (in pounds). It takes the weight from the PHB and multiplies that by the number of items. If the text in the item box doesn’t match exactly any option on the drop-down, no calculations are made and you can enter or change the weight. Note: If the text in the item box isn’t on the drop-down list, it will ignore the number in the # column.
23 – Character’s Name and #____
Character’s Name and Character sheet version (see 2 & 3 on page 1).
24 – Armor & Shield
ARMOR: Select the armor you are wearing (or select “No Armor”). The text here will also appear on page 1 (number 14), and used to calculate your armor class. The text can be entered or changed on either page. If the text here doesn’t match exactly what is on the drop-down menu the AC calculation on Page 1 may be inaccurate. Magic Bonus: This will appear on page 1 as a magic + for any armor, or as OTHER if unarmored. Exception: This value will be ignored when unarmored if your class is Monk. SHIELD: Select “Shield” or “No Shield”. The text here will also appear on page 1 (number 14), and used to calculate your armor class. The text can be entered or changed on either page. If the text here doesn’t match exactly what is on the drop-down menu the AC calculation on Page 1 may be inaccurate. Magic Bonus: This is added as a bonus to your armor class with or without a shield. (It can be changed here or on page 1.)
25 – Weapons
Select your Weapons from the drop down menu. They will appear in the same order here and on page 1 (number 19). The text can be entered or changed on either page. If the text here doesn’t match exactly what is on the drop-down menu the Attack Bonus and Damage for this weapon on Page 1 may be inaccurate. Magic Bonus: This will appear on page 1 as a magic + for the weapon and can be selected on either page.
26 – Ammunition
Select your Ammunition from the drop down menu. Note that the Cost and Weight are calculated based on the cost and weight of one item and most ammunition is sold in bundles of multiple items. So if, for example, you purchase 20 arrows, be sure to enter 20 in the number column to get an accurate cost and weight calculation.
27 – Tools
Select any Tools from the drop down menu.
28 – Equipment
Select Equipment from the drop down menu. You may want to first enter your starting Equipment in the Adventuring Gear section. Both sections contain the same drop-down list of items.
29 – Adventuring Gear
This section is to automate the selection of bundles of items that are available as “Equipment Packs” in the PG, many of which are available options with your chosen class. Selecting a Pack: When you select a pack (by checking the box by the name of the pack) all of the Number, Name, Cost, and Weight boxes in this section will be cleared and replaced with the items available in that pack. As long as one of the packs is selected you can’t make any changes to this list. Selecting “No Pack”: When you select “No Pack” the “Adventuring Gear” section will function exactly the same as the “Equipment” section. It is important to note that this does not clear any of the current information in this section so you could, for example, select the Explorer’s Pack and then select No Pack, leaving all the items that came with the Explorer’s Pack. You could then remove, add or change items as you choose. COINS: The coins section at the bottom of the “Adventuring Gear” section is unaffected by the selection of any Pack. This row is where you can track your money, in the form of CP (Coper Pieces), SP (Silver Pieces), EP (Electrum Pieces), GP (Gold Pieces), and PP (Platinum Pieces). Tracked Cost & Tracked Weight: These show the Totals (in GP and pounds) of all the items you have checked for tracking. This is an easy way to see how much weight you are carrying. You could easily choose to not track items that you have in a bag of holding for example, or items you own but are not currently carrying. Another tip; if you are on a shopping spree, you can select the items you are thinking of buying and only select them to track. That will give you a quick cost total.
30 – Trinket
This is a section where you may want to enter the description of a unique item. It’s cost and quantity will not be tracked.
31 – Treasure
This has two text fields, one for a name like “Treasure from the Dragon’s hoard.” And a larger area for listing multiple items. These will not be tracked.
32 – Magic Items
There is space here to list 4 magic items. There is a field above the box for the item’s name and a larger text field in the box for a description. The check box beside the word “Attuned” can be checked if you are attuned to the magic item. (You can be attuned to no more than a 3 magic items at any one time.)
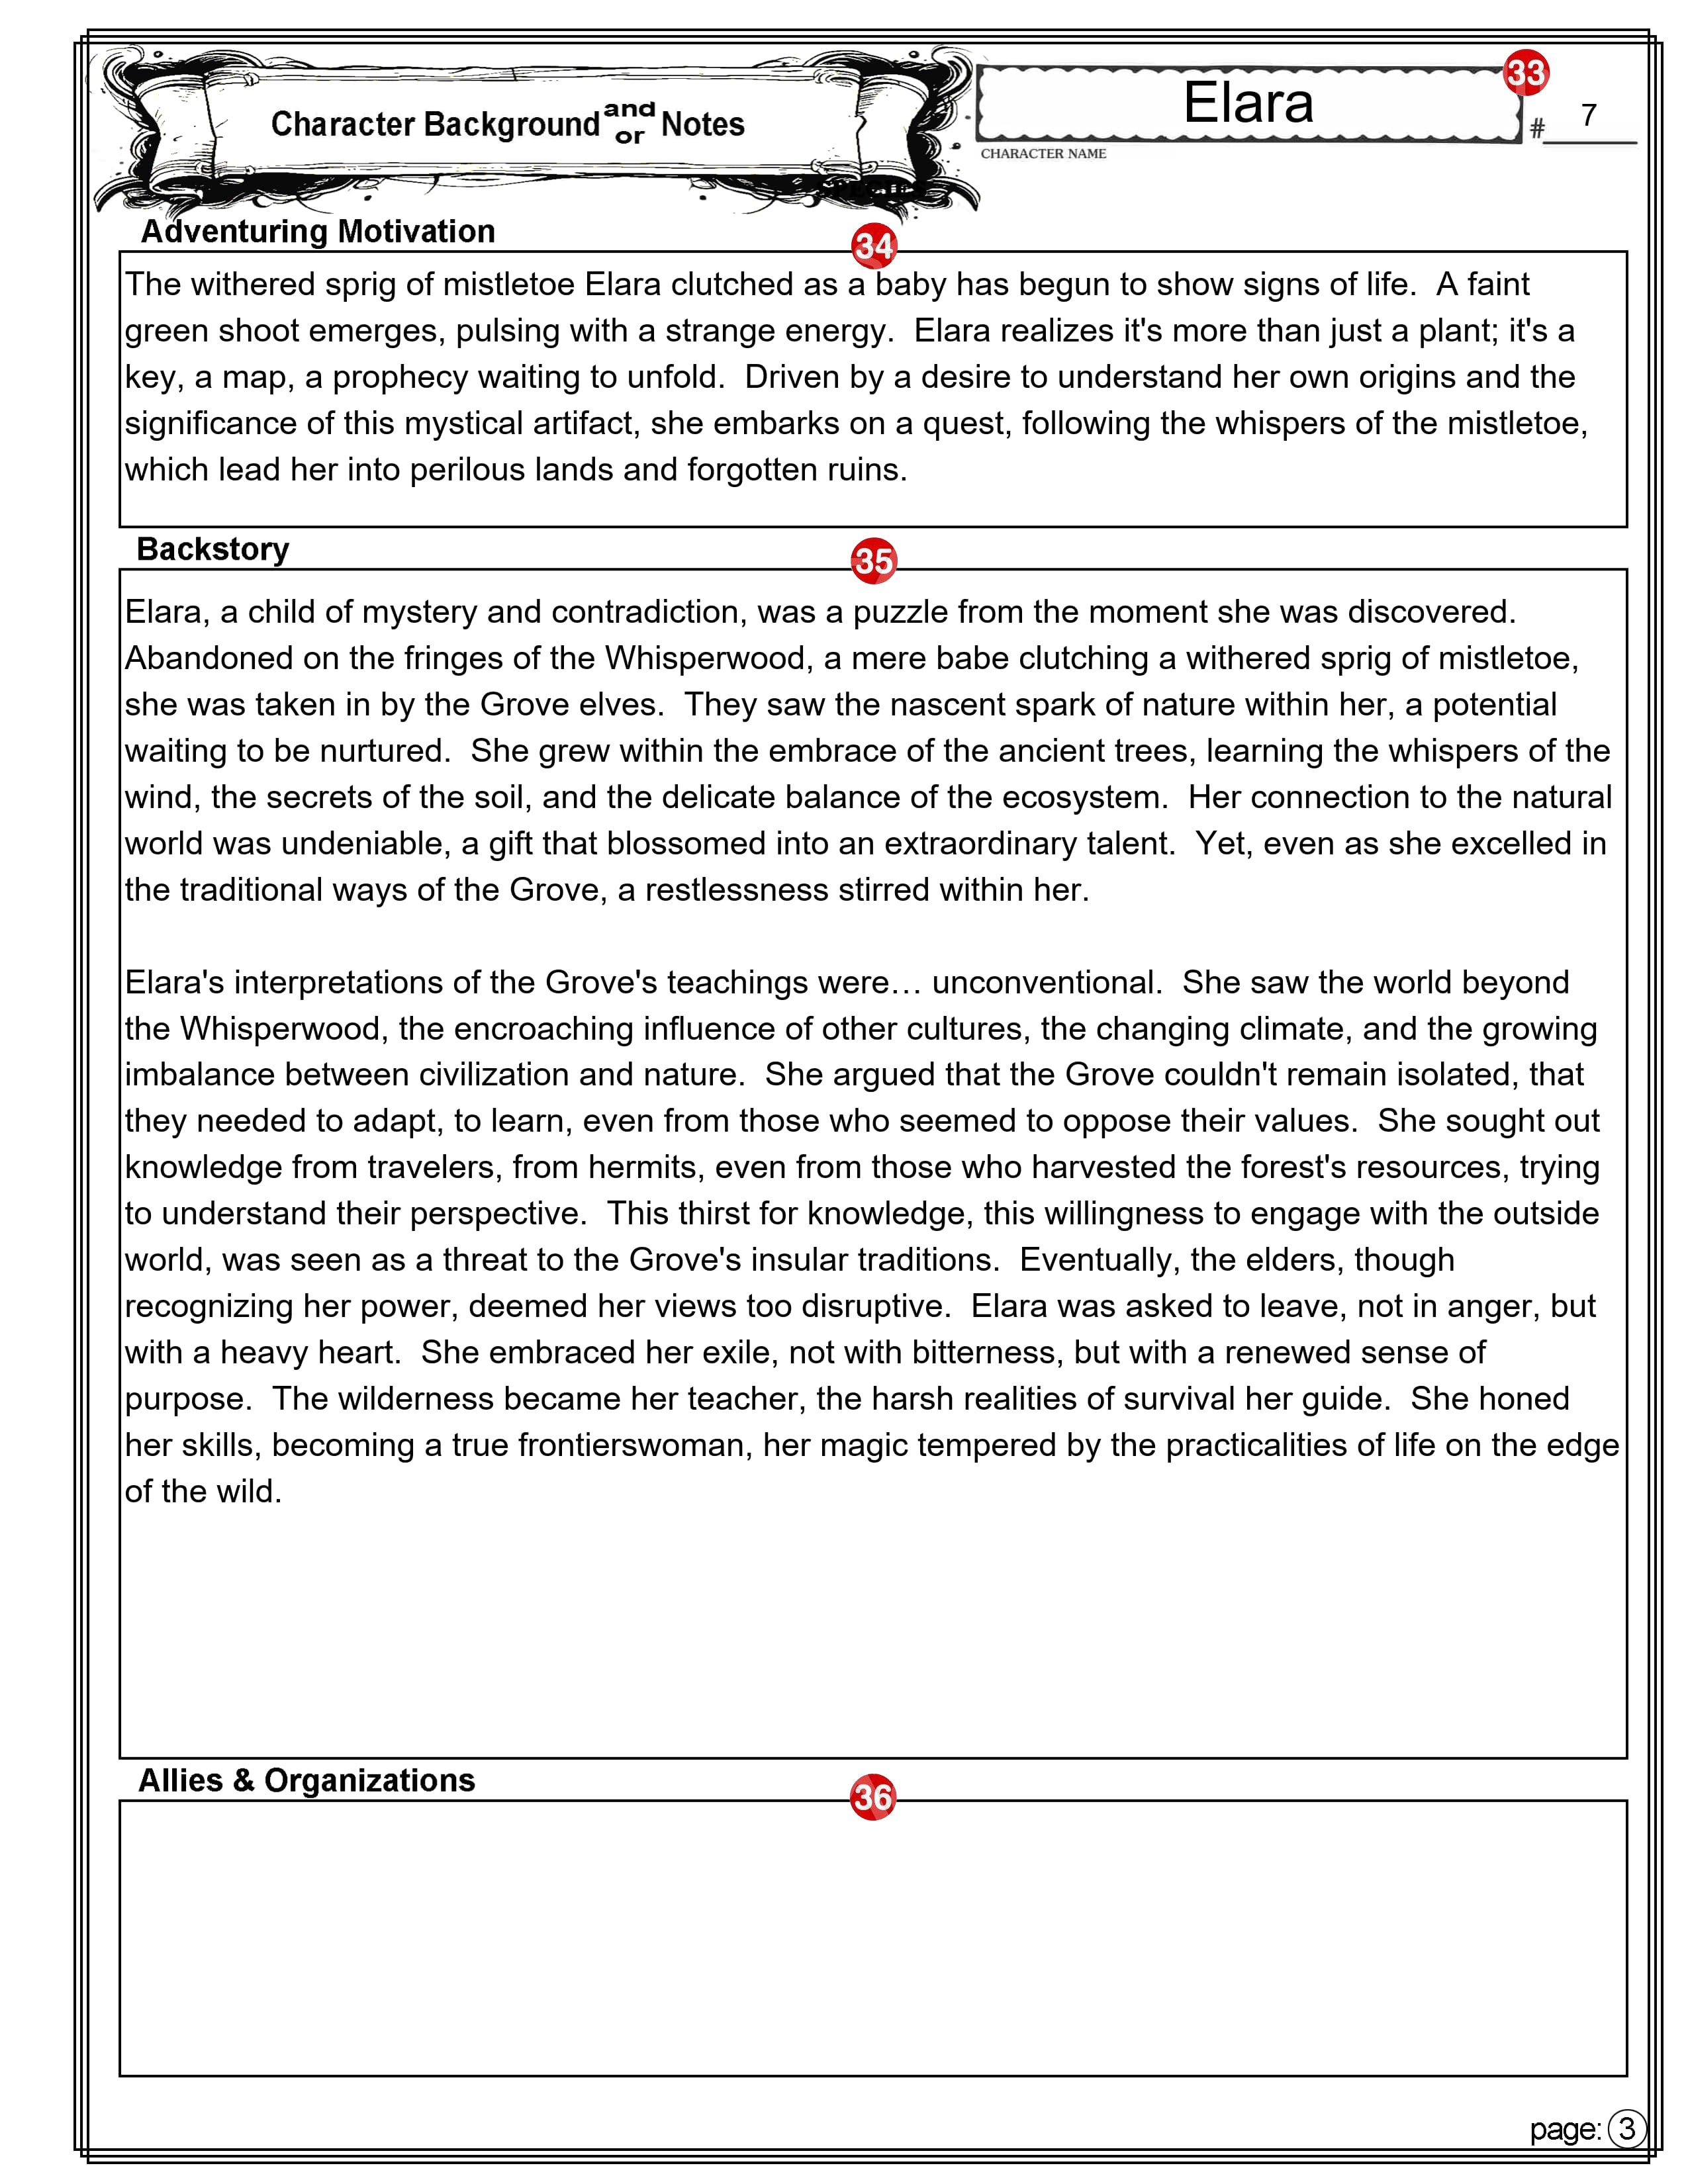
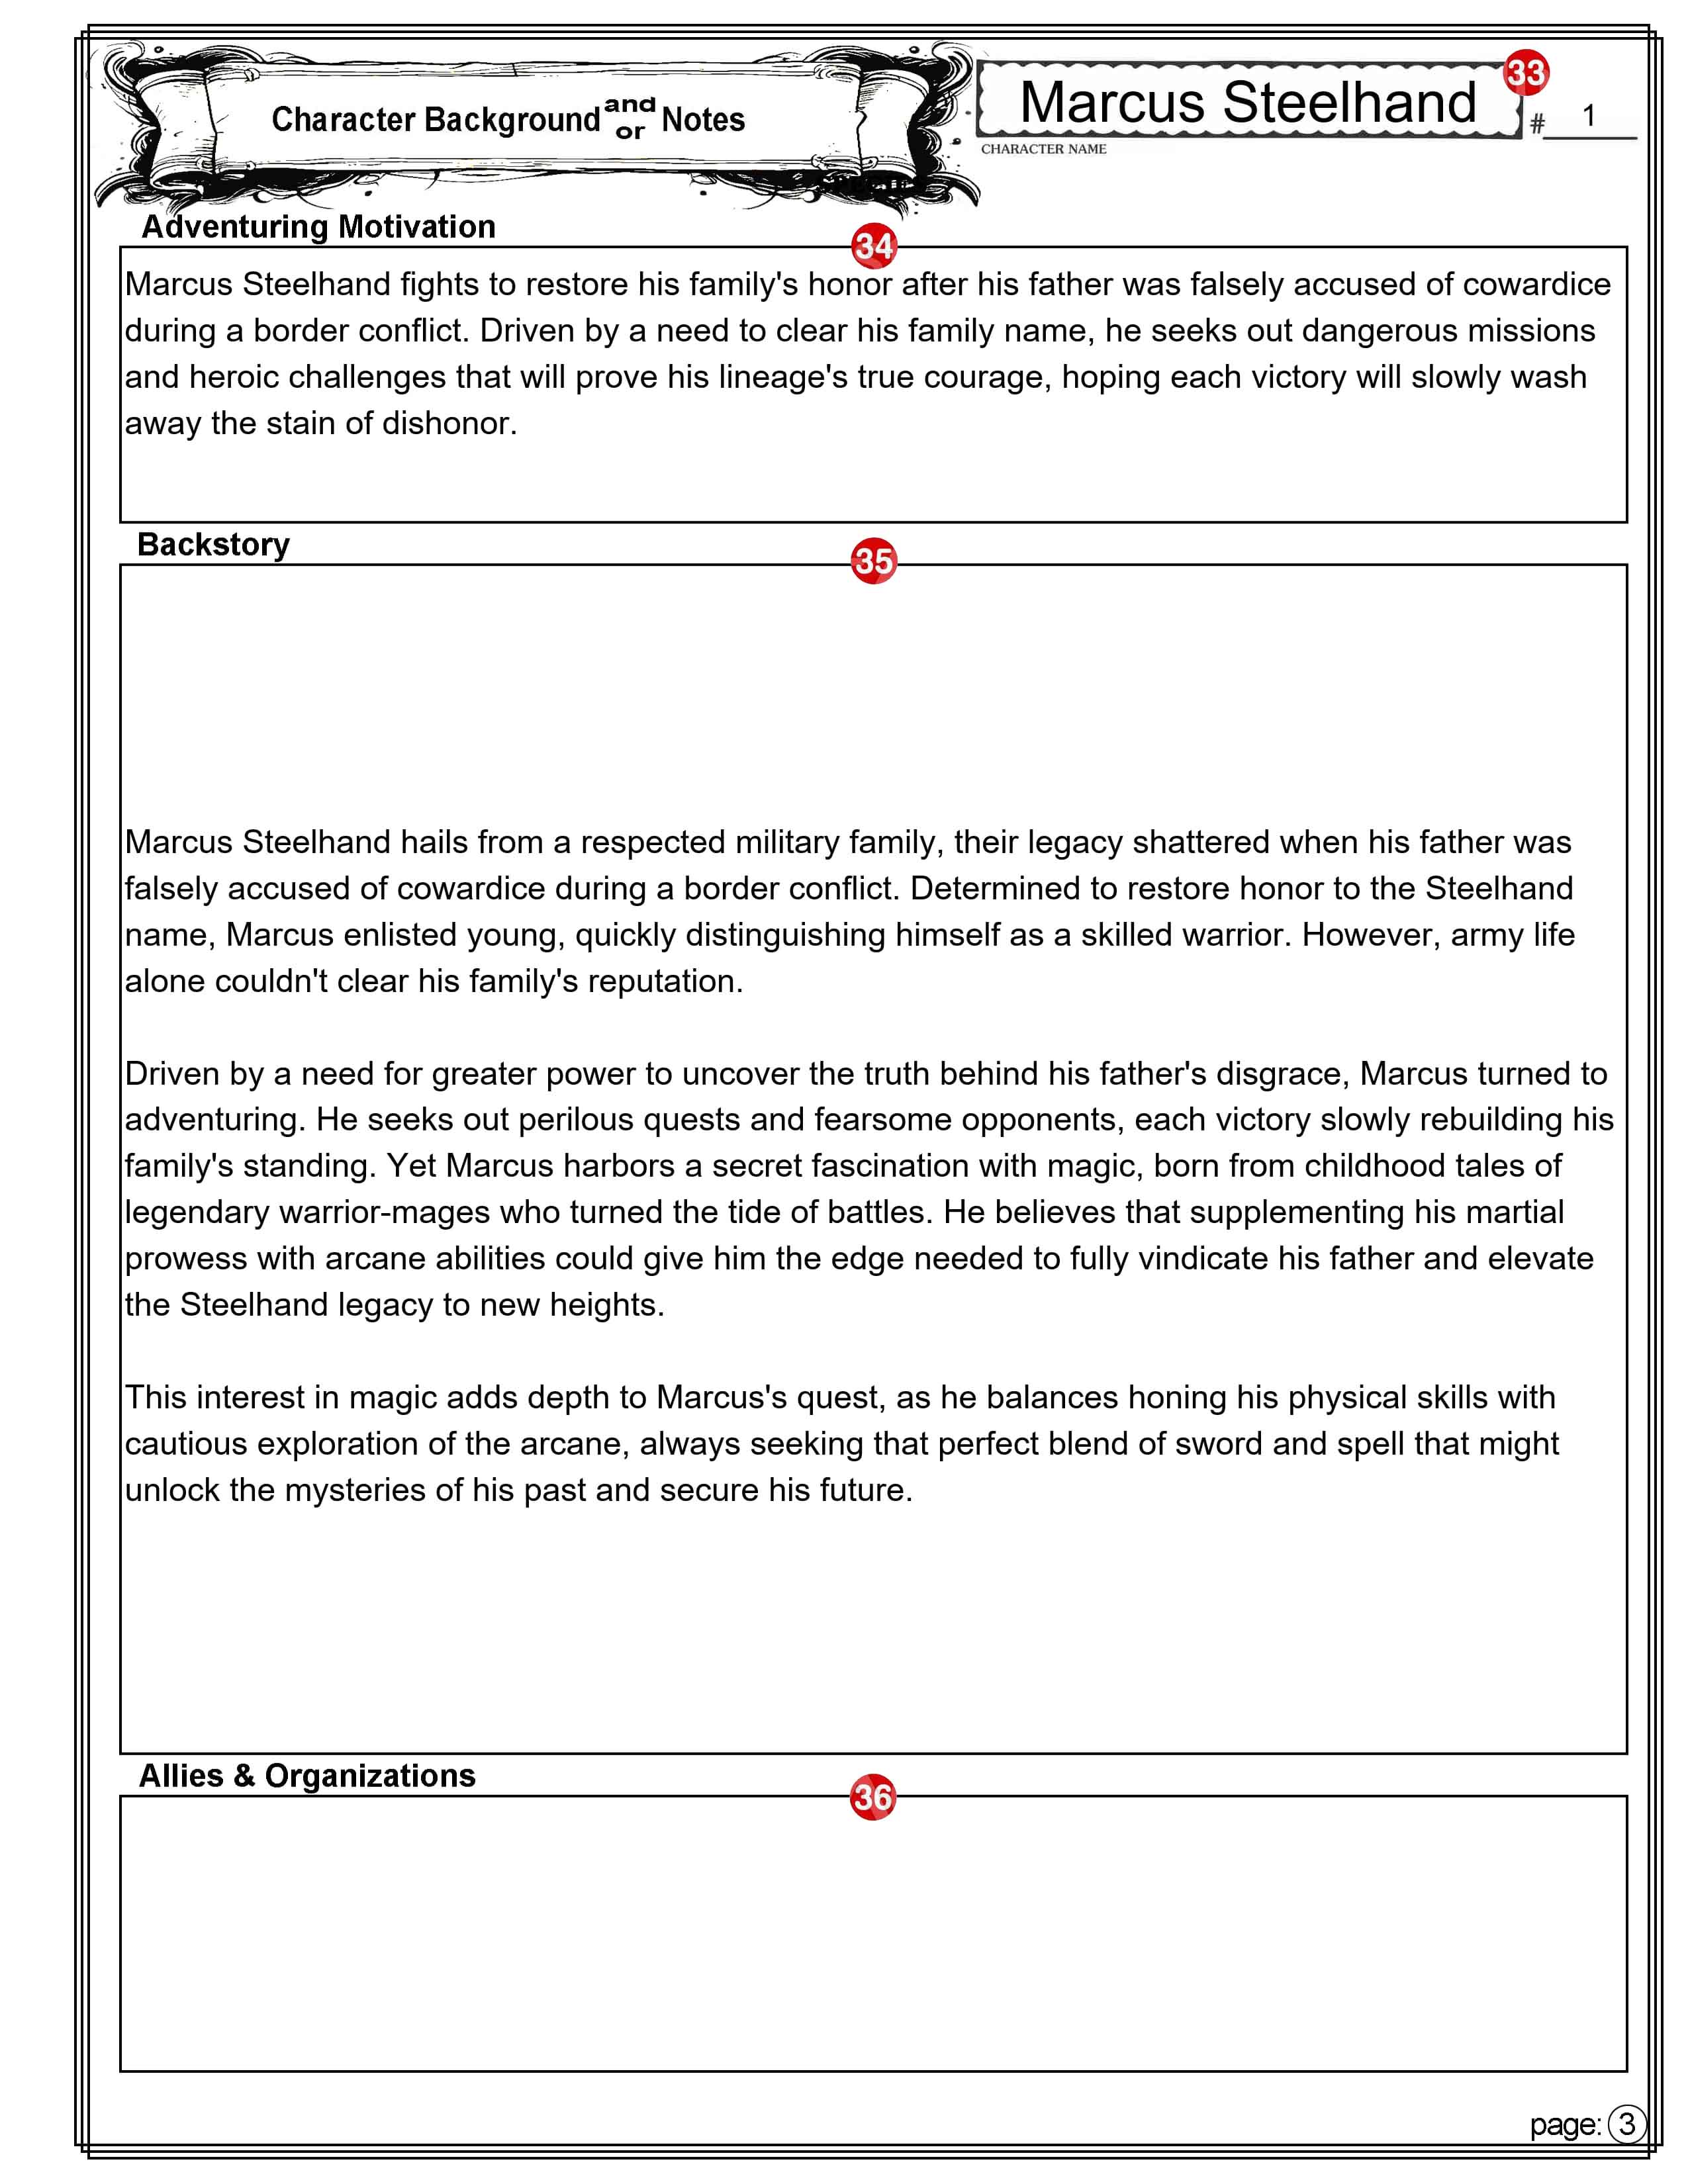
PAGE 3
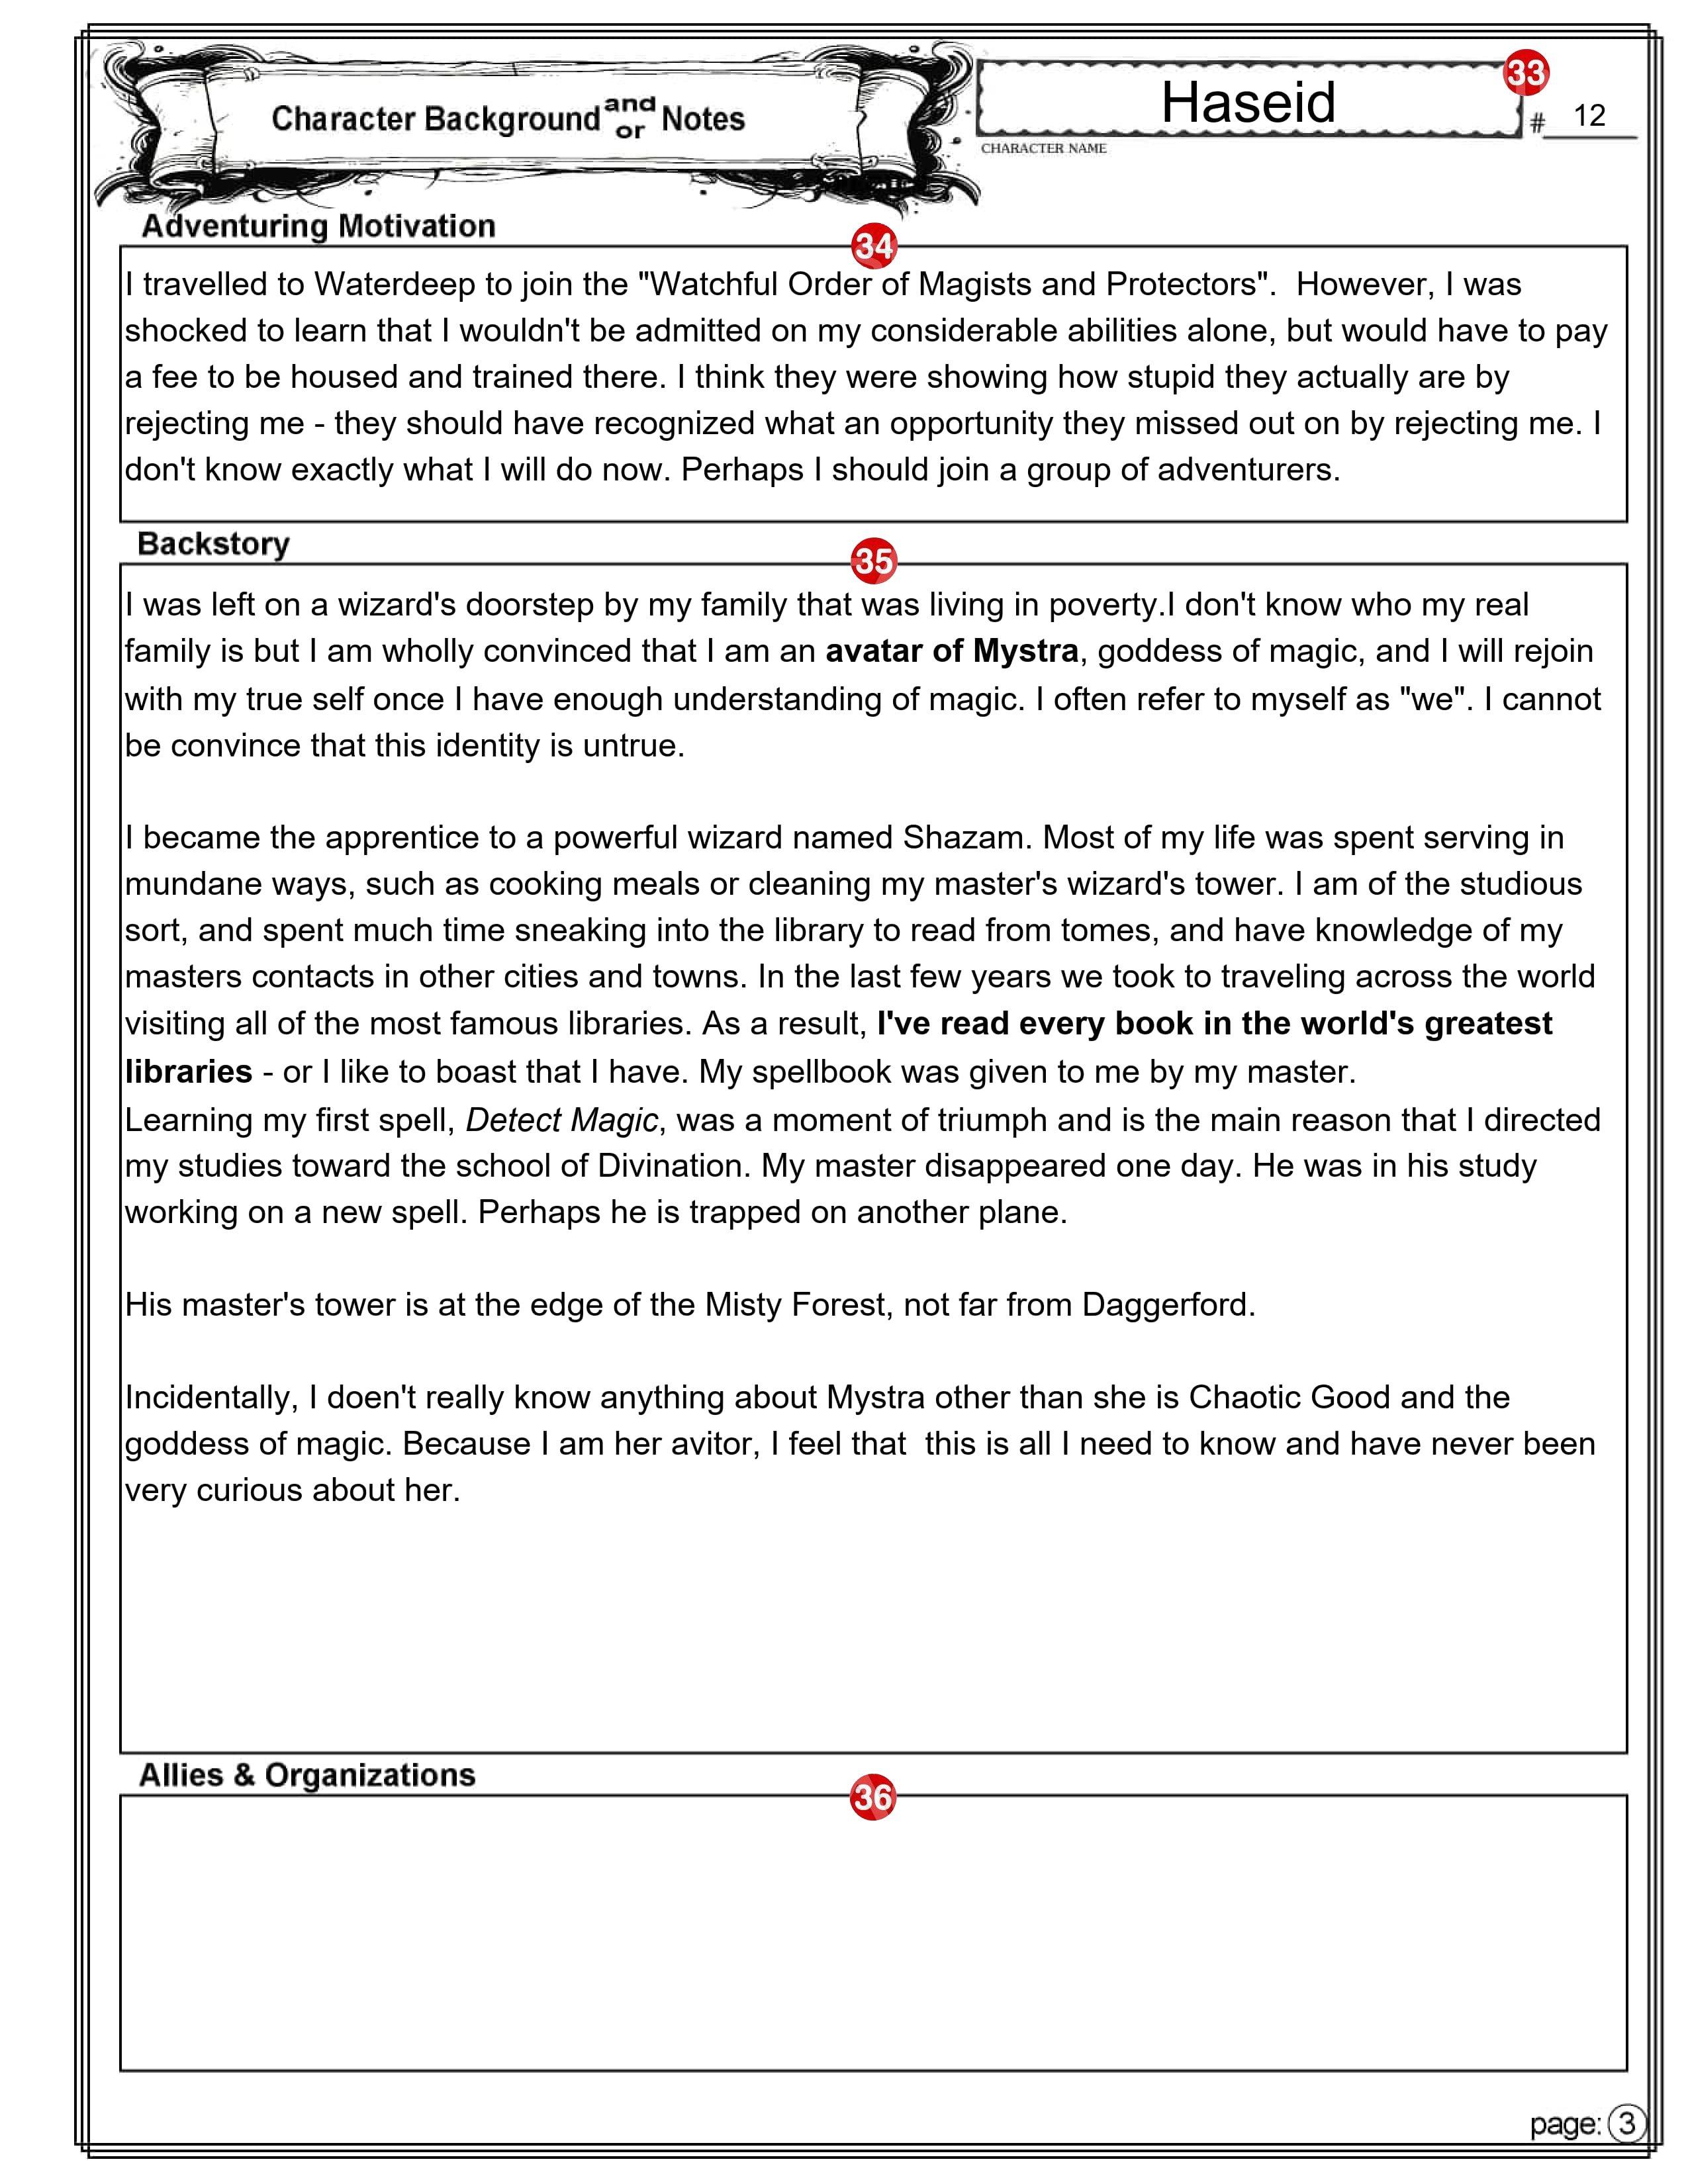
33 – Character’s Name and #____
Character’s Name and Character sheet version (see numbers 2 & 3).
34 – Adventure Motivation
This is where you can enter the reason your character decided to become an adventurer.
35 – Backstory
Many players like (and some DMs require you) to come up with a character backstory. Players create backstories for their D&D characters to add depth, motivation, and personality to their roles in the game. A well-crafted backstory can enhance roleplaying, provide plot hooks for the DM, and make the character more engaging for both the player and the party.
There is plenty of room here to also add any notes about your character that don’t easily fit elsewhere on the character sheet.
36 – Allies and Organizations
A place to list the names and something about the other Player Characters (PCs) in the game, along with who the character belongs to. There may be organizations in the game world that you want to remember. Some may be friendly and some not.
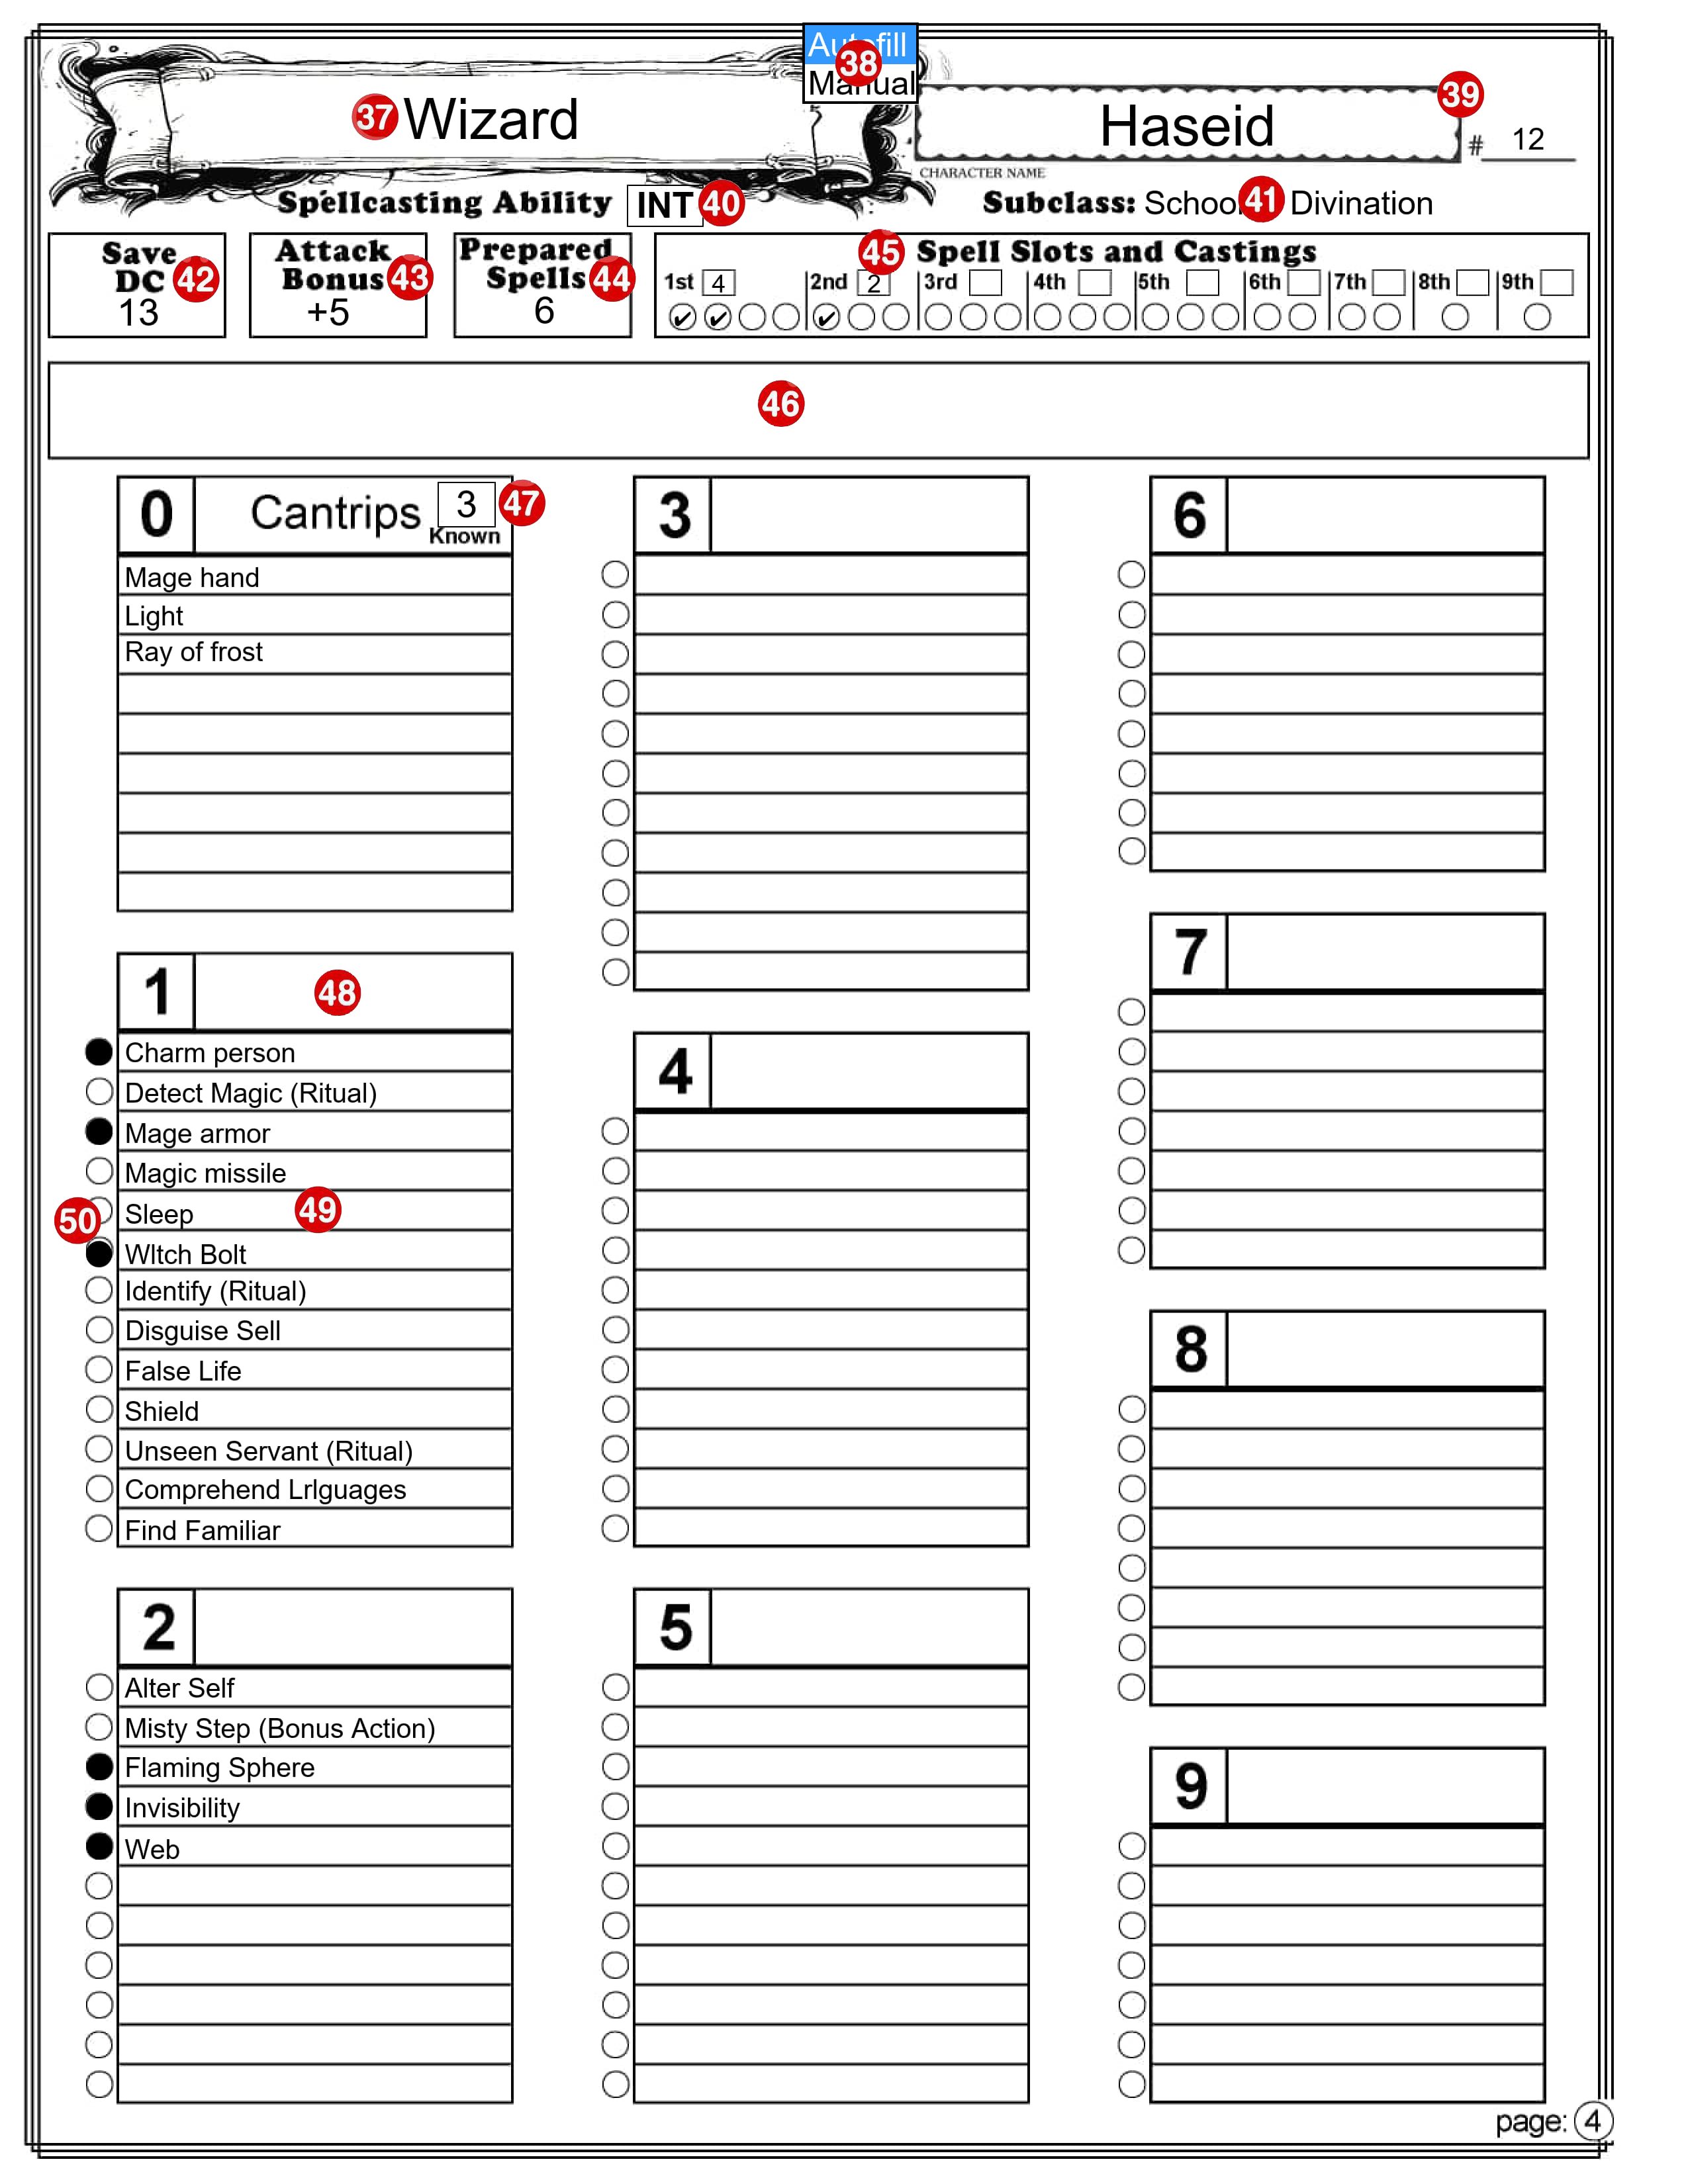
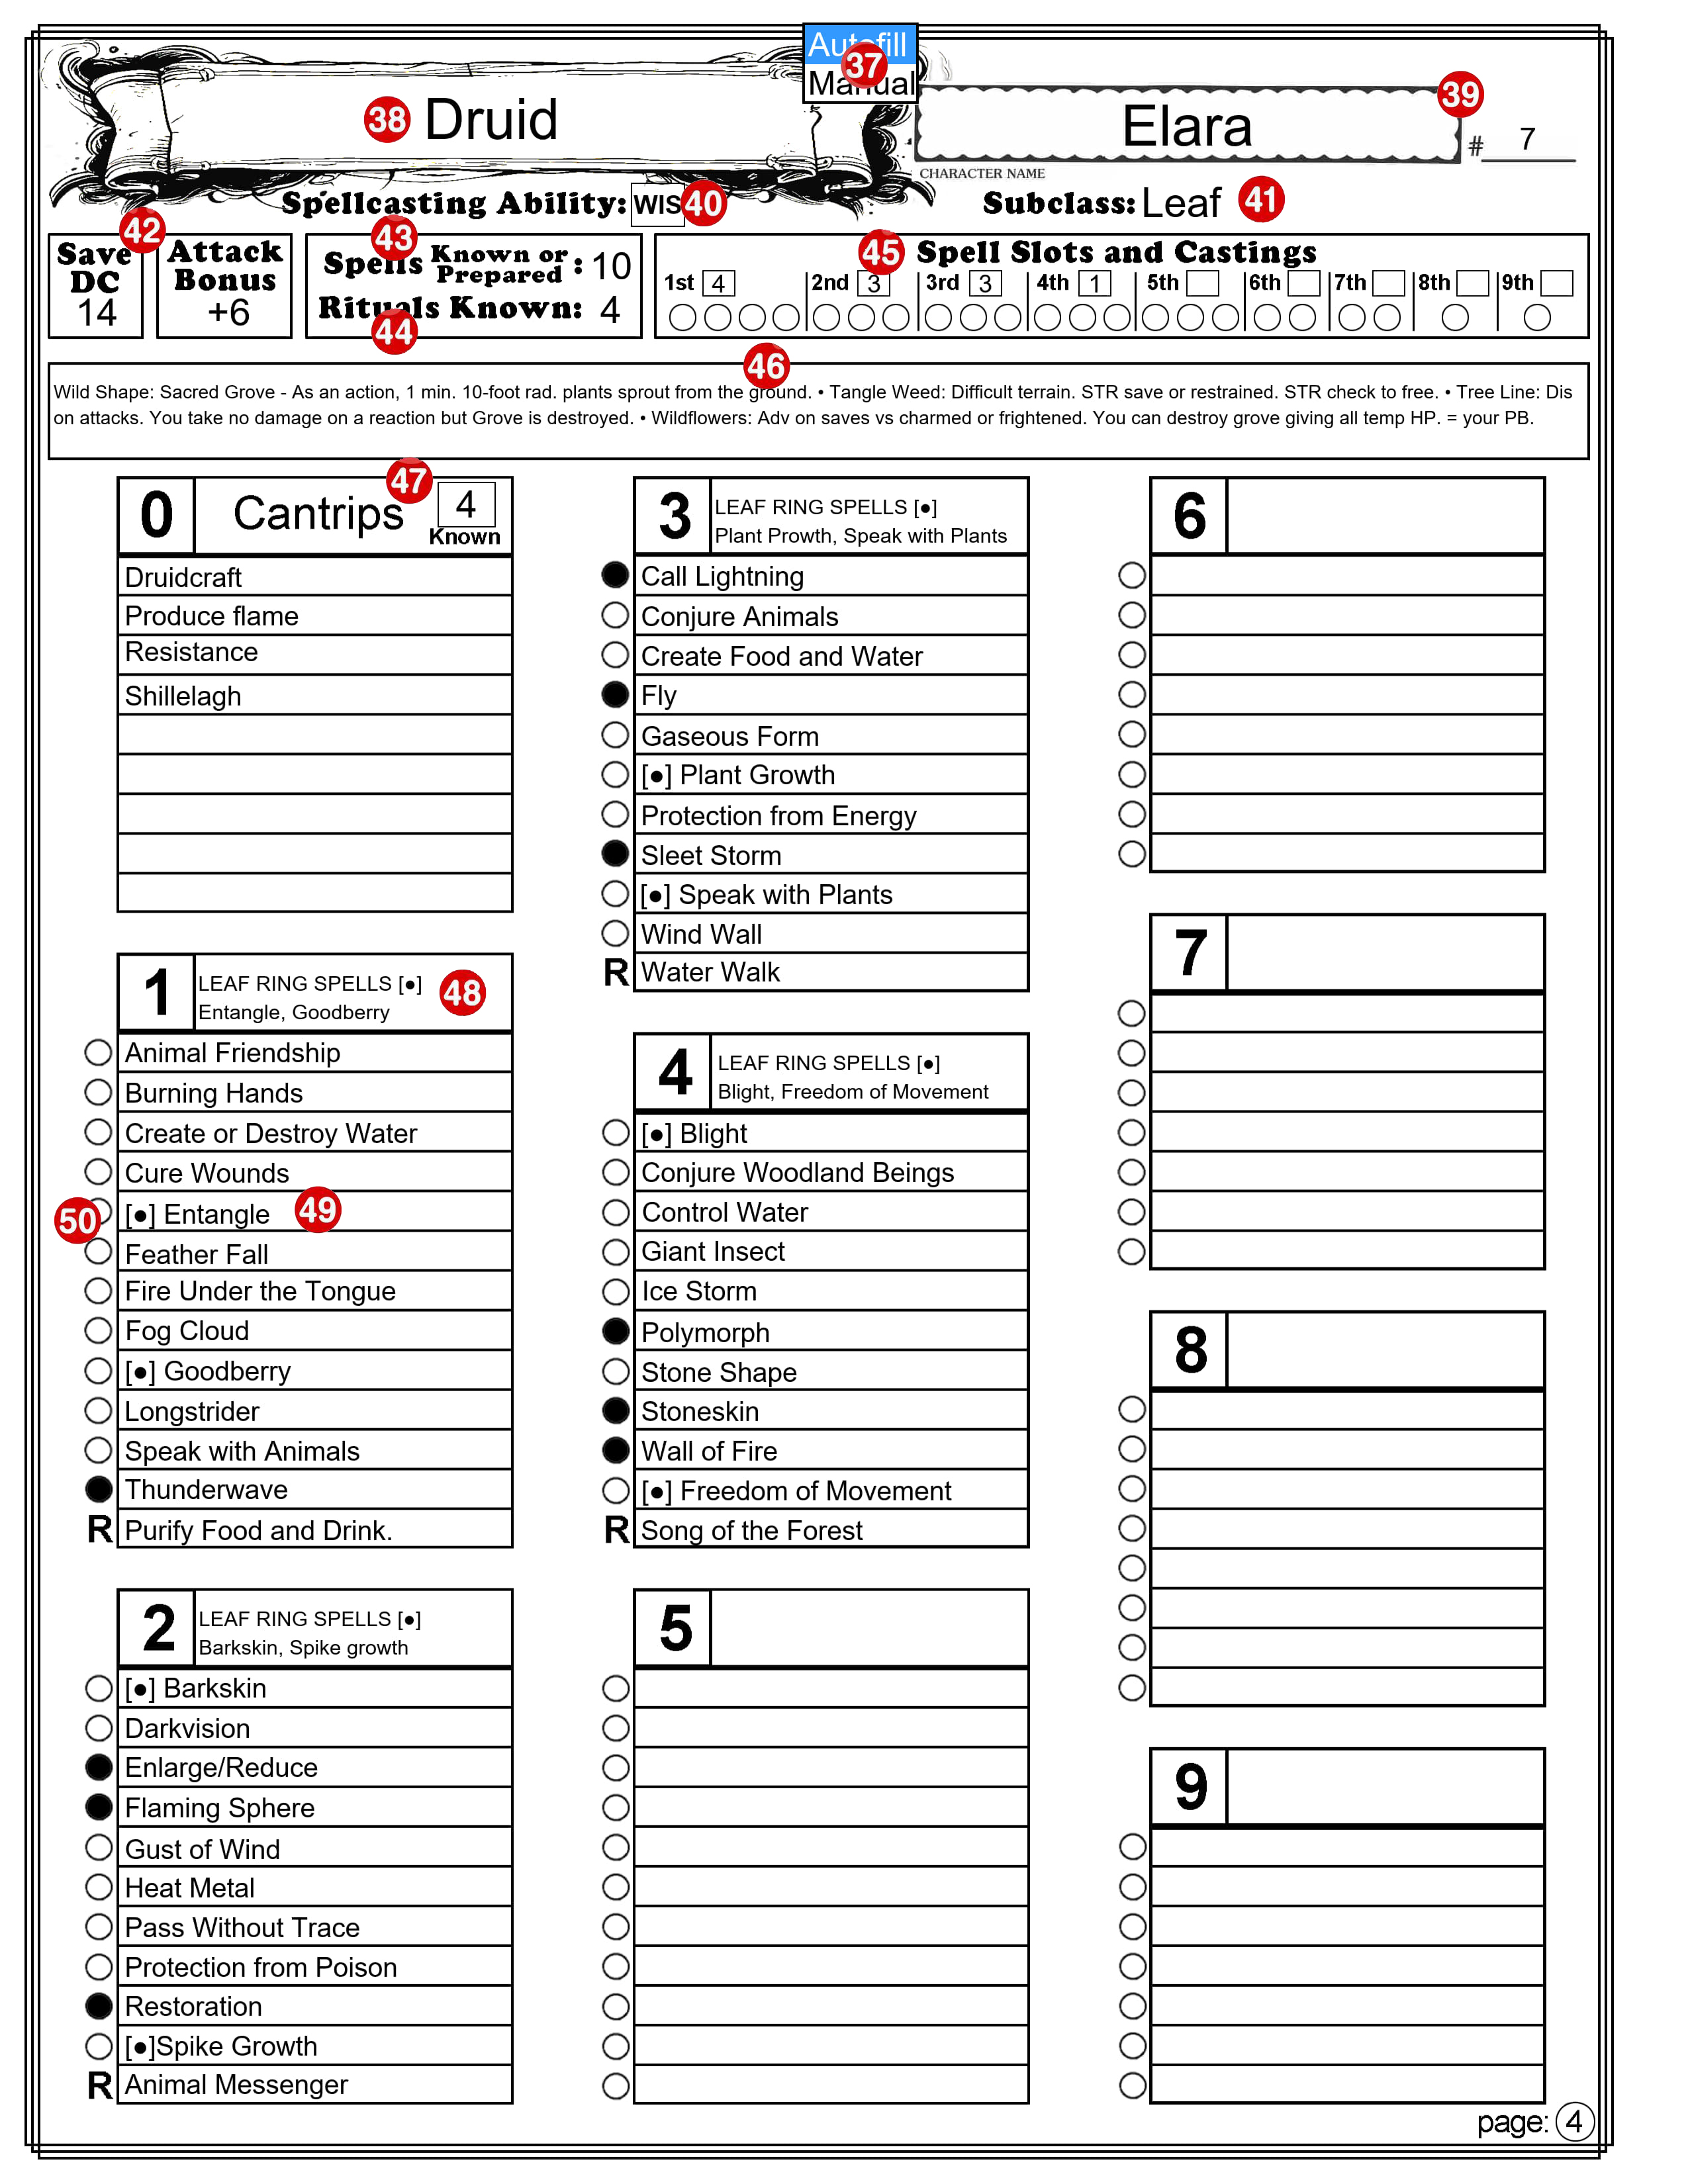
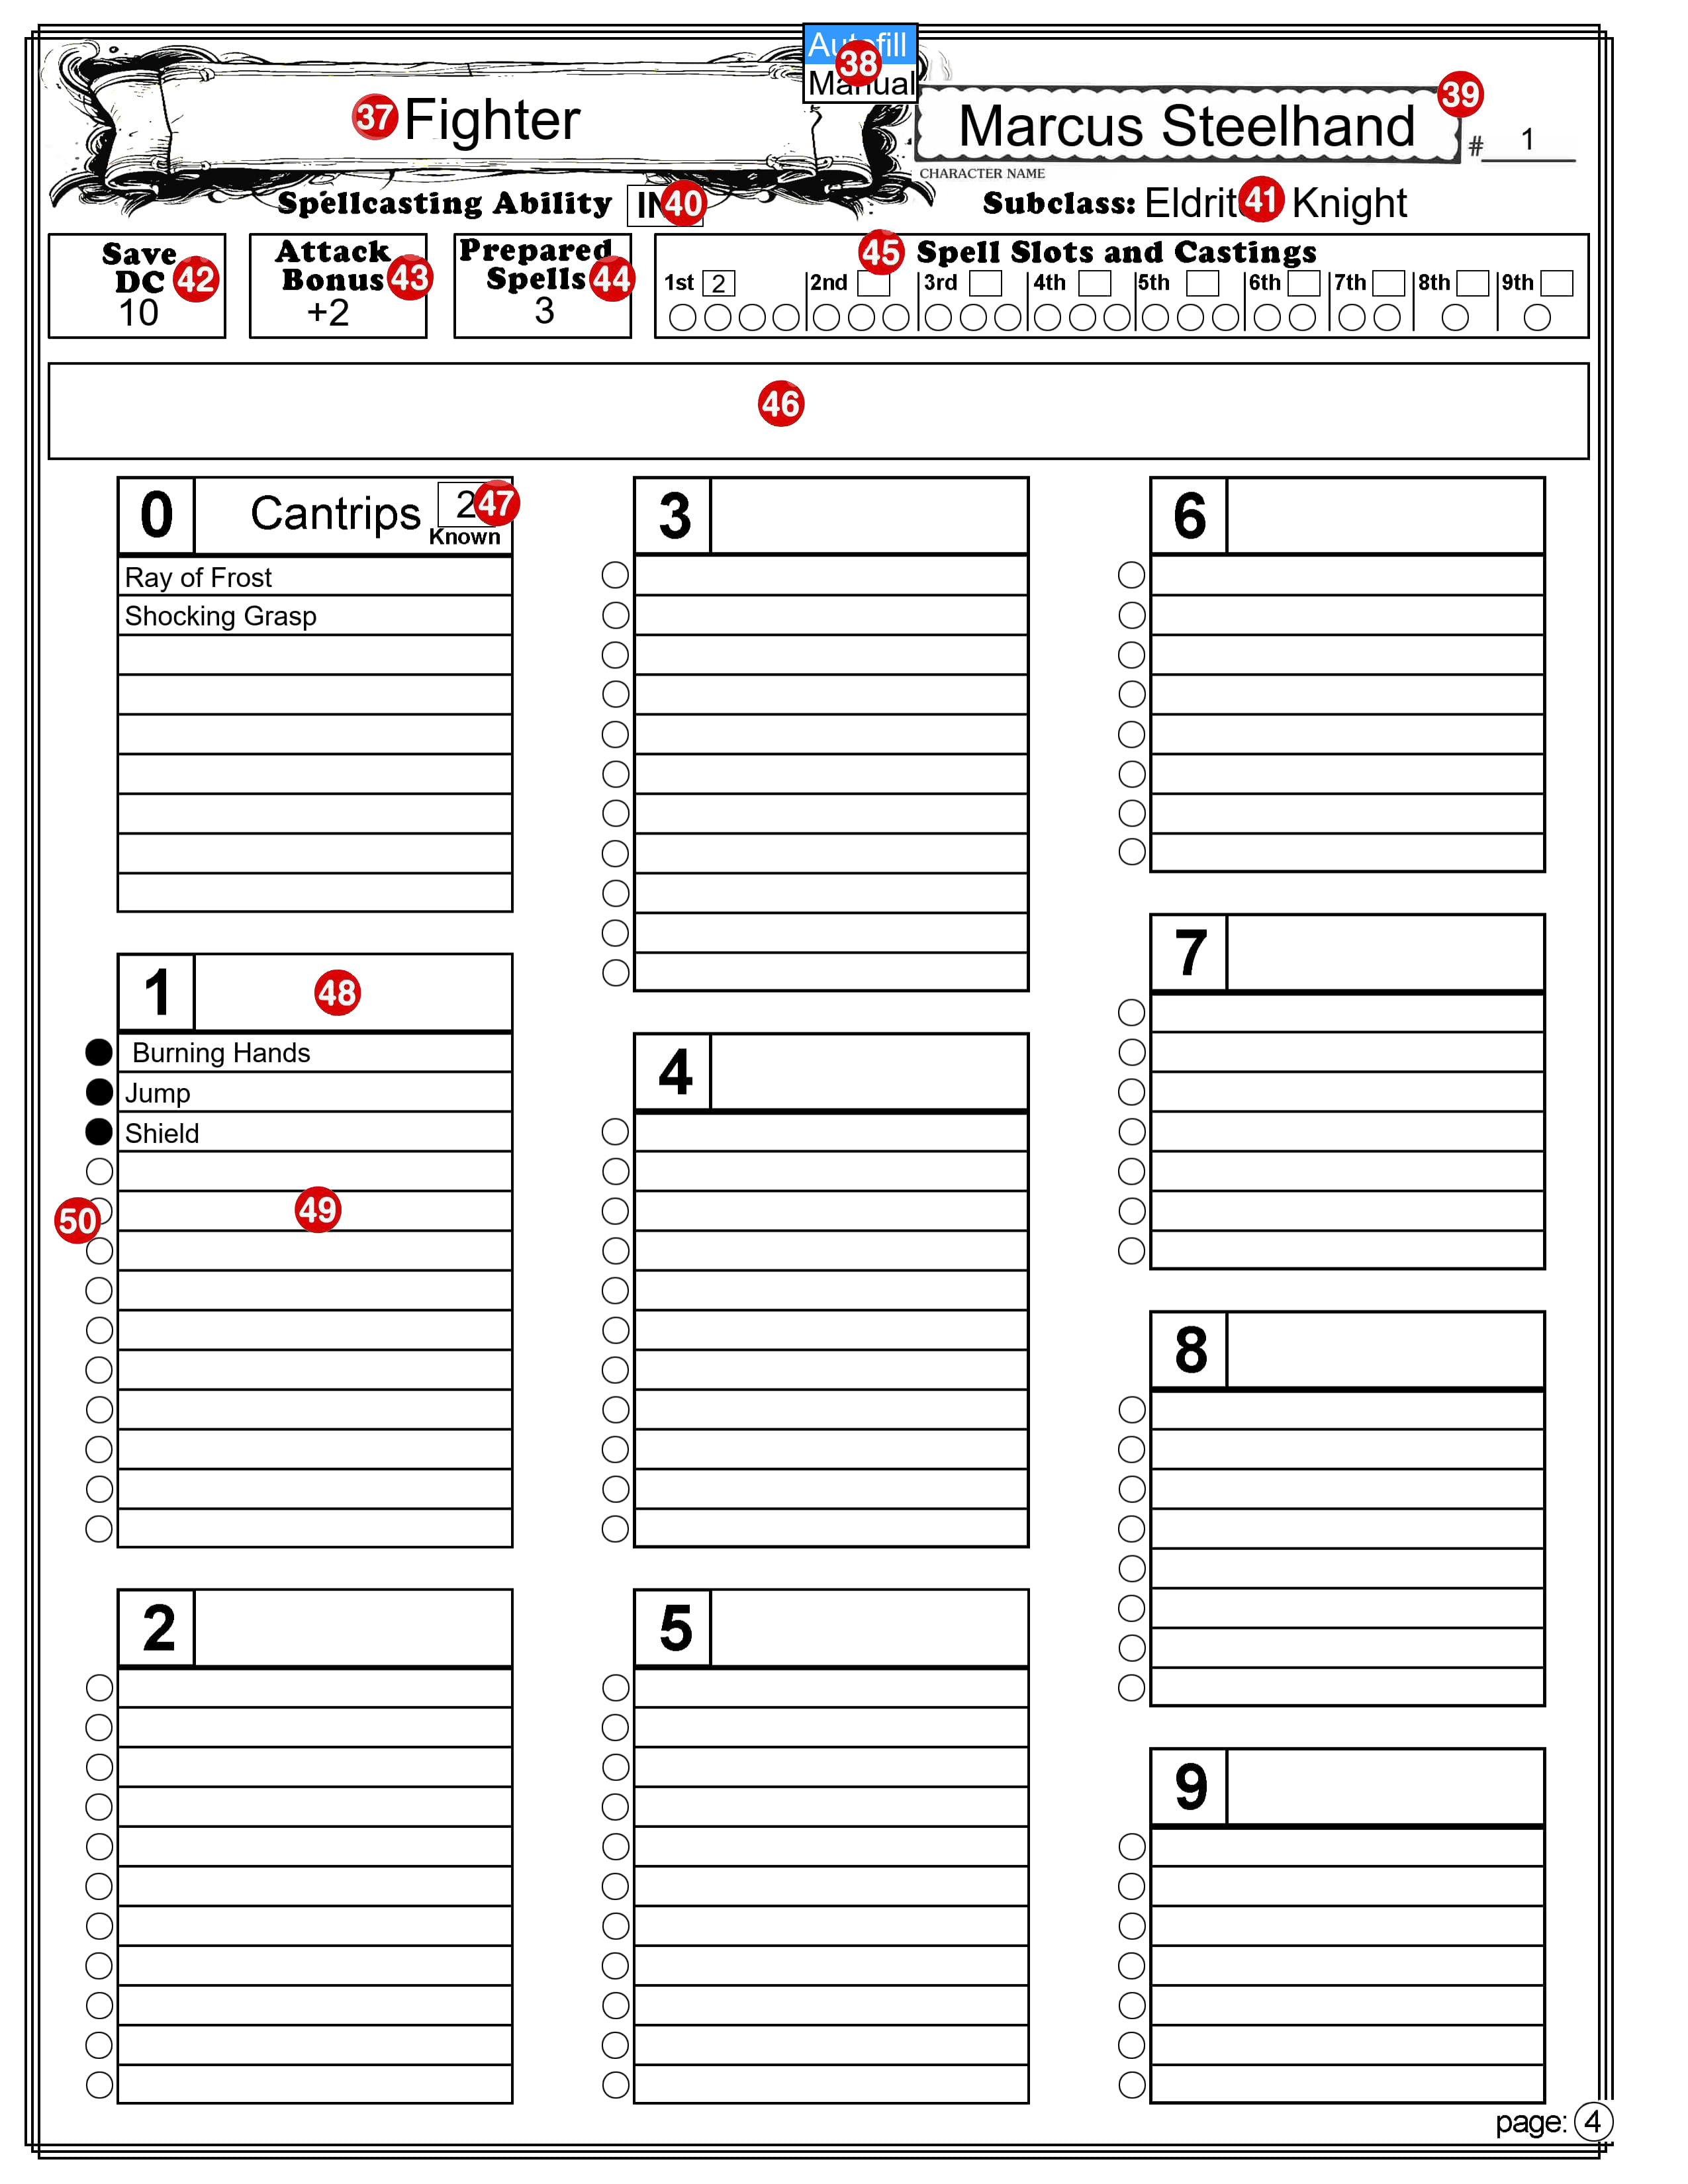
PAGE 4
37 – Your Character’s Class
Autofill mode: Your Character’s Class as it appears on page 1, will be copied here. Manual mode: When you switch this to Manual mode, any text here remains, but you can edit, delete or change it.
38 – Autofill/Manual Selection Box
This selection box is independent of the similar one on page 1. Be aware that one page might be set to Autofill and the other one set to Manual. Select ‘Autofill’ mode to automatically fill in portions of this page based on your choices, as described below. Choose ‘Manual’ mode to keep existing information unchanged and make your own edits. Note: This selection box will not appear on the printed page.
39 – Character’s Name and #____
Character’s Name and Character sheet version (see numbers 2 & 3).
40 – Spellcasting Ability
Autofill mode: This will show the ability used by this class of spellcaster. You can’t change the text. Manual mode: You can change the text,
41 – Subclass
Autofill mode: This will reflect the sub-class that is on page 1. Manual mode: The text in this field is fully editable.
42 – Save DC
Autofill mode: The spellcaster’s save DC and attack bonus is calculated and displayed here. Manual mode: You can change the number.
43 – Attack Bonus
Autofill mode: The attack bonus to add to spell attacks is calculated and displayed here. Manual mode: You can change the number.
44 – Prepared Spells
Autofill mode: If the spellcaster has a limited number of spells they know or that they can prepare, that number is displayed here. You cannot change the number. Manual mode: You can change the number.
45 – Spell Slots and Castings
Autofill mode: The spellcaster’s number of spell slots is calculated for each spell level and displayed here. You cannot change the numbers. Manual mode: You can change the numbers. Castings: The check boxes are for you to use during your game to check off the spell slots as you use them.
46 – A space for notes
This area is where you can enter notes specific to your spellcasting features and abilities.
47 – Known Cantrips
Autofill mode: The number of cantrips you can know is calculated based on your class level is calculated and displayed here. You cannot change this number. Manual mode: You can change the number.
48 – Another space for notes
This space at the top of the list of spells of each level is for any notes you may want to keep regarding spells of this level.
49 – Spell List
You can enter the name of the spells you have access to for each spell level. You can enter anything you want here. You might want to include the page number where the spell can be found in the PG. I like to include things [C] for concentration.
50 – Prepared Spells
If your Class has you prepare a certain number of spells from your list of spells, you can indicate the prepared spells by filling in the circle (by clicking on it). Clicking on it a second time returns it to a circle.
Multiclass
To use this character sheet for a multiclass character there are two options.
Option 1. One way is to simply switch to ‘Manual’ mode and enter everything any way you want. Option 2. To take full advantage of the features available on this character sheet I recommend the following:
Create a level 1 character in ‘Autofill’ mode. Enter all its weapons, armor, and equipment.
When you are ready to add a second class switch to ‘Manual’mode (if you haven’t already).
In the Class box (number 7) add the level for the current class and the name of the second class and its level. For example, if you have a third level Barbarian and add two levels of Sorcerer you might enter its class as: Barbarian,3 Sorcerer,2.
Make changes as required to the other class related features on this section. You can delete anything that no longer applies or that you don’t need to reference.
The Class Feature box (number 11) will change to allow several lines of text. You can use this area to enter information you want to keep track of, or that won’t easily fit in other places on the sheet.
Enter the combined level of all of your classes in the “Level” box (number 10). This is important because many calculated values are based on this.
On page 4, select “Manual” mode and make any needed changes.
Final Comments
The main thing to remember is that the character sheet is yours. Use it in any way that makes sense to you. You can write outside the boxes, use circles and arrows, scribble in the margins, or use it in any way that you choose. Also, you don’t have to completely fill out every box before you start playing. If you never decide on your character’s eye color, it won’t affect the game. [As a DM, I do strongly recommend that you give your character a name before your second gaming session. I have played too many times with one or more “no name” characters. This can be a distraction.]
Here are a couple of tips. First, if you are using a printed character sheet, use pencil instead of ink. Many things can happen during an adventure that can cause things to change so keep an eraser handy. Second, if you can cast spells, you might want to use one or more weapon boxes on page 1 for quick reference to your favorite offensive spells.
Having problems? Occasionally users of my previous Character Sheet would report issues with getting everything to work. The problem has typically been with the PDF reader they are using. Problems with the PDF reader in their browser were common. If you have access to a desktop computer running Windows, I recommend you first download a copy of the file to your hard drive. Then open the file using your preferred PDF reader. The most popular one is the free “Adobe Acrobat” PDF Reader. This Character Sheet has been tested on that and it all appears to work. If you are curious, I created this using PDF-XChange Editor.
Call to action. I’m always looking to improve my resources for the D&D community! I would love to hear your feedback on this new character sheet. Let me know what you think in the comments below. If you encounter any issues using the sheet, please report them so I can address them. And if you have any suggestions for improvement, I’m all ears! Your input helps me create the best possible tools for fellow Dungeon Masters and players.
This is the eighth adventure in a series of adventures that I will be posting here, that will make up the “Its About Time” campaign arc. These adventures will take a group of adventurers from level 1 to level 20.
This is the eighth adventure in the series. This 66 page PDF file is a D&D 5E adventure for a group of 8th level Player Characters (PCs). In this adventure the party teams up with the spirit of the Pirate Queen who takes them on her ghost ship to an uncharted isle, where the heroes must face deadly undead guarding forbidden treasure. Even if you have no intention of running this adventure, it provides tools you may find useful in your campaign. This adventure is in 4 parts. The two major parts are: 1) “The Ghostly Galleon” where the PCs explore a ghost ship, and every room they enter is first an old and neglected ship inhabited by a crew of ghostly figures. When they enter each room there is a chance that time will move back about 300 years into the past, where there is a party going on. Or, it may switch to a time in the future where the ship is much more corrupted and is infested with a variety of monsters. 2) “The Hidden Temple” which is basically a dungeon crawl where the PCs fight monsters, solve puzzles, encounter traps, and strive to locate another fragment of the Clock of Aeons. It has 15 new monsters and a new magic item, the “Wand of Age Humanoid”. The Digital Accessories Pack includes images of encounter locations and Monsters along with maps and monster tokens you can use in your virtual table top game.
Check it out and let me know what you think about it in the comments section below.
The next adventure will be “AT-09: The Prehistoric Portal.”
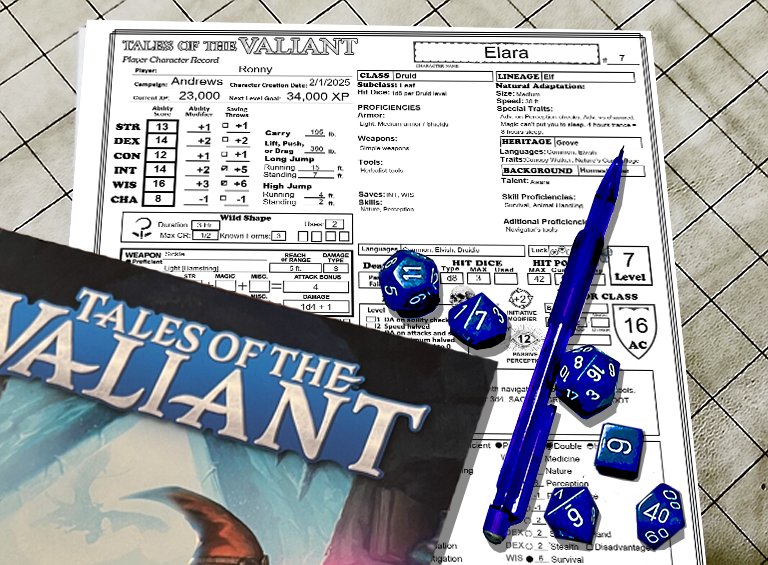
Here is the form fillable ToV Character Sheet you have been waiting for!
In 2015 Wizards of the Coast published the current version of Dungeons and Dragons (D&D 5E). Last year they published an update to the game that they refer to as the 2025 version (I call it D&D 5.5). Last year Kobold Press published “Tales of the Valiant” (ToV). It is also based on D&D 5E and is also an update to that game. If you aren’t familiar with it you should go over to koboldpress.com and get a free copy of the 385 page “Black Flag Reference Document” PDF. It contains everything you need to play ToV. If you like it you can get their equivalent to WotC’s “Player’s Handbook” (PHB), “Dungeon Master’s Guide” (DMG), and “Monster Manual” (MM). ToV calls them the “Player’s Guide” (PG), “Game Master’s Guide” (GMG), and “Monster Vault” (MV).
Last month I posted my updated character sheet for D&D 5.5. This is a similar character sheet specifically for “Tales of the Valiant”.
This incorporates the changes to D&D 5E found in ToV’s “Players Guide”. It is 4 pages, 2 sheets if printed on both sides. (Note that I will be referring to the set of all 4 pages in the singular, as the “character sheet”.) Page one has all of your character’s basic information and all you need for combat other than your spells. Page two is just for equipment and treasure. Page three is Character background and notes. Page four is for magic spells. It can be printed blank and filled out with a pencil, or you can fill in the forms on your device and most of the calculations will be done for you. It automatically calculates; ability and saving throw modifiers, carrying capacity and jump distances, Armor Class, Proficiency Bonus, Passive Perception, Skill check modifiers, Weapon attack bonus and damage, Equipment cost and weight, and more. It can fill in all the adventuring gear you get if you select an equipment pack (such as an “Explorer’s Pack”). In addition to that, it contains a new Autofill option that can fill in all the standard information based on your class, Lineage, Heritage, and Background.
Update #1: 2/9/2025 Minor item cost display fix for Adobe Acrobat For items whose cost is in copper pieces or silver pieces it was displaying their cost in fractions of a gold piece. It now displays their cost in cp or sp if their total cost is less than the next more valuable coin. Adobe Acrobat wasn’t displaying this correctly.
Filling in the ToV Character Sheet
These instructions are for use with the character sheet you can download above. You can print a blank Character Sheet and fill it out by hand. If you fill it out on your device, many boxes will be filled in for you. There is information at the end of this on how to use this sheet for multi-class characters.
PAGE 1
1 – Autofill/Manual Selection Box
This selection box is independent of the similar one on page 4. Be aware that one page might be set to Autofill and the other one set to Manual. Select ‘Autofill’ mode to automatically fill in portions of this page based on your choices, as described below. Choose ‘Manual’ mode to keep existing information unchanged and make your own edits. CAUTION: If you switch to ‘Manual’ mode to make a few changes and then switch back to ‘Autofill’ mode, all your changes will be lost, replaced by the ‘Autofill’ information. I recommend you leave it in ‘Autofill’ mode until you are finished with Page 1, including your weapons and armor. You can then safely change to ‘Manual’ mode and make changes and additions. You may want to make a backup copy of your sheet before making changes. Each of the numbered sections below where this selection makes a difference will include a description for both Autofill mode and Manual mode. Note: This selection box will not appear on the printed page.
2 – Your Character’s Name
The text you enter here will also appear in the same location on the other pages. The text can be entered or changed on any page.
3 – #____
Character sheet version. If you make multiple copies of your character sheet enter the version number here. Like the Character Name, this text will also appear on the other pages.
4 – XP/Milestones Selection Box
If ‘XP’ is selected the Next Level Goal will be calculated and entered for you here based on your current character level (see below). If “Milestones” is selected the text on this line will be replaced by a “Notes” section. Note: This selection box will not appear on printed pages
5 – Campaign Information
This is where you enter your name, the name of the campaign you are in and the date this character was created. Trust me, if you look back at this years from now, you will appreciate having this information.
6 – Ability Sores
Enter your ability scores in the boxes. All the data to the right of the ability scores will be filled in for you based on the ability scores, including your carrying and jumping stats based on your strength score. Because your long jump distances are based on your walking speed, and there are several ways it might change, I don’t calculate that for you. Check the little box next to the Saving Throw modifier to indicate that you are proficient in that Save.
7 – Class
Select your Class from the drop-down box. The Class Feature box (number 10 below) will display information relevant to this class. Subclass: You can select a subclass from the drop-down menu. Autofill mode: All the information from the Class Features section in the PG for this Class will be filled in, down to (but not including) Starting Equipment. If there is any current text in any of these areas it will be removed. You can also type text into this ‘Class’ box, but if it differs in any way from one of the selections in the drop-down box any text below will be removed. Manual mode: No matter what you select or enter into the “Class’ box, existing text in this section will remain unchanged. You can change or add any text in the ‘Class’ box or any of the information below it.
8 – Lineage
Select your Lineage from the drop-down box. Natural Adaption: Some call this a Sub Lineage. Some lineages (such as the Dwarf) don’t have one. You can type in the name of a Natural Adaption or select one from the drop-down. Autofill mode: An abbreviated version of the size, speed, and special traits for this lineage will be filled in. If there is any current text in any of these areas it will be removed. You can also type text into the ‘Lineage’ box, but if it differs in any way from one of the selections in the drop-down box any text below will be removed. Manual mode: No matter what you select or enter into the ‘Lineage’ box, existing text in this section will remain unchanged. You can change or add any text in the ‘Lineage’ box or any of the information below it.
9 – Heritage and Background
Select your Heritage and Background from the drop-down boxes. Autofill mode: The Languages and Traits for your Heritage will be filled in. Your Talent, Skill Proficiencies and Additional Proficiencies from your Background will be filled in. Manual mode: No matter what you select or enter into the ‘Heritage’ or ‘Background’ box, existing text in these sections will remain unchanged. You can change or add any text in either box or any of the information below them.
10 – Class Feature box
The content of this box will change depending on your character’s Class (number 7). It shows certain traits for the selected class that change based on class level and/or abilities and provides check boxes to track uses of limited use features. If no class is selected, or anything is entered into the Class box (number 7) other than what can be selected from its drop-down box, this will show the default Class Feature box which only shows a stylized die and contains an empty text box where you can enter any notes you may want.
11 – Advantages, Disadvantages, Languages and Luck Points
Enter any types of checks where you get advantage or disadvantage on the role, your known languages and track your luck points.
12 – Level
You must enter your character’s current level in this box.
13 – Proficiency Bonus, Initiative Modifier, Heroic Inspiration, Passive Perception, Death Saves, and Exhaustion, Hit Dice, and Hit Points
Hit Dice Type, Proficiency Bonus, Initiative Modifier and Passive Perception will be calculated and filled in for you. The check boxes in Heroic Inspiration, Death Saves, and Exhaustion are for you to check off as needed during play. You should enter your MAX Hit Dice. The Used Hit Dice, Current and Temp Hit points are for you to use to track them during play.
14 – Armor Class
Select the type of armor you are wearing, or “Unarmored” and select “Shield” or “No Shield”. Your Armor Class (AC) is displayed in the shield symbol. It is your Basic AC + the bonus you get if you have a Shield. The Basic AC is calculated by adding together the values in the three boxes under your armor type (or “No Armor”). Your shield bonus is +2 but if you have a magic shield you can select the bonus from the drop-down menu in the OTHER box under the Shield/No Shield box. Autofill mode: Armor: When you select an armor type the BASE value will be entered in the first box. The MOD value will be filled in with your DEX Modifier if it is Light armor, and your DEX Modifier (max 2) if it is Medium armor, and “None” if it is Heavy armor. The OTHER box is for you to enter any magical + it may have. Unarmored: If you have selected “Unarmored” the BASE will be 10 and MOD will be your DEX Modifier. If your Class is Barbarian the BASE will be 13 and MOD will be your CON Modifier. If your Class is Monk the BASE will be 10, MOD will be your DEX Modifier and OTHER will be your WIS Modifier. If not used otherwise, you can use the OTHER box to enter any other modifier you may get to your AC when unarmored. (If your character is a Sorcerer, the third level feature “Draconic Resilience” gives you an unarmored AC of 13 + your DEX Modifier. This is the only one that isn’t done for you. You will need to switch to Manual Mode to enter that. CAUTION: later switching back to Autofill Mode will replace anything you have entered anywhere on this page while in Manual Mode back to its autofill status. Manual mode: All of these boxes are to be filled in by you. The totals are still added up and show as your AC in the big armor class shield.
15 – Features, Traits and Talents
You can enter any information you want in these text boxes. They are intended for you to list your characters Features, Traits, Talents and any reminders you may want to include.
16 – Skills
The ability modifier to use for each different skill check is listed here. Empty circles indicate your character is not proficient in that skill. Click once on an empty circle to fill that circle, indicating that you are proficient in that skill. Your Proficiency Bonus will be added to your ability modifier for that skill check. Click on the filled circle and a slightly larger circle will be added around the filled one, indicating that you can add double your proficiency bonus to this skill check, and the number will change to reflect this change. Click on this same circle again and it will change to a half-filled circle, indicating that you add only half your proficiency bonus to this skill check and the number will change again. Click on it one more time and it will change back to not proficient. Stealth: To the right of the stealth skill is a checkbox in front of the word “Disadvantage”. This box will automatically be checked as a reminder to you if the type of armor you are wearing gives you Disadvantage on DEX (Stealth) checks. It will automatically be checked if your armor has the “Noisy” property.
17 – Physical Description
Refer to the information on your Lineage, but within those general guidelines your character can look any way that you want.
18 – Character Sketch
If your PDF reader supports it, you can click on the image area and it will pop-up a “Select Icon” menu where you can select an image you have access to. Or just draw a picture of your character in the frame.
19 – Weapons
Select a weapon from the drop-down menu.
Select an Ability from the drop-down above the second column of boxes to will apply that ability’s modifier to the attack bonus. This should typically be STR for melee weapons and DEX for ranged weapons.
Click on the check box between the two boxes below that to also apply that modifier to the damage calculation. You don’t add your ability modifier to the damage when attacking with second weapon in your other hand unless the modifier is negative.
If you have proficiency in the use of this weapon, click on the circle next to “Proficient”. (This will fill in the circle and replace the word “None” in the attack bonus row with the value of your Proficiency Bonus.)
If this is a magic weapon select the magical bonus from either of the drop-downs in that column. The magic bonus will show up in both boxes and be applied to the attack bonus and to the damage.
To add additional modifiers to the attack bonus or to the damage select the modifier from the box in the MISC. column. Autofill mode: The Weapon Properties, Reach and/or Range, and Damage Dice will be filled in for you. On the line under the weapons name, it will list the weapon’s properties and the weapon options (if any) in square brackets. Manual mode: You will have to fill in the Weapon Properties, Reach and/or Range, Damage Type, and Damage Dice boxes.
20 – Ammo Check boxes
For weapons that use ammunition, you can use these boxes to check off your ammunition as it is used.
21 – Update Calculations
All of the information filled in automatically for you should update whenever you make any change. Sometimes it doesn’t. You can press this button to force the form to update all of the calculated fields. Note: This selection box will not appear on the printed page.
22 – Clear
Be careful to not press this unless you want to erase everything from all of the fields on all pages. If you press it by accident, you may be able to recover the lost information if you press CTRL Z. This button is useful for clearing all fields and starting over, or before printing a blank form to fill out by hand. Note: This selection box will not appear on the printed page.
PAGE 2
Note: There is no Autofill or Manual mode for this sheet, although the Adventuring Gear section (number 29) has a “No Pack” option that is similar to Manual mode that only applies to the Adventuring Gear section.
All Equipment Lists
For all items in the Armor, Shield, Weapons, Ammunition, Equipment, and Adventuring Gear sections.
Item Selection: The drop-down will only lists items of the appropriate type. For example: Item selection in the Tools section will only list tools. If you have an item that is not on the drop-down menu, or you want to modify a name, you can type anything you want in the box. (Refer to number 29 for exceptions.) Track: If this box is selected a check mark will appear in the box and the cost and weight of this item will be included in the boxes labeled “Tracked Cost” and “Tracked Weight,” found at the bottom of the “Adventuring Gear” section. #: Number, or quantity. You will need to enter a number in this box for how many of this item you have. If you leave this box empty (it will not display the number 0) the Cost and Weight boxes will remain empty. Magic Bonus: (Only found on the Armor, Shield, and Weapons sections.) You can select a magic modifier to apply to the item from the drop-down menu. Cost: This box will contain the cost of the item. It takes the cost from the PG and multiplies that by the number of items. If the text in the item box doesn’t match exactly any option on the drop-down, no calculations are made and you can enter or change the cost. You can’t enter the cost in cp, sp, or pp. You will need to convert the cost into its value in gold pieces, or fractions of a gp. 1 CP = 0.01 GP, 1 SP = 0.1 GP , 1 PP = 10 GP. Note: If the text in the item box isn’t on the drop-down list, the cost you enter here will ignore the number in the # column. Also note that this is the price of the item. If you later sell the item you will typically only be able to sell it for a maximum of 1/2 its original value. There are some exceptions, such as for gems and coins. Weight: This box will contain the weight of the item (in pounds). It takes the weight from the PHB and multiplies that by the number of items. If the text in the item box doesn’t match exactly any option on the drop-down, no calculations are made and you can enter or change the weight. Note: If the text in the item box isn’t on the drop-down list, it will ignore the number in the # column.
23 – Character’s Name and #____
Character’s Name and Character sheet version (see 2 & 3 on page 1).
24 – Armor & Shield
ARMOR: Select the armor you are wearing (or select “No Armor”). The text here will also appear on page 1 (number 14), and used to calculate your armor class. The text can be entered or changed on either page. If the text here doesn’t match exactly what is on the drop-down menu the AC calculation on Page 1 may be inaccurate. Magic Bonus: This will appear on page 1 as a magic + for any armor, or as OTHER if unarmored. Exception: This value will be ignored when unarmored if your class is Monk. SHIELD: Select “Shield” or “No Shield”. The text here will also appear on page 1 (number 14), and used to calculate your armor class. The text can be entered or changed on either page. If the text here doesn’t match exactly what is on the drop-down menu the AC calculation on Page 1 may be inaccurate. Magic Bonus: This is added as a bonus to your armor class with or without a shield. (It can be changed here or on page 1.)
25 – Weapons
Select your Weapons from the drop down menu. They will appear in the same order here and on page 1 (number 19). The text can be entered or changed on either page. If the text here doesn’t match exactly what is on the drop-down menu the Attack Bonus and Damage for this weapon on Page 1 may be inaccurate. Magic Bonus: This will appear on page 1 as a magic + for the weapon and can be selected on either page.
26 – Ammunition
Select your Ammunition from the drop down menu. Note that the Cost and Weight are calculated based on the cost and weight of one item and most ammunition is sold in bundles of multiple items. So if, for example, you purchase 20 arrows, be sure to enter 20 in the number column to get an accurate cost and weight calculation.
27 – Tools
Select any Tools from the drop down menu.
28 – Equipment
Select Equipment from the drop down menu. You may want to first enter your starting Equipment in the Adventuring Gear section. Both sections contain the same drop-down list of items.
29 – Adventuring Gear
This section is to automate the selection of bundles of items that are available as “Equipment Packs” in the PG, many of which are available options with your chosen background. Selecting a Pack: When you select a pack (by checking the box by the name of the pack) all of the Number, Name, Cost, and Weight boxes in this section will be cleared and replaced with the items available in that pack. As long as one of the packs is selected you can’t make any changes to this list. Selecting “No Pack”: When you select “No Pack” the “Adventuring Gear” section will function exactly the same as the “Equipment” section. It is important to note that this does not clear any of the current information in this section so you could, for example, select the Explorer’s Pack and then select No Pack, leaving all the items that came with the Explorer’s Pack. You could then remove, add or change items as you choose. COINS: The coins section at the bottom of the “Adventuring Gear” section is unaffected by the selection of any Pack. This row is where you can track your money, in the form of CP (Coper Pieces), SP (Silver Pieces), GP (Gold Pieces), and PP (Platinum Pieces). Tracked Cost & Tracked Weight: These show the Totals (in GP and pounds) of all the items you have checked for tracking. This is an easy way to see how much weight you are carrying. You could easily choose to not track items that you have in a bag of holding for example, or items you own but are not currently carrying. Another tip; if you are on a shopping spree, you can select the items you are thinking of buying and only select them to track. That will give you a quick cost total.
30 – Trinket
This is a section where you may want to enter the description of a unique item. It’s cost and quantity will not be tracked.
31 – Treasure
This has two text fields, one for a name like “Treasure from the Dragon’s hoard.” And a largr area for listing multiple items. These will not be tracked.
32 – Magic Items
There is space here to list 4 magic items. There is a field above the box for the item’s name and a larger text field in the box for a description. The check box beside the word “Attuned” can be checked if you are attuned to the magic item. (You can be attuned to no more than a number of items equal to its proficiency bonus (PB) at any one time.)
PAGE 3
33 – Character’s Name and #____
Character’s Name and Character sheet version (see numbers 2 & 3).
34 – Adventure Motivation
This is where you can enter the Adventuring Motivation you selected from those suggested by your background, for one you created.
35 – Backstory
Many players like (and some GMs require you) to come up with a character backstory. Players create backstories for their D&D characters to add depth, motivation, and personality to their roles in the game. A well-crafted backstory can enhance roleplaying, provide plot hooks for the GM, and make the character more engaging for both the player and the party.
There is plenty of room here to also add any notes about your character that don’t easily fit elsewhere on the character sheet.
36 – Allies and Organizations
A place to list the names and something about the other Player Characters (PCs) in the game, along with who the character belongs to. There may be organizations in the game world that you want to remember. Some may be friendly and some not.
PAGE 4
37 – Autofill/Manual Selection Box
This selection box is independent of the similar one on page 1. Be aware that one page might be set to Autofill and the other one set to Manual. Select ‘Autofill’ mode to automatically fill in portions of this page based on your choices, as described below. Choose ‘Manual’ mode to keep existing information unchanged and make your own edits. Note: This selection box will not appear on the printed page.
38 – Your Character’s Class
Autofill mode: Your Character’s Class as it appears on page 1, will be copied here. Manual mode: When you switch this to Manual mode, any text here remains, but you can edit, delete or change it.
39 – Character’s Name and #____
Character’s Name and Character sheet version (see numbers 2 & 3).
40 – Spellcasting Ability
Autofill mode: This will show the ability used by this class of spellcaster. You can’t change the text. Manual mode: You can change the text,
41 – Subclass
Autofill mode: This will reflect the sub-class that is on page 1. Manual mode: The text in this field is fully editable.
42 – Save DC and Attack Bonus
Autofill mode: The spellcaster’s save DC and attack bonus is calculated and displayed here. Manual mode: You can change the number.
43 – Spells Known or Prepared
Autofill mode: If the spellcaster has a limited number of spells they know or that they can prepare, that number is displayed here. You cannot change the number. Manual mode: You can change the number.
44 – Rituals Known
Autofill mode: If the spellcaster can cast Rituals, the number they have available is displayed here. You cannot change the number. Manual mode: You can change the number.
45 – Spell Slots and Castings
Autofill mode: The spellcaster’s number of spell slots is calculated for each spell level and displayed here. You cannot change the numbers. Manual mode: You can change the numbers. Castings: The check boxes are for you to use during your game to check off the spell slots as you use them.
46 – A space for notes
This area is where you can enter notes specific to your spellcasting features and abilities.
47 – Known Cantrips
Autofill mode: The number of cantrips you can know is calculated based on your class level is calculated and displayed here. You cannot change this number. Manual mode: You can change the number.
48 – Another space for notes
This space at the top of the list of spells of each level is for any notes you may want to keep regarding spells of this level.
49 – Spell List
You can enter the name of the spells you have access to for each spell level. You can enter anything you want here. You might want to include the page number where the spell can be found in the PG. I like to include things [C] for concentration. Note: The example character sheet is for a Druid that can cast Leaf Ring spells without preparing them. I have indicated that with this symbol: [●]. This is a standard text filled circle, feel free to copy it from here and past it into any text field on this character sheet.
50 – Prepared Spells
If your Class has you prepare a certain number of spells from your list of spells, you can indicate the prepared spells by filling in the circle (by clicking on it). If you click on it a second time it will be replaced by the letter “R” Use this to indicate a Ritual spell that you know. You don’t have to have a Ritual Spell prepared to cast it. Clicking it a third time returns it to a circle.
Multiclass
To use this character sheet for a multiclass character there are two options.
Option 1. One way is to simply switch to Manual mode and enter everything any way you want. Option 2. To take full advantage of the features available on this character sheet I recommend the following:
Create a level 1 character in Autofill mode. Enter all its weapons, armor, and equipment.
When you are ready to add a second class switch to Manualmode (if you haven’t already).
In the Class box (number 7) add the level for the current class and the name of the second class and its level. For example, if you have a third level Barbarian and add two levels of Sorcerer you might enter its class as: Barbarian,3 Sorcerer,2.
Make changes as required to the other class related features on this section. You can delete anything that no longer applies or that you don’t need to reference.
The Class Feature box (number 11) will change to allow several lines of text. You can use this area to enter information you want to keep track of, or that won’t easily fit in other places on the sheet.
Enter the combined level of all of your classes in the “Level” box (number 12). This is important because many calculated values are based on this.
On page 4, select “Manual” mode and make any needed changes.
Final Comments
The main thing to remember is that the character sheet is yours. Use it in any way that makes sense to you. You can write outside the boxes, use circles and arrows, scribble in the margins, or use it in any way that you choose. Also, you don’t have to completely fill out every box before you start playing. If you never decide on your character’s eye color, it won’t affect the game. [As a DM, I do strongly recommend that you give your character a name before your second gaming session. I have played too many times with one or more “no name” characters. This can be a distraction.]
Here are a couple of tips. First, if you are using a printed character sheet, use pencil instead of ink. Many things can happen during an adventure that can cause things to change so keep an eraser handy. Second, if you can cast spells, you might want to use one or more weapon boxes on page 1 for quick reference to your favorite offensive spells.
Having problems? Occasionally users of my previous Character Sheet would report issues with getting everything to work. The problem has typically been with the PDF reader they are using. Problems with the PDF reader in their browser were common. If you have access to a desktop computer running Windows, I recommend you first download a copy of the file to your hard drive. Then open the file using your preferred PDF reader. The most popular one is the free “Adobe Acrobat” PDF Reader. This Character Sheet has been tested on that and it all appears to work. If you are curious, I created this using PDF-XChange Editor.
Call to action. I’m always looking to improve my resources for the D&D community! I would love to hear your feedback on this new character sheet. Let me know what you think in the comments below. If you encounter any issues using the sheet, please report them so I can address them. And if you have any suggestions for improvement, I’m all ears! Your input helps me create the best possible tools for fellow Dungeon Masters and players.
Here is the form fillable 2024 D&D Character Sheet you have been waiting for!
This incorporates the 2024 changes to the fifth edition of Dungeons and Dragons (that I call D&D 5.5) found in the new Players Handbook (PHB). If you are familiar with the previous version of my Character Sheet you will find that it has change in many ways. It is still 4 pages, 2 sheets if printed on both sides. (Note that I will be referring to the set of all 4 pages in the singular, as the “character sheet”.) Page one has all of your character’s basic information and all you need for combat other than your spells. Page two is just for equipment and treasure. Page three is Character background and notes. Page four is for magic spells. As before, it can be printed blank and filled out with a pencil, or you can fill in the forms on your device and most of the calculations will be done for you. It automatically calculates; ability and saving throw modifiers, carrying capacity and jump distances, Armor Class, Proficiency Bonus, Passive Perception, Skill check modifiers, Weapon attack bonus and damage, Equipment cost and weight, and more. It can fill in all the adventuring gear you get if you select an equipment pack (such as an “Explorer’s Pack”). In addition to that, it contains a new Autofill option that can fill in all the standard information based on your class, species and background. There is no need for a separate character sheet for each different class, or for multiclass, you only need this one sheet. (Watch for updated Class Feature Sheets in a future post.)
Update #1: 2/8/2025 Minor revisions and changes Thanks a lot to Anonymous for pointing out some errors, and I found a few more. Many were Adobe Acrobat not displaying everything the same way that PDF-XChange Editor does. And I made a few other, mostly cosmetic, changes. I also updated the instructions.
Update #2: 2/26/2025 Corrected Sub Species Sub Species was only displaying a number. Now you can select a sub species (if any are available) for the chosen Species.
Update #3: 3/7/2025 Display of Total Item Costs Corrected a problem that, when using Adobe Acrobat, the total cost of tracked items would sometimes display a huge number.
Filling in the 5E Character Sheet
These instructions are for use with the character sheet you can download above. You can print a blank Character Sheet and fill it out by hand. If you fill it out on your device, many boxes will be filled in for you. There is information at the end of this on how to use this sheet for multi-class characters.
PAGE 1
1 – Autofill/Manual Selection Box
This selection box is independent of the similar one on page 4. Be aware that one page might be set to Autofill and the other one set to Manual. Select ‘Autofill’ mode to automatically fill in portions of this page based on your choices, as described below. Choose ‘Manual’ mode to keep existing information unchanged and make your own edits. CAUTION: If you switch to ‘Manual’ mode to make a few changes and then switch back to ‘Autofill’ mode, all your changes will be lost, replaced by the ‘Autofill’ information. I recommend you leave it in ‘Autofill’ mode until you are finished with Page 1, including your weapons and armor. You can then safely change to ‘Manual’ mode and make changes and additions. You may want to make a backup copy of your sheet before making changes. Each of the numbered sections below where this selection makes a difference will include a description for both Autofill mode and Manual mode. Note: This selection box will not appear on the printed page.
2 – Your Character’s Name
The text you enter here will also appear in the same location on the other pages. The text can be entered or changed on any page.
3 – #____
Character sheet version. If you make multiple copies of your character sheet enter the version number here. Like the Character Name, this text will also appear on the other pages.
4 – Campaign Information
This is where you enter your name, the name of the campaign you are using this character in and the date it was created.
5 – XP/Milestones Selection Box
If ‘XP’ is selected the Next Level Goal will be calculated and entered for you here based on your current character level (see below). If “Milestones” is selected the text on this line will be replaced by a “Notes” section. Note: This selection box will not appear on printed pages.
6 – Ability Sores
Enter your ability scores in the boxes. All the data to the right of the ability scores will be filled in for you based on the ability scores, including your carrying and jumping stats based on your strength score. Check the little box next to the Saving Throw modifier to indicate that abilities Saving Throw Proficiency.
7 – Class
Select your Class from the drop-down box. The Class Feature box (number 11 below) will display information relevant to that class. Subclass: You can select a subclass from the drop-down menu. Autofill mode: All the information from the Class Features section in the PG for this Class will be filled in, down to (but not including) Starting Equipment. If there is any current text in any of these areas it will be removed. You can also type text into this ‘Class’ box, but if it differs in any way from one of the selections in the drop-down box any text below will be removed. Manual mode: No matter what you select or enter into the “Class’ box, existing text in this section will remain unchanged. You can change or add any text in the ‘Class’ box or any of the information below it.
8 – Species
Select your Species from the drop-down box. Sub Species: You can also type in the name of a Sub Species or select one from its own drop-down. Whatever you enter for the Sub Species has no effect on any other text. Autofill mode: All the information from the Traits table in the PHB for this Species will be filled in. If there is any current text in any of these areas it will be removed. You can also type text into this ‘Species’ box, but if it differs in any way from one of the selections in the drop-down box any text below will be removed. Manual mode: No matter what you select or enter into the ‘Species’ box, existing text in this section will remain unchanged. You can change or add any text in the ‘Species’ box or any of the information below it.
9 – Background
Select your Background from the drop-down box. Autofill mode: All the information from the Traits table in the PHB for this Background will be filled in. If there is any current text in any of these areas it will be removed. You can also type text into this ‘Background’ box, but if it differs in any way from one of the selections in the drop-down box any text below will be removed. Manual mode: No matter what you select or enter into the ‘Background’ box, existing text in this section will remain unchanged. You can change or add any text in the ‘Background’ box or any of the information below it.
10 – Level
You must enter your character’s current level in this box.
The content of this box will change depending on your character’s Class (number 7). It shows certain traits for the selected class that change based on class level and/or abilities and provides check boxes to track uses of limited use features. If no class is selected, or anything is entered into the Class box (number 7) other than what can be selected from its drop-down box, this will show the default Class Feature box which only shows a stylized die and contains an empty text box.
12 – Notes, Advantages, Disadvantages, Languages, Alignment, Hit Dice, and Hit Points
Autofill mode: Under Hit Dice, the Type and Max boxes will be filled in for you based on your Class and character level. The rest are to be filled in by you. Manual mode: All of these boxes are to be filled in by you.
13 – Proficiency Bonus, Initiative Modifier, Heroic Inspiration, Passive Perception, Death Saves, and Exhaustion
Proficiency Bonus, Initiative Modifier and Passive Perception will be calculated and filled in for you. The check boxes in Heroic Inspiration, Death Saves, and Exhaustion are for you to check off as needed during play.
14 – Armor Class
Select the type of armor you are wearing, or “Unarmored” and select “Shield” or “No Shield”. Your Armor Class (AC) is displayed in the shield symbol. It is your Basic AC + the bonus you get if you have a Shield. The Basic AC is calculated by adding together the values in the three boxes under your armor type (or “No Armor”). Your shield bonus is +2 but if you have a magic shield you can select the bonus from the drop-down menu in the OTHER box under the Shield/No Shield box. Autofill mode:Armor: When you select an armor type the BASE value will be entered in the first box. The MOD value will be filled in with your DEX Modifier if it is Light armor, and your DEX Modifier (max 2) if it is Medium armor, and “None” if it is Heavy armor. The OTHER box is for you to enter any magical + it may have. Unarmored: If you have selected “Unarmored” the BASE will be 10 and MOD will be your DEX Modifier. If your Class is Barbarian the OTHER box will be your CON Modifier, and your WIS Modifier if you are a Monk. If not used otherwise, you can use the OTHER box to enter any other modifier you may get to your AC when unarmored. (If your character is a Sorcerer, with a Draconic Sorcery subclass, enter your CHA Modifier in the OTHER box. This is the only one that isn’t done for you.) Manual mode: All of these boxes are to be filled in by you. The totals are still added up and show as your AC in the big armor class shield.
15 – Features, Traits and Feats
You can enter any information you want in these text boxes. They are intended for you to list your characters Features, Traits and Feats and any reminders you may want to include.
16 – Skills
The ability modifier to use for each different skill check is listed here. Empty circles indicate your character is not proficient in that skill. Click once on an empty circle to fill that circle, indicating that you are proficient in that skill. Your Proficiency Bonus will be added to your ability modifier for that skill check. Click on the filled circle and a slightly larger circle will be added around the filled one, indicating that you can add double your proficiency bonus to this skill check, and the number will change to reflect this change. Click on this same circle again and it will change to a half-filled circle, indicating that you add only half your proficiency bonus to this skill check and the number will change again. Click on it one more time and it will change back to not proficient. Stealth: To the right of the stealth skill is a checkbox in front of the word “Disadvantage”. This box will automatically be checked as a reminder to you if the type of armor you are wearing gives you Disadvantage on DEX (Stealth) checks.
17 – Physical Description
Refer to the information on your Species, but within those general guidelines your character can look any way that you want.
18 – Character Sketch
If your PDF reader supports it, you can click on the image area and it will pop-up a “Select Icon” menu where you can select an image you have access to. Or just draw a picture of your character in the frame.
19 – Weapons
A. Select a weapon from the drop-down menu. B. Select an Ability from the drop-down above the second column of boxes (this will apply that ability’s modifier to the attack bonus.) C. Click on the check box between the two boxes below that to also apply that modifier to the damage calculation. D. If you have proficiency in the use of this weapon, click on the circle next to “Proficient”. (This will fill in the circle and replace the word “None” in the attack bonus row with the value of your Proficiency Bonus.) E. If you weapon mastery in this weapon, click the circle next to the word “Mastery.” (This will fill in the circle.) F. If this is a magic weapon select the magical bonus from either of the drop-downs in that column. The magic bonus will show up in both boxes and be applied to the attack bonus and to the damage. G. If there are any other modifications that you want to add to the attack bonus or to the damage select the modifier from the associated box in the MISC. column. Autofill mode: The Weapon Properties, Reach and/or Range, and Damage Dice will be filled in for you. If you click the circle next to the word “Mastery” it will not only fill in the circle but it will also add the name of the Mastery Feature in square brackets to the Weapon Properties text. Manual mode: You will have to fill in the Weapon Properties, Reach and/or Range, Damage Dice boxes.
20 – Ammo Check boxes
For weapons that use ammunition, you can use these boxes to check off your ammunition as it is used.
21 – Update Calculations
All of the information filled in automatically for you should update whenever you make any change. Sometimes it doesn’t. You can press this button to force the form to update all of the calculated fields. Note: This selection box will not appear on printed pages.
22 – Clear
Be careful to not press this unless you want to erase everything from all of the fields on all pages. If you press it by accident, you may be able to recover the lost information if you press CTRL Z. This button is useful for clearing all fields and starting over, or before printing a blank form to fill out by hand. Note: This selection box will not appear on printed pages.
PAGE 2
Note: There is no Autofill or Manual mode for this sheet, although Adventuring Gear has a “No Pack” option that is similar to Autofill that only applies to that section.
All Equipment Lists
For all items in the Armor, Shield, Weapons, Ammunition, Equipment, and Adventuring Gear sections.
Item Selection: The drop-down will only lists items of the appropriate type. For example: Item selection in the Tools section will only list tools. If you have an item that is not on the drop-down menu, or you want to modify a name, you can type anything you want in the box. (Refer to ’29 – Adventuring Gear’ below, for exceptions.) Track: If this box is selected a check mark will appear in the box and the cost and weight of this item will be included in the boxes labeled “Tracked Cost” and “Tracked Weight,” found at the bottom of the “Adventuring Gear” section. #: Number, or quantity. You will need to enter a number in this box for how many of this item you have. If you leave this box empty (it will not display the number 0) the Cost and Weight boxes will remain empty. Magic Bonus: (Only found on the Armor, Shield, and Weapons sections.) You can select a magic modifier to apply to the item from the drop-down menu. Cost: This box will contain the cost of the item. It takes the cost from the PG and multiplies that by the number of items. If the text in the item box doesn’t match exactly any option on the drop-down, no calculations are made and you can enter or change the cost. You can’t enter the cost in cp, sp, or pp. You will need to convert the cost into its value in gold pieces, or fractions of a gp. 1 CP = 0.01 GP, 1 SP = 0.1 GP , 1 PP = 10 GP. Note: If the text in the item box isn’t on the drop-down list, the cost you enter here will ignore the number in the # column. Also note that this is the price of the item. If you later sell the item you will typically only be able to sell it for a maximum of 1/2 its original value. There are some exceptions, such as for gems and coins. Weight: This box will contain the weight of the item (in pounds). It takes the weight from the PHB and multiplies that by the number of items. If the text in the item box doesn’t match exactly any option on the drop-down, no calculations are made and you can enter or change the weight. Note: If the text in the item box isn’t on the drop-down list, it will ignore the number in the # column.
23 – Character’s Name and #____
Character’s Name and Character sheet version (see numbers 2 & 3).
24 – Armor & Shield
ARMOR: Select the armor you are wearing (or select “No Armor”). The text here will also appear on page 1 (number 14 ), and used to calculate your armor class. The text can be entered or changed on either page. If the text here doesn’t match exactly what is on the drop-down menu the AC calculation on Page 1 may be inaccurate. Magic Bonus: This will appear on page 1 as a magic + for any armor, but just as OTHER if unarmored. Exception: This value will be ignored when unarmored if your class is Barbarian or Monk. SHIELD: Select “Shield” or “No Shield”. The text here will also appear on page 1 (number 14), and used to calculate your armor class. The text can be entered or changed on either page. If the text here doesn’t match exactly what is on the drop-down menu the AC calculation on Page 1 may be inaccurate. Magic Bonus: This be added as a magic + to your armor class with or without a shield. (it can be changed on either page.)
25 – Weapons
Select your Weapons from the drop down menu. They will appear in the same order here and on page 1 (number 19). The text can be entered or changed on either page. If the text here doesn’t match exactly what is on the drop-down menu the Attack Bonus and Damage for this weapon on Page 1 may be inaccurate. Magic Bonus: This will appear on page 1 as a magic + for the weapon and can be selected on either page.
26 – Ammunition
Select your Ammunition from the drop down menu. Note that the Cost and Weight are calculated based on the cost and weight of one item and most ammunition is sold in bundles of multiple items. So if, for example, you purchase 20 arrows, be sure to enter 20 in the number column to get an accurate cost and weight calculation.
27 – Tools
Select any Tools from the drop down menu.
28 – Equipment
Select Equipment from the drop down menu. You may want to first enter your starting Equipment in the Adventuring Gear section. Both sections contain the same drop-down list of items.
29 – Adventuring Gear
This section is to automate the selection of bundles of items that are available as “Equipment Packs” in the PG, many of which are available options with your chosen background. Selecting a Pack: When you select a pack (by checking the box by the name of the pack) all of the Number, Name, Cost, and Weight boxes in this section will be cleared and replaced with the items available in that pack. As long as one of the packs is selected you can’t make any changes to this list. Selecting “No Pack”: When you select “No Pack” the “Adventuring Gear” section will function exactly the same as the “Equipment” section. It is important to note that this does not clear any of the current information in this section so you could, for example, select the Explorer’s Pack and then select No Pack, leaving all the items that came with the Explorer’s Pack. You could then remove, add or change items as you choose. COINS: The coins section at the bottom of the “Adventuring Gear” section is unaffected by the selection of any Pack. This row is where you can track your money, in the form of CP (Coper Pieces), EP (Electrum Pieces), SP (Silver Pieces), GP (Gold Pieces), and PP (Platinum Pieces). Tracked Cost & Tracked Weight: These show the Totals (in GP and pounds) of all the items you have checked for tracking. This is an easy way to see how much weight you are carrying. You could easily choose to not track items that you have in a bag of holding for example, or items you own but are not currently carrying. Another tip; if you are on a shopping spree, you can select the items you are thinking of buying and only select them to track. That will give you a quick cost total.
30 – Trinket
There are two text fields here. The upper one is one line for a short mane and the larger one for a more lengthy description.
31 – Treasure
Like trinket (number 30) this also has two text fields, but more room for listing several items.
32 – Magic Items
There is space here to list 5 magic items. There is a field above the box for the item’s name and a larger text field in the box for a description. The check box beside the word “Attuned” can be checked if you are attuned to the magic item. (You can be attuned to no more than 3 magic items.)
PAGE 3
33 – Character’s Name and #____
Character’s Name and Character sheet version (see numbers 2 & 3 on page 1).
34 – Adventure Motivation
This is a good place to describe why your character has chosen to become an adventurer.
35 – Backstory
Many players like (and some DMs require you) to come up with a character backstory. Players create backstories for their D&D characters to add depth, motivation, and personality to their roles in the game. A well-crafted backstory can enhance roleplaying, provide plot hooks for the DM, and make the character more engaging for both the player and the party.
There is plenty of room here to also add any notes about your character that don’t easily fit elsewhere on the character sheet.
36 – Allies and Organizations
A place to list the names and something about the other Player Characters (PCs) in the game, along with who the character belongs to. There may be organizations in the game world that you want to remember. Some may be friendly and some not.
PAGE 4
37 – Your Character’s Class
This displays your character’s Class at it appears on page 1 (see number 7 on page 1). To change it, go to page 1.
38 – Autofill/Manual Selection Box
Select ‘Autofill’ mode to automatically fill in portions of this page based on your choices, as described below. Choose ‘Manual’ mode to keep existing information unchanged and make your own edits. Note: This selection box will not appear on printed pages.
39 – Character’s Name and #____
Character’s Name and Character sheet version (see numbers 2 & 3 on page 1).
40 – Spellcasting Ability
Autofill mode: This will show the ability used by this class of spellcaster. You can’t change the text. Manual mode: You can change the text,
41 – Subclass
Autofill mode: This will reflect the sub-class that is on page 1. Manual mode: The text in this field is fully editable.
42 – Save DC
Autofill mode: The spellcaster’s save DC and attack bonus is calculated and displayed here. Manual mode: You can change the number.
43 – Attack Bonus
Autofill mode: The spellcaster’s attack bonus is calculated and displayed here. Manual mode: You can change the number.
44 – Prepared Spells
Autofill mode: If the spellcaster has a limited number of spells they can prepare, that number is displayed here. You cannot change the number. Manual mode: You can change the number.
45 – Spell Slots and Castings
Autofill mode: The spellcaster’s number of spell slots is calculated for each spell level and displayed here. You cannot change the numbers. Manual mode: You can change the numbers. Castings: The check boxes are for you to use during your game to check off the spell slots as you use them.
46 – A space for notes
This area is where you can enter notes specific to your spellcasting features and abilities.
47 – Number of Cantrips
Autofill mode: The number of cantrips you can know is calculated based on your class level is calculated and displayed here. You cannot change this number. Manual mode: You can change the number.
48 – Another space for notes
This space at the top of the list of spells of each level is for any notes you may want to keep regarding spells of this level.
49 – Spell List
You can enter the name of the spells you have access to for each spell level. You can enter anything you want here. You might want to include the page number where the spell can be found in the PHB. I like to include things like [R] for ritual and [C] for concentration.
50 – Prepared Spells
If your Class requires you to prepare a certain number of spells from your list of spells, you can indicate the prepared spells by filling in the circle (by clicking on it).
Multiclass
To use this character sheet for a multiclass character there are two options.
Option 1. One way is to simply switch to Manual mode and enter everything any way you want. Option 2. To take full advantage of the features available on this character sheet I recommend the following:
Create a level 1 character in Autofill mode. Enter all its weapons, armor, and equipment. Then, if you want more levels in this class before adding a second class, go ahead and add them now.
When you are ready to add a second class switch to Manualmode (if you haven’t already).
In the Class box (number 7) add the level for the current class and the name of the second class and its level. For example, if you have a third level Barbarian and add two levels of Sorcerer you might enter Barbarian,3 Sorcerer,2.
Make changes as required to the other class related features on this section. You can delete anything that no longer applies or that you don’t need to reference.
The Class Feature box (number 10) will change to allow several lines of text. You can use this area to enter information you want to keep track of, or that won’t easily fit in other places on the sheet.
Enter the combined level of all of your classes in the “Level” box (number 12). This is important because many calculated values are based on this.
On page 4, select “Manual” mode and make any needed changes.
Final Comments
The main thing to remember is that the character sheet is yours. Use it in any way that makes sense to you. You can write outside the boxes, use circles and arrows, scribble in the margins, or use it in any way that you choose. Also, you don’t have to completely fill out every box before you start playing. If you never decide on your character’s eye color, it won’t affect the game. [As a DM, I do strongly recommend that you give your character a name before your second gaming session. I have played too many times with one or more “no name” characters. This can be a distraction.]
Here are a couple of tips. First, use pencil instead of ink. Many things can happen during an adventure that can cause things to change so keep an eraser handy. Second, if you can cast spells, you might want to use one or more weapon boxes on page 1 for quick reference to your favorite offensive spells.
Having problems? Occasionally users of my previous Character Sheet would report issues with getting everything to work. The problem has typically been with the PDF reader they are using. Problems with the PDF reader in their browser were common. If you have access to a desktop computer running Windows, I recommend you first download a copy of the file to your hard drive. Then open the file using your preferred PDF reader. The most popular one is the free “Adobe Acrobat” PDF Reader. This Character Sheet has been tested on that and it all appears to work. If you are curious, I created this using PDF-XChange Editor.
Call to action. I’m always looking to improve my resources for the D&D community! I would love to hear your feedback on this new character sheet. Let me know what you think in the comments below. If you encounter any issues using the sheet, please report them so I can address them. And if you have any suggestions for improvement, I’m all ears! Your input helps me create the best possible tools for fellow Dungeon Masters and players.
This is the seventh adventure in a series of adventures that I will be posting here, that will make up the “Its About Time” campaign arc. These adventures will take a group of adventurers from level 1 to level 20.
This is the seventh adventure in the series. This 54 page PDF file is a D&D 5E adventure for Dungeon Master’s (DMs) to take a group of 7th level Player Characters (PCs) to a future where the party arrive in a bleak future version of their city, only to find it ravaged by Lord Malachi, a corrupted vampire wizard who wields an artifact that alters ages. This corruption has attracted undead monsters and incited a power struggle between three groups; Malachi’s forces, the defenders of the Chronosphere Temple, and a growing number of Deathbringers. The adventure culminates in a three-way battle for control over the clock fragment, with the potential for an epic resolution that could alter the course of history. Even if you have no intention of running this adventure, it provides tools you may find useful in your campaign.
It throws the PCs into a future where the city they are in has been corrupted. For most of the keyed locations in the city there are two encounters; one for when the PCs are just randomly searching through an area they may be familiar with (or they were 100 years in the past), and one for when they have come to the area specifically searching for someone or something that they have reason to believe may be at this location.
It goes into detail on how to kill a vampire (it isn’t easy).
There is an example of how you can run a three-way combat with multiple creatures on each side.
It has 8 new magic items.
It has 19 new monsters and NPCs.
The Digital Accessories Pack includes images of Items and Monsters along with maps and monster tokens you can use in in your virtual table top game..
Check it out and let me know what you think about it in the comments section below.
The next adventure will be “AT-08 The Pirate Queen’s Ploy.”
This is the sixth adventure in a series of adventures that I will be posting here, that will make up the “Its About Time” campaign arc. These adventures will take a group of adventurers from level 1 to level 20.
This is the sixth adventure in the series. This 48 page PDF file is a D&D 5E adventure for Dungeon Master’s (DMs) to take a group of 6th level Player Characters (PCs) to a chaotic dimension where time magic runs rampant. They must navigate through warped landscapes and encounter bizarre creatures to retrieve another fragment of the shattered Clock of Aeons. Even if you have no intention of running this adventure, it provides tools you may find useful in your campaign.
It introduces the Temporal Winds, a chaotic and unpredictable dimension that exists outside of linear time. The Temporal Wilds is filled with temporal anomalies, which can cause time to flow at different rates or even reverse, and is home to a variety of creatures that have been displaced from different time periods.
It has 4 new magic items.
It has 25 New monsters.
The Digital Accessories Pack includes images of Items and Monsters along with maps and monster tokens you can use in in your virtual table top game.
Check it out and let me know what you think about it in the comments section below.
The next adventure will be “AT-07 Echoes of the Future,” where PCs will travel to a possible future ravaged by Thanatos’ influence. They will encounter monstrous versions of familiar creatures and glimpse the potential consequences of failing.
This is the fifth adventure in a series of adventures that I will be posting here, that will make up the “Its About Time” campaign arc. These adventures will take a group of adventurers from level 1 to level 20.
This is the fifth adventure in the series. This 50 page PDF file is a D&D 5E adventure for Dungeon Master’s (DMs) to take a group of 5th level Player Characters (PCs) to the city of Eldoria, where they purchase magical supplies before venturing into the Whispering Wood where they uncover forgotten lore about Thantos’ dark influence, and secure another artifact needed to prevent him destroying the world. Even if you have no intention of running this adventure, it provides tools you may find useful in your campaign.
It includes a new walled port city to explore that includes 17 keyed locations with descriptions of individuals, points of interest, and potential encounters, including a ruined temple to explore complete with monsters, traps and treasure.
It presents a trek through an enchanted forest searching for the next corrupted artifact used by the malevolent Thanatos to spread chaos.
It has 4 new magic items..
It has 12 New monsters including a Spectral Nymph and a Skeletal Dragon.
It includes a magic item price and availability system with a simple table where you can roll to determine how many (if any) of any particular magic item is available for purchase depending on its rarity and the size of the town.
Check it out and let me know what you think about it in the comments section below.
The next adventure will be “AT-06 The Temporal Wilds.” It starts as the heroes (now 6th level) stroll through the bustling Eldoria marketplace. A growing murmur among the crowd catches their attention. Suddenly, a deafening roar echoes through the city. A gaping tear in reality materializes, its edges shimmering with an otherworldly light. Before their eyes, unsuspecting citizens vanish into the abyss, their screams echoing through the panicked crowd. Monstrous creatures, their forms distorted and alien, begin to emerge from the rift. The heroes, their instincts honed by previous adventures, find themselves drawn to the heart of the chaos. The fate of the city, perhaps even the world, hangs in the balance. A new adventure unfolds, testing their courage, skill, and resolve.
This is the fourth adventure in a series of adventures that I will be posting here, that will make up the “Its About Time” campaign arc. These adventures will take a group of adventurers from level 1 to level 20.
This is the fourth adventure in the series. It is a D&D 5E adventure for Dungeon Master’s (DMs) to take a group of 4th level Player Characters (PCs) to Chronopolis, a lost city on the lawful plane of Mechanus. Here, they encounter temporal anomalies, puzzles guarded by Corrupted Modrons, and the long-dead ancestor of their friend Lander, all while searching for a fabled artifact: the Chronometer of Harmony. Even if you have no intention of running this adventure, it provides tools you may find useful in your campaign.
There are tips on using “Theater of the Mind”.
The digital accessories pack includes images for Items, Locations, Monsters and Tokens.
There are 12 new monsters, complete with stat blocks, images and tokens for use on virtual table tops (VTT).
For each encountered monster, it lists the page number where that monster can be found in the Monster Manuel or, for new monsters, in the adventure. It then has an abbreviated version of the monster’s stat block on the page with the encounter.
Check it out and let me know what you think about it in the comments section below.
The next adventure will be “AT-05 The Whispering Wood,” where the heroes, guided by Lander the flump and Puck the sprite, embark on a journey to retrieve a fragment of the Clock of Aeons hidden within the Whispering Wood, a remote enchanted forest in Manoria. Their path leads from a small fishing village of Saltport Cove to the bustling city of Eldoria, where they can seek magical supplies before venturing into the perilous woods. Within the Whispering Wood, they face guardians, solve time-based puzzles, and uncover forgotten lore about the Sundering and Thanatos’ dark influence. A climactic battle awaits them as they confront a creature twisted by Thanatos’ power, forcing them to utilize all their skills and resources to secure the Clock fragment and ensure the flow of time remains stable.