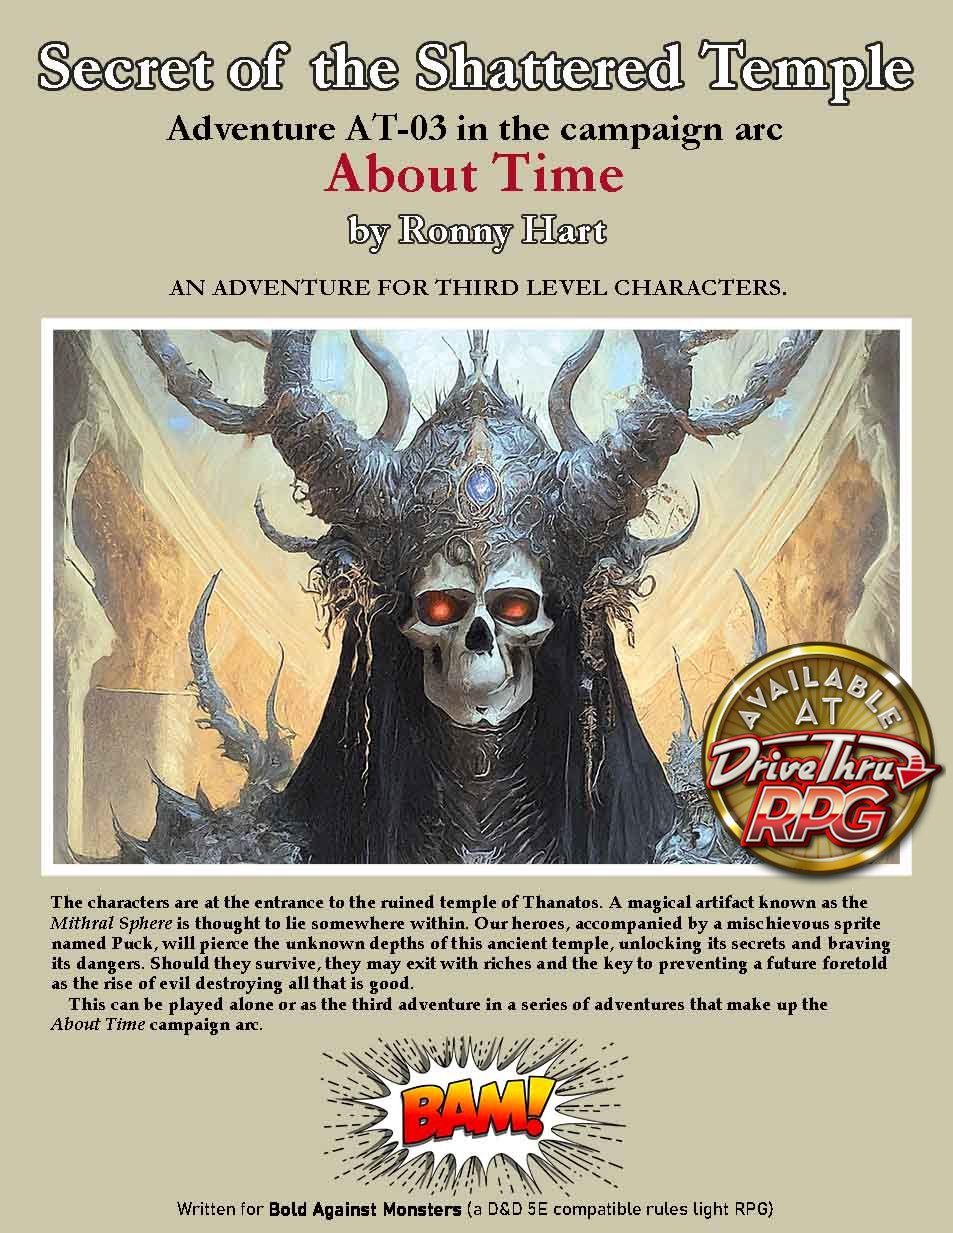
Secret of the Shattered Temple,written for 4 third level characters, can be played alone (a set-up is provided to play as a stand-alone adventure for newly-arrived PCs) or as the third adventure in a series of adventures that make up the About Time campaign arc. The previous adventure ended with our heroes locating the hidden entrance to the ruined temple of Thanatos on the island of Aethelgard. They were told by Lander, a Flying Cyanea with powerful magical abilities, about an artifact called the Mithral Sphere reported to be somewhere on the island. He said that they must find the artifact to prevent the future destruction of the world. Our heroes have searched the island and everything points to the artifact being in this ancient temple.
Also included:
➛ This is an old fashion dungeon crawl. The ancient temple consists of two levels, with a total of 39 numbered areas, with secret doors, traps and puzzles. ➛ There are tips for running a dungeon crawl. ➛ The entry for each area includes everything you need to run that encounter including: a separate map of just that area, how to handle any encounters, the full stat block for any monster and how it should act, and a simple list of all treasure that the PCs may have found. ➛ It has 18 monsters (3 of them new), all complete with full stat blocks and tokens. ➛ For each encountered monster, that monsters full stat block is included on the page with the encounter. ➛ There are three new magic items. ➛ It includes Puck, a companion for the group, a detailed and illustrated NPC with a full stat block and information to help the GM play the character, a tiny fey creature (sprite) with a playful nature. + Free VTT Pack with high quality Battle Maps and Tokens.
Quest for the Mithral Sphere is written for the rules light, D&D 5E compatible, RPG Bold Against Monsters (also called BAM). It requires either the use of the Bold Against Monsters Core Rule Book, or the D&D fifth edition Player’s Handbook, or the Tales of the Valiant Player’s Guide.
The first adventure was AT-01 An Ancient Evil – primarily an Urban Adventure. The second adventure was AT-02 Quest for the Mithral Sphere – a Micro-Hex Crawl, where the characters explored an island. This is the third adventure AT-03 Secret of the Shattered Temple – a Dungeon Crawl. The next adventure will be AT-04 The Cogs of Lost Time – a “Theater of the Mind” adventure set in the Clockwork Realm – a plane devoted to ultimate order inhabited by sentient Cyberbots.
If you would like to purchase Secret of the Shattered Temple as a soft cover book, or to support me by paying for the PDF, go to DriveThruRPG.
I introduced the It’s About Time Campaign arc here in May 2024 when I posted AT-01 An Ancient Evil. I haven’t finished writing these adventures. The last one I posted here was AT-08 The Pirate Queen’s Ploy in March this year. I still intend to finish these, but first I am re-writing them specifically for use with my new rules light 5E compatible RPG game rules Bold Against Monsters (BAM). I have just finished the first of these and it is now for sale on DriveThruRPG.
Because BAM only supports player characters up to 10th level, the target now is to wrap up the campaign at that level. I have also dropped the tie-in with my time travel rules. For those of you waiting for the conclusion of the original adventures, I apologize for the delay. Hopefully you will enjoy these revised adventures. I’m going to convert everything, other than the images, to avoid any copyright issues. I’m cleaning up and polishing all of the text. Practically every location and encounter will be improved. I think you will enjoy the new consistency and ease of play.
I am providing it free here as a thank you to my loyal followers on this blog.
Download your free PDF files below. These are the exact same files that I am selling on DriveThruRPG.
This is the first installment in a series of adventures collectively called About Time. An Ancient Evil starts out as an urban adventure for 4 first level characters, set in the small fishing village of Saltport Cove. It highlights many of the village’s locations. A mixture of encounters includes roleplaying, investigation, combat, and a festival with games where they compete with the local fishermen. Just before midnight, while celebrating the coming of the new year, a fireball zooms overhead and crashes into a nearby island causing a large wave to destroy much of the dock area. The party is hired to map the island and report any threats. As they step onto the island they are teleported to another location and 10,000 years into the past, where they fight monsters and learn of a threat to their entire world. They are then returned to the present where they can continue their exploration of the island in the next episode in the About Time campaign arc.
The fully bookmarked 36 page PDF includes: ➛ An abbreviated stat block for every NPC and monster on the page of the encounter, with a link to the full stat block in the appendix. ➛ An introduction to the world of Manoria – a new campaign setting. ➛ Manoria’s creation myth and the full BAM pantheon with all the major and minor deities, their domain, associated races, worshipers, alignment, and holy symbol. ➛ An overview of time travel with tips on solving potential paradoxes. ➛ Detailed and illustrated NPCs with full stat blocks and information to help the GM play the character. ➛ New monsters with full stat blocks: Barracuda Swarm, Buccaneer, Cave Lion, Cultist Fanatic, Mammoth Calf, Neanderthal Warrior, Giant Octopus, Minor Siren.
The VTT Pack includes: ➛ High quality Battle Maps ➛ Player handouts ➛ Tokens
An Ancient Evil is written for the rules light, D&D 5E compatible, RPG Bold Against Monsters (also called BAM). It requires the use of the Bold Against Monsters Core Rule Book (available free HERE), or the D&D fifth edition Player’s Handbook, or the Tales of the Valiant Player’s Guide.
If you would like to purchase An Ancient Evil as a soft cover book, or to support me by paying for the PDF, go to DriveThruRPG.
The print-on-demand book version of my Bold Against Monsters (BAM) is now available on DriveThruRPG. I found that it isn’t easy to charge for the printed version but make the PDF free (pay what you want). As a result, I no longer offer the PDF for free on DriveThruRPG. SO I AM POSTING IT HERE! For the foreseeable future, everything that I post for sale on DriveThruRPG, I will also post for free here.
I am providing these free here as a thank you to my loyal followers on this blog.
Download your free PDF files below. These are the exact same files that I am selling on DriveThruRPG, and are a major update to the rules I previously posted on this blog. They are all 8.5″ x 11″. The Rule book is full color, and the others are all black and white.
BAM Rules[80 page PDF 6,870 KB] BAM Character Sheet [1 page form-fillable PDF 1,015KB] You can select Ancestry, Class, Weapons, Equipment, and more from drop-down lists and many calculstions are done for you. BAM Class Reference Sheets [6 page PDF 112KB] Intend to be used along with the Character Sheet. BAM Weapons [4 page PDF 159KB] A list of every weapon type with information regarding their special features – useful when players are selecting their weapons. BAM Weapon Cards[22 page PDF 2,479KB] You can print these 2 sided and cut them out for cards, one for each weapon type. Perfect for each player to have a card for each of their character’s weapons, with that weapon’s properties and special features to use during game play. There is also space on the card to calculate the weapon’s bonuses to hit and damage. On the back is a drawing of the weapon along with its name and cost.
Bold against Monsters (or BAM) is a 5E compatible rules-light fantasy Role Playing Game (RPG). Everything needed to play or run a game is in this book. It is compatible with any published 5E adventure for characters up to level 10. It can serve as an introduction to 5E role playing for new players or anyone looking for a game with familiar characters you can easily create and quickly play. Character creation, level advancement, weapons, inventory tracking, proficiencies, spellcasting, combat, and more have been simplified.
BAM includes: ➛ Information on how BAM compares to D&D and how to convert 5E Adventures to BAM. ➛ Five ancestries (called “Race” in 5E, “Species” in 5.5): Beastkin (a bipedal humanoid with some beast features), Dwarf, Elf, Halfling, Human, and Half-Orc. ➛ Eighteen backgrounds: Acolyte, Chirurgeon, Cult Initiate, Farmer / Rancher, Herbalist, Jeweler, Mercenary, Minstrel, Noble, Ranger, Sailor, Scholar, Scout, Sheriff or Watchman, Soldier, Thief, Urchin,and Wizard’s Apprentice. ➛ Six classes: Barbarian, Cleric, Fighter, Paladin, Rogue, and Wizard. All the class features gained through all levels are presented on a single page. There are no subclasses and no multiclassing. Character Levels. Characters only advance to level 10. Gaining Feats: Every character gets a feat at level 1, 4, and 8. Humans get one additional feat at level 1. ➛ Twenty-five Feats: Ability Enhancement, Alert, Arcanist, Archer, Armor Expert, Armor Training, Athlete, Brawler, Careful Observer, Charger, Combat Caster, Elemental Savant, Fighting Styles, Medic, Polyglot, Quick, Savage Attacker, Scout, Shield Mastery, Spell Duelist, Strength of Mind, Tough, Trap Specialist, Vanguard, Weapon Expert, and Weapon training. ➛ Gear Slots: Each item you carry fills a number of gear slots that represents its approximate weight and/or its carrying difficulty. The number of filled gear slots you can carry is equal to 10 + twice your STR modifier (minimum of 10 slots total). ➛ Weapon Types: Weapons fall into 3 broad categories; Melee, Thrown, and Ranged. Each of those are further divided into Light, Medium, or Heavy. ➛ Weapon special features: Most of the weapons have a feature that is unique to that weapon. For example, for the Javalin; “On a critical hit: Rather than doing damage, you can choose to pin a humanoid target to an adjacent wall or surface. Its speed becomes 0 until the start of your next turn, unless the target, or another creature, uses its action to release the target.” ➛ Deities: Clerics and Paladins are required to specify which deity they worship. The BAM pantheon is provided should you choose to use it. ➛ Combat: On your turn you can move up to your speed and perform one action, Or you can move twice if you don’t perform any action. ➛ Spellcasting: There are no Spell Slots. You can cast any spell you know. To cast a spell, you must roll a spellcheck. If it succeeds the spell takes effect, otherwise it fails. A natural 20 is a critical success, you double one of the spell’s numerical effects. A natural 1 is a critical failure, the spell is removed from your list of know spells. There are no Spell Components, no Spellbooks, no Casting at Higher Levels, and no Rituals. ➛ Monsters: BAM includes a few monsters based on ones from Tales of the Valiant. You must get your other monster stats from other sources. Any monster that you would pit against a party of 5E PCs will provide an encounter of similar difficulty using BAM against a party with the same number of PCs at the same level.
If you would like to purchase BAM rules as a soft cover book, or to support me by paying for the PDFs, go to DriveThruRPG.
In their travels, the PCs often find themselves in a settlement that is unfamiliar to them. While there they want to buy supplies. I have spent countless hours in the past deciding on what shops are in the town. What each shop has for sell. How many of each item, and its cost. Not to mention shop names and the names and stats for the shop owner and others who work there. How about a description of what the shop looks like and what patrons may be there. This is what is expected of the DM. Right? Well … most of the time, the PCs only want to replenish their ammunition, upgrade their armor and maybe buy a couple of healing potions. They just want to know if what they want is available in this settlement, and how many can they buy. So here is what I have come up with. I don’t enjoy role-playing a haggling session, and my players have never been much into that aspect of the game either. So I simply use the prices that are in the Players Handbook. When running a game where buying magic items is allowed, I typically use the prices found in Sane_Magical_Prices.pdf and I often don’t allow the purchase of certain items. Of course you can modify these however you think is appropriate for your campaign, but I have found that that is an unnecessary complication. I thought there could be a simple table to find how many of any particular item (if any) are available in a settlement based on how large a settlement it is. The result of my attempt to create that table is what I am presenting here.
There are two tables. One for mundane (non-magical) items, and another for magical items. There are also Spellcasting Services and Spell Scrolls at the end.
How to use the tables. 1) Find the cost of the item you are seeking to purchase. This should be the cost of a single item unless it is commonly sold in a bundle consisting of several identical items, such as arrows for example.
2) Refer to the Mundane Item Availability table for anything other than a magic item, magic scroll, or potion. For those refer instead to the Magic Item Availability table.
3) Find the row on the table that corresponds to the settlement size.
4) If the cost of the item is higher than the value in the MAX Value column, there are none of these items available for purchase here. Otherwise, continue to step 5.
5) Refer to the value in the # Available column (for magic items refer to the die roll indicated under the items rarity: Common, Uncommon, Rare or Very Rare). This indicates the roll needed to determine how many of this particular type of item is available in this settlement.
A note regarding the Availability Roll. This is expressed in the standard format for making modified die rolls. Treat any negative result as zero. If you are unfamiliar with this: Dice rolls are described with expressions such as “1d4-2,” which means “roll one four-sided dice and subtract 2” (resulting in either -1, 0, 1, or 2). The first number tells you how many dice to roll (adding the results together). The number immediately after the “d” tells you the type of die to use (a 4 sided die in our example). Any number after that indicates a quantity that is added or subtracted from the result.
Mundane Item Availability
Type
Population
Max Value
# Available
Purchase Limit
Thorp
< 20
50 gp
1d4-3
500 gp
Hamlet
21–60
200 gp
1d4-2
1,000 gp
Village
61–200
500 gp
1d4-1
2,500 gp
Small town
201–2,000
1,000 gp
1d4
5,000 gp
Large town
2,001–5,000
2,000 gp
1d6
10,000 gp
Small city
5,001–10,000
4,000 gp
1d8
25,000 gp
Large city
10,001–25,000
8,000 gp
2d8
50,000 gp
Metropolis
25,001 >
*16,000 gp
2d10
100,000 gp
* In a metropolis, single items valued over 16,000 gp may be available for purchase on a case by case basis subject to the DM’s discretion. The item may need to be created/built/fabricated and may require that the PC furnish some needed components. All of this and how long it takes to create the item is also to be determined by the DM.
Max Value: There is no single item for sale with a value higher than this.
# Available: For any specific type of item (other than a magic item), if the value of the item is the Max Value or less, the modified die roll indicated determines how many (if any) are available for purchase.
Purchase Limit: This maximum total that the entire party can spend on items, including magic items.
Magic Item Availability
Type
Population
Max Value
# Available
Common
Uncommon
Rare
Very Rare
Thorp
< 20
50 gp
1d4-3
—
—
—
Hamlet
21–60
200 gp
1d4-2
1d4-3
—
—
Village
61–200
500 gp
1d4-1
1d4-2
1d4-3
—
Small town
201–2,000
1,000 gp
1d4
1d4-1
1d4-2
1d4-3
Large town
2,001–5,000
2,000 gp
1d6
1d4
1d4-1
1d4-2
Small city
5,001–10,000
4,000 gp
1d8
1d6
1d4
1d4-1
Large city
10,001–25,000
8,000 gp
2d8
1d8
1d6
1d4
Metropolis
25,001 >
16,000 gp
2d10
2d8
1d8
1d6
Legendary magic items are not commonly for sale.
Max Value: There is no single magic item for sale with a value higher than this.
# Available: For any specific magic item, if the value of the item is the Max Value or less, the modified die roll indicated in the column for the items rarity determines how many (if any) are available for purchase.
Spellcasting Services The following is a rough pricing guide to have someone cast a spell for you and the smallest settlement in which you might find a spellcaster to cast a spell of that level. It also requires you to find someone that is capable and willing casting it for you. To these prices you must add the cost of material components (if any). Cantrip (Thorp) – 15 gp; 1st Level (Hamlet) – 25 gp; 2nd Level (Village)- 100 gp; 3rd Level (Small town) – 150 gp; 4th Level (Large town) – 1,000 gp; 5th Level (Small city) – 1,500 gp. It is not typically possible to hire someone to cast a spell that is higher than 5th Level, but they may be persuaded to cast it in exchange for some item or service that the PCs could provide.
Spell Scrolls The cost of a spell scroll is double the cost of having the spell cast for you.
These weapons are intended as a replacement for the weapons in the official rules. They have been modified somewhat to work with Bold Against Monsters (BAM) and ShadowDark, but could be used with Tails of the Valiant (ToV), Dungeons and Dragons 2014 (D&D 5e) or Dungeons and Dragons 2024 (D&D 5.5). This free PDF file contains all the weapons that are in D&D 5.5 (except for the Musket and the Pistol). There is a card for each weapon containing the features for the weapon and a box at the top for calculating the Attack modifier and Damage for each weapon. For ranged weapons, there is a space at the bottom of the card for tracking used ammunition.
Update #1: 8/2/2025 Removed “Long” feature and added special features to most of the weapons.
This a black and white 22 page (8.5″x11″) PDF file. There are four 3″x5″ cards on each page that you will have to cut out (except on page 1). If printed 2 sided by long edge you will have 36 two sided weapon cards with a drawing of the weapon on the back of each card. Page 1 contains a card with information regarding Ability Modifiers and Character Sizes. It also has an example card with information on how to fill in the blanks that are on the weapon cards. There are also cards for Unarmed attack, Improvised weapons (both melee and thrown), and blank cards.
What I changed and why.
First I was just going to make a set of printable cards so each player could have a card for each of the weapons their PC had that would contain the basic information and the calculations used to arrive at that weapon’s damage and attack bonus. After working on this for a while, I realized that the old categories and properties needed to be re-organized and simplified.
Weapon Properties: I added a “medium” weight property and changed the weight property on a few weapons. I added the “light” property to the dagger, dart, spear, sling, flail, rapier, whip, blowgun, and hand crossbow. Then I added a “medium” weight property to the other weapons that weren’t listed as having the “light” or “heavy” property.
I got rid of the Simple and Martial categories so, for D&D, you will need to adjust Weapon Proficiencies for the Classes.
Barbarian, Fighter, Paladin, and Ranger – “Simple and Martial weapons” changes to “All weapons.”
Bard, Cleric, Druid, Sorcerer, Warlock, and Wizard – “Simple weapons” changes to “Light and medium weapons.” [Note: To exactly match D&D 5.5 this will have to change to “No heavy weapons. No medium weapons other than the greatclub, javelin, mace, quarterstaff, light crossbow, or shortbow. All light weapons except for the flail, rapier, scimitar, shortsword, or whip.“]
Monk and Rogue – “Simple weapons and Martial weapons that have the Light property” changes to “Light weapons.” [Note: To exactly match D&D 5.5 this will have to change to “All light and medium weapons except for the Battleaxe, Longsword, Morningstar, Trident, Warhammer, or War Pick.“]
Added the “Thrown” weapon type and replaced “Reach” with “Long“.
Some melee weapons could be throne and some had to be thrown, making them more like ranged weapons. To clarify, I added the “Throne” weapon type.
ABILITY Which ability modifier to use for attack and damage.(For D&D, I removed the “finesse” property and added the DEX or STR option to the cards where it applies.)
Melee and Thrown weapons
Light: use your DEX modifier
Medium: use your STR modifier
Ranged weapons
Light: use your DEX modifier
Medium: use your DEX modifier
Heavy: use your STR modifier
ONE or TWO HANDED Which weapons can your character use one handed, based on your size, unless noted otherwise.
Large (or larger) character:
You can weld any weapon one handed.
Medium character:
Light weapons – You can weld them one handed.
Medium weapons – You can weld them one handed.
Heavy weapons – You must use 2 hands to weld them.
Small character:
Light weapons – You can weld them one handed.
Medium weapons – You must use 2 hands to weld them.
Heavy weapons – You must use 2 hands to weld them, and you have disadvantage on attacks.
Tiny character:
Light weapons – You must use 2 hands to weld these.
Medium weapons – You must use 2 hands to weld them, and you have disadvantage on attacks.
Heavy weapons – You can’t use these weapons
ADDITIONAL FEATURES Many of the weapons have a feature that is specific to that specific weapon type. For example, The greataxe has a feature called Second Target: “On a hit that drops the target, your swing can continue to also hit a target next to the first that is within range. If your attack could hit its AC, any remaining damage will be applied to the second target.”
When reading through these, keep in mind that in both BAM and ShadowDark your character only gets a single attack each round, making things like not adding your DEX modifier to your second attack made with a weapon in your other hand doesn’t apply.
I would love to hear your feedback on these weapon cards. Let me know what you think in the comments below.
Let me introduce Bold Against Monsters. (You can call it BAM.). This is a new D&D 5E compatible rules-light Role Playing Game that I – the Old Dungeon Master – just finished writing.
I started with the 2014 versions of Dungeons and Dragons (5E). Then, based on my 40+ years of DMing, I eliminated or changed things I thought could be improved, added things I prefer from the 2024 versions of Dungeons and Dragons (5.5) and Tales of the Valiant (ToV), and used some of the concepts found in ShadowDarkRPG (SD), modified for a more 5E compatible campaign. To all of this, I added some of my favorite house rules to come up with the Table Top Role Playing Game – Bold Against Monstrers. This is the game I like best. Give it a try, I think you will like it too.
This Core Rule Book contains everything you need to play the game (except for the dice). It is compatible for use with any published 5E adventure for characters up to level 10. It can serve as an introduction to 5E role playing for new players or anyone looking for a game with familiar characters you can easily create and quickly play. Character creation, level advancement, inventory tracking, proficiencies, spellcasting, combat, and more have been simplified without moving too far from the basics I love about the 5E game system.
This was made possible through the use of the D&D 5E and D&D 5.5 rules as published under Creative Commons License in SRD_CC_v5.1 and SRD_CC_v5.2 respectively, the ToV rules published as “Black Flag Roleplaying” under the ORC license, and the “Shadowdark RPG Third-Party License V1.1”. No AI was used in creating this. All artwork was found on-line with commercial licenses, or created by the author.
Update #1: 6/24/2025 (BAM Rules_v2.pdf) Minor changes Removed the “Lifting and Carrying” and the “Push, Drag, or Lift” sections. They were in conflict with “Gear Slots”. I renumbered the pages (and updated the Table of Contents) so now when going to a page in the PDF, the number on the page will match the page number of the PDF file. Corrected misspellings (thanks to the comment from larrymannplays). Made a couple of cosmetic and formatting changes.
I’m always looking to improve my resources for the D&D community! I would love to hear your feedback on this new RPG. Let me know what you think in the comments below. I am especially interested in your opinion on which rules you like or would have done differently.
Download your free form-fillable PDF BAM character sheet HERE.
The BAM Core Rule Book includes a character sheet on the back cover, but I also created this form-fillable version.
You will need to enter your ability modifiers and character level before the calculations for Weapons and Armor Class can be made. You can select Ancestry, Background, Class, Deity, and Weapons from drop-down lists, or enter any text in the box. For selected text, the features and other information below will fill in. For Ancestry, Background, Class, or Weapons text you typed in, you can enter any information below as you would like. To change the information below a selection you made, just change the name (adding a space behind the name will do). Clearing the text in the box, or making a different selection from the drop-down, will delete all the text below it.
Selecting your armor and shield from the drop-downs will calculate and display your Armor Class (AC).
Refer to the BAM Core Rule Book for information regarding Gear Slots. All the Weapons, Armor, Tools, and other equipment listed in that book can be selected from drop-downs, or you can type any text you want into the boxes.
There are now free Class Reference Sheets available to download HERE.
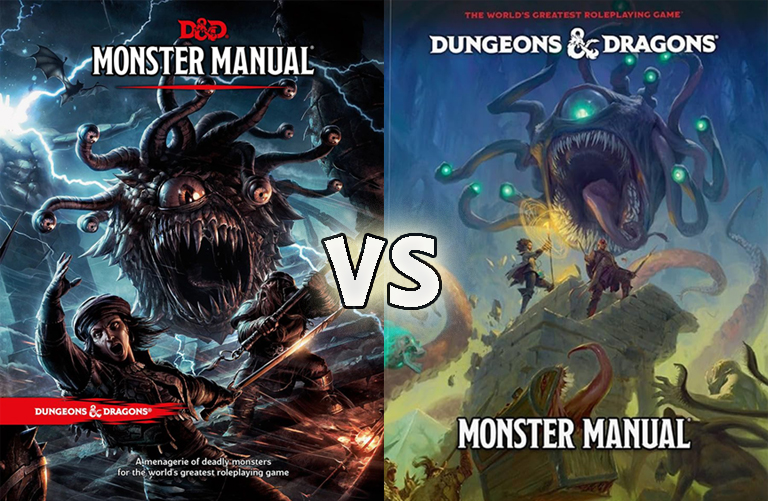
Comparing the Tales of the Valiant Monster Vault to the Dungeons and Dragons (2014 and 2025) Monster Manuals.
This is an overview of the Tales of the Valiant Monster Vault. Refer to my post 5.5 Monster Manual Reviewfor a more in-depth review of the new D&D Monster Manual. Tales of the Valiant is a roleplaying game (RPG) published in 2024 by Kobold Press. It includes material taken from the System Reference Document 5.1 (“SRD 5.1”) by Wizards of the Coast. The SRD 5.1 is licensed under the Creative Commons Attribution 4.0 International and is is compatible with the fifth edition of Dungeons & Dragons. Both the new D&D Monster Manual and the Tales of the Valiant Monster Vault were published as upgrades to the D&D Monster Manual that was published in 2014. They are both intended to be compatible with D&D 5E which was published in 2014. The Monster Manual was published as one of the three core rulebooks that were upgraded in 2014; the Players Handbook, the Dungeon Master’s Guide and the Monster Manual.
Using Monsters
2014 Monster Manual (5E MM)
The 5E MM has an 8 page Introduction explaining what a monster is, where they live and how to read the stat block.
2025 Monster Manual (5.5 MM)
The 5.5 MM has 5 pages mainly explaining how to read the stat block.
The Tales of the Valiant Monster Vault (ToV MV)
Chapter 1: Using Monsters is 10 pages with lots of information on building challenging encounters based on the party’s level and the monsters Challenge rating. With several tables based on the number of PCs and their level. And lots of information on customizing combat and modifying monsters. Chapter 2: Understanding Monster Statistics adds another 10 pages expounding on the monster’s stat block. Chapter 3: Understanding Terrain and Creature Types is 21 pages filled with tables and descriptions.
Number & Location of Stat Blocks
NOTE: the following counts are my own. I apologize in advance for any inaccuracies.
5.5 MM
Contains 504 stat blocks. The Main Section The main section contains 408 creature stat blocks. On page 374 of the 5.5 MM there is a Stat Block Conversion table that lists 69 creatures whose stat blocks were in the 5E MM and don’t appear in the 5.5 MM. These are all creatures that either had their name changed or have been removed. For each, a different monster with the same CR is listed that could be used in place of the older monster. Creatures in 5E MM that are not in 5.5 MM: Deep Gnome, Drow, Drow Elite Warrior, Drow Mage, Drow Priestess of Lolth, Duergar, Green Blue Indigo and Violet Faerie Dragons, Lizardfolk, Orc, Orc Eye of Gruumsh, Orc War Chief, Orog, Half-Elves, and Half-Dragons. They changed some other creatures from humanoid to a different creature type, specifically: Aarakocra, Goblins, Hobgoblins, Bugbears, Bullywugs, Githyanki, Githzerai, Grimlocks, Kuo-toa, Gnolls, Jackalwere, Kenku, Kobolds, and Lizardfolk. There are 55 others where the name was changed. Some examples: The Androsphinx was renamed Sphinx of Valor. The Gynosphinx was changed to Sphinx of Lore. The Half-Ogre (Ogrillon) was renamed Ogrillon Ogre. The Poisonous Snake was renamed Venomous Snake. And the Quipper was renamed Piranha. Appendix A: Animals Contains 96 stat blocks for animals including and fantastic variants of animals. Note that dinosaurs have been moved out of the main section of the book and into this appendix where they are listed alphabetically, mixed in with the other animals. AppendixB: Nonplayer Characters This appendix was in the 5E MM but has been removed from the 5.5 MM. Each of the 35 NPC stat blocks are now listed, grouped by type and those groups sorted alphabetically, in the main section of the book. It has all the NPCs that are in the 5E MM and has added Pirates: Pirate, Pirate Captain, and Pirate Admiral. It also added Performers: Performer, Performer Maestro, and Performer Legend. To Berserker it added Berserker Commander. To Cultist it added Cultist Hierophant, Aberrant Cultist, Death Cultist, Elemental Cultist, and Fiend Cultist. To Guard it added Guard Captain. To Knight it added Questing Knight. To Noble it added Noble Prodigy. To Priest it added Priest Acolyte and Archpriest. To Scout it added Scout Captain. To Spy it added Spy Master. To Thug it added Tough Boss. It changed the name of Wild Warrior to Warrior Infantry and added Warrior Veteran, and Warrior Commander.
ToV MV
Contains 419 stat blocks. The Main Section Contains 302 creature stat blocks. 229 of these creatures are also in the 5E MM. Some of the creature names have changed, and the stats have all been revised, some more heavily than others. Similar to 5E MM, they are arranged alphabetically by creature type, so all Dragons are listed together, all Dinosaurs are listed together, etc. Notably, the creatures listed under “Oozes” in the 5E MM are listed separately in the ToV MV. There are 95 creatures that were in the main section of the 5E MM but are not in the ToV MV. This is primarily because they were left out of the SRD and are considered exclusive property of Wizards of the Coast. They are: Aarakocra, Banshee, Beholder, Death Tyrant, Spector, Needle blight, Twig blight, Vign blight, Bullywug, Cambion, Carrion Crawler, Crawling Claw, Cyclops, Demilich, Barlgura Demon, Chasme Demon, Goristro Demon, Manes Demon, Shadow Demon, Yochlol, Spined Devil, Allosaurus, Pteranondon, Displacer Beast, Dracolitch, Shadow Dragon, Drow Elite Warrior, Drow Mage, Drow Priestess of Loth, Empyrean, Faerie Dragon, Flameskull, Flump, Fungi, Gas Spore, Galeb Duhr, Dao, Marid, Fomorian, Githyanki Warrior, Githyanki Knight, Githzerai Monk, Githzerai Zerth, Gnoll Pack Lord, Gnoll Fang of Yeenoghu, Hobgoblin Warlord, Grell, Half-Dragon, Helmad Horror, Hook Horror, Intellect Devourer, Jackalwere, Kenku, Winged Kobold, Kuo-Toa, Kuo-Toa Archpriest, Kuo-Toa Whip, Pentadrone, Mud Mephit, Smoke Mephit, Mind Flayer, Mycolid Sprout, Mycolid, Quaddoth Spore Servant, Nagam Bone, Nothic, Half-Ogre, Orc Eye of Gruumsh, Orog, Peryton, Piercer, Pixie, Quaggoth, Young Remorhaz, Revenat, Fire Snake, Scarecrow, Slaad Tadpole, Slaad Red, Slaad Blue, Slaad Green, Slaad Grey, Slaad Death, Thri-Kreen, Troglodyte, Umber Hulk, Water Weird, Yeti, Adominable Yeti, Tuan-Ti Abomination, Tuan-Ti Malison, Tuan-Ti Pureblood, Arcanaloth, Mezzoloth, Nyaloth, Ultroloth, and Beholder Zombie. The main section of the ToV MV contains 64 new (unique) creatures. They are: Astral Destroyer, Balara, Chol, Uulgol, Icthol, Trillipol, Crimson Jelly, Deathless, Golmana Demon, Husk Demon, Mire Fiend, Unska Demon, Wrack Demon, Derro, Void Eater Derro, Velociraptor, Void Dragon Wyrmling, Young Void Dragon, Adult Void Dragon, Ancient Void Dragon, Yellow Dragon Wyrmling, Young Yellow Dragon, Adult Yellow Dragon, Ancient Yellow Dragon, Scorch Drake, Feral Hunter, Fey Guardian, Flinderbeast, Hinn (Genie), Sila (Genie), Necrophage Ghast, Dirgesinger Giant, Hobgoblin Conjurer, Morlock, Ambush Hag, Hippocampus, Hivebound, Infernal Champion, Insatiable Brood, Swiftblade Kobold, Tinkerer Kobold, Witch Kobold, Lantern Hagfish, Virtuoso Lich, Living Colossus, Moon Knight, Mordovermis, Nimbostratus Spirit, Robot Drone, Robot Warden, Satarre, Satarre Destroyer, Selang, Void Piper Selang, Selkie, Skullbloom Sporeborn, Bloatblossom Sporeborn, Star Crow, Vampire Thrall, Voidling, Lesser Voidling, Wickerbeast, Wood Herald, and Wyrdling. Appendix: Animals This contains 91 stat blocks. The 5 dinosaurs are under “Dinosaurs” in the main section. It contains all the animals in Appendix A: Miscellaneous Creatures of the 5E MM. It changed the name of the Giant Toad to Giant Poisonous Frog and added a Seal. Appendix: NPCs This contains 26 stat blocks. This includes all the NPCs that were in the 5E MM and adds: Archdruid, Bard, and Mechanist (a new ToV character class).
What’s New?
5.5 MM
Monster Tables Many of the monsters include a table for inspiration on why the creature might be there or what it may be doing. Stat Block Conversions: Lists every monster that was in the 5E MM that isn’t in the 5.5 MM. Even if it was just a name change, this list tells you the name of the monster in this book you can substitute for the old one. Monster by Habitat: The habitats are: Any, Arctic, Coastal, Desert, Forest, Grassland, Hill, Mountain, Swamp, Underdark, Underwater, and Urban. Monsters by Creature Type: The creature types are: Aberration, Beast, Celestial, Construct, Dragon, Elemental, Fey, Fiend, Giant, Humanoid, Monstrosity, Ooze, Plant, Undead, Monsters by Group: The groups are: Angles, Beholders, Demons, Devils, Dinosaurs, Dragons (Chromatic), Dragons (Metallic), Genies, Goblinoids, Lycanthropes, Titans, and Yugoloths. Monsters by Challenge Rating: List all the monsters sorted by CR.
ToV MV
Chapter 1:Using Monsters is 10 pages with lots of information on building challenging encounters based on the party’s level and the monsters Challenge rating. With several tables based on the number of PCs and their level. And lots of information on customizing combat and modifying monsters. Chapter 2:Understanding Monster Statistics adds another 10 pages expounding on the monster’s stat block. Appendix: Creatures by Challenge List all the monsters sorted by CR. Appendix: Creatures by Tag (called Group in 5.5) Creatures tags are: Animal, Golem, Outsider, Outsider (Angel), Outsider (Demon), Outsider (Devil), Shapechanger, or Shapechanger (Lycanthrope). Appendix: Creatures by Terrain (called Habitat in 5.5) Terrain types are: Any, Arctic, Badlands, Coastal, Desert, Farmland, Forest, Grassland, Hills, Mountain, Planar, Swamp, Underground, Underwater, and Urban.
The Stat Blocks
Example 5E MM Stat Block
This is the Unicorn stat block from the 5E MM. If you have been playing fifth edition D&D you are probably familiar with this stat block format. I picked this as a typical stat block of a monster that is in all three Monster Books, the 2014 Monster Manual (5E MM), 2025 Monster Manual (5.5 MM), and the Tales of the Valiant Monster Vault (ToV MV).
Example 5.5 MM Stat Block
This is the Unicorn stat block from the 5.5 MM. The stat blocks have all been gone over and changes were made. For the most part, the monster names and CR have remained the same, but all of the monster stats were modified as needed to make all monsters of a CR do similar amounts of damage and be about the same when it comes to how hard they are to defeat. The descriptions were made shorter and easier for the DM to use during combat. For example, in the Unicorn stat block the description for the action Hooveshas been changed from: “Hooves.Melee Weapon Attack: +7 to hit, reach 5 ft., one target. Hit: 11 (2d6+4) bludgeoning damage.” to “Hooves.Melee Attack Roll: +7, reach 5 ft. Hit: 11 (2d6 + 4) Bludgeoning damage.” The 5.5 stat block is laid out in basically the same format as the 5E stat block, but you will notice some differences. First, beside the AC there is “Initiative +8 (18).” This is the monster’s Initiative modifier followed by the monster’s Initiative score in parentheses. You can add the modifier to your monsters roll for the monsters initiative, or you can just use the number in parentheses. The most obvious change is in the ability score block. In the 5.5 stat block, for each ability it lists the modifier and its saving throw modifier. In the 5E stat block it simply lists each ability score and it’s modifier. In the 5E stat block if the monster has any saving throw modifiers that are different from the abilities modifier there is a separate list of those below the abilities block. For example, in the Shadow Demon stat block it says “Saving Throws: Dex +5, Cha +4.” Resistances, Vulnerabilities and Immunities lists have been simplified. For example, in the Unicorn stat block you can see that instead of Damage Immunities and Condition Immunities, the 5.5 stat block just lists “Immunities Poison; Charmed, Paralyzed, Poisoned.” Note the semicolon separating the Damage Immunities from the Condition Immunities. The Proficiency Bonus (PB) is shown after the XP. The following section is now labeled “Traits.” The list of traits are often changed. “Innate Spellcasting” has been moved into the “Actions” section and renamed “Spellcasting.” In most of the stat blocks the list of spells has been shortened and/or the list has changed somewhat. This is typically how spellcasting is handled. Here are some of the other changes in this example: “Charge” and “Magic Weapons” was removed from Traits, and “Legendary Resistance (3/Day)” was added. The “Horn” action was replaced with the “Radiant Horn” action that does a little more damage of a different type (radiant instead of piercing). “Teleport (1/Day)” was removed. The action “Healing Touch (3/Day)” was replaced by the bonus action “Unicorn’s Blessing (3/Day).” The legendary actions “Hooves” and “Heal Self (cost 3 Actions)” were removed. The legendary action “Charging Horn” was removed. The legendary action “Shimmering Shied (Cost 2 Actions)” changed to “Shimmering Shield” and it now gives temporary hit points in addition to adding 2 to the targets AC.
Example ToV MV Stat Block
This is the Unicorn stat block from the ToV MV. Like in the 5.5 MM, the stat blocks for monsters that are in the 5E MM, the monster names and CR have remained the same but the monster stats are modified as needed to make all monsters of a CR do similar amounts of damage and be about the same when it comes to how hard they are to defeat. Challenge Rating (CR). This has been moved to the top. To the right of the monster’s name. Experience Points (XP). The ToV MM stat block does not list the monster’s XP. The book does have a table showing Experience Points by Challenge Rating. Alignment. The ToV game doesn’t use Alignment at all, so the monster’s stat bocks do not include the monster’s alignment. Armor Class (AC). The AC is calculated using this formula: AC = 10 + DEX modifier + any additional bonuses (from equipment, natural armor, or special traits). Note that the AC is calculated before the PB is added to the ability modifiers (refer to abilities below). Hit Points. Most (possibly all?) monster’s hit points have been revised to more closely align with their CR. In this example they were increased from 67 to 92. Perception. ToV adds this to the stat block. It is calculated using this formula: Perception Value = 10 + WIS modifier. To successfully hide from this monster, the PC’s DEX (Stealth) check must be equal to or higher than this value. Stealth. ToV adds this to the stat block. It is calculated using this formula: Stealth Value = 10 + DEX modifier + some creatures add their PB or double their PB. When a creature attempts to hide, it doesn’t make a hide check, instead it used its stealth value. When trying to detect signs of a creature, the PC’s WIS (Perception) check must be equal to or higher than the creature’s stealth score. For example: A PC’s WIS (Perception) check result must be a 12 or better to detect the Unicorn when it is trying to hide from the PC. Abilities. The ToV stat block shows the ability modifier and doesn’t show the ability score. Unlike 5E, or 5.5, the Proficiency Bonus (PB), which is based on the monster’s CR, is already included in this modifier so you use the ability modifier that is shown when making an ability check or save. In the example stat block shown here, the PB has been added to the WIS and CHA modifiers. Vulnerable, Resistant, and Immune. As in the new 5.5 MM, these lists have been simplified. Spellcasting. For creatures that have the spellcasting ability, this has been moved to be listed as an action and the lists has been shortened to list only the spells most likely to be used during combat. In some cases some (or all) the spells have been removed and replaced with magical actions. On the Unicorn example: detect evil and good has been replaced with the Sense the Unnatural trait, pass without trace has been replaced with the Woodland Walk trait, druidcraft has been moved into the Unicorn Magic action which also adds the dancing lights cantrip, the other spells (calm emotions, dispel evil and good, and entangle) have been removed. Here are some of the other changes in this example: The Chargetrait was removed. The Celestial Resilience, and the Speak with Beasts and Plants traits were added. The Hooves action was removed. The damage was increased on the Hornaction. The Horn Bolt action was added (this gives the Unicorn a ranged attack). The Teleport (1/Day) action was removed. Shimmering Shield was removed as a legendary action and became a reaction. The legendary action Hooveswas removed. The legendary actions Canterand Radiant Stomp were added.
Final Thoughts
When I started writing this review I was expecting to unconditionally recommend the Tales of the Valiant Monster Vault (ToV MV) over the 2025 version of the Dungeons and Dragons Monster Manual (5.5 MM). However, after a closer look at both of them it’s not that easy. First, let me say that if you are currently using the 2014 Monster Manual (5E MM) and are wondering if switching to one of these would be an improvement, the answer in my opinion is yes. Even though they differ in many specific details they have both done a good job in making the Difficulty Class (DC) for the monsters avoid most of the wild fluctuations they have in the 5E MM, making the creation of balanced encounters an easier task for the DM.
5.5 MM
By my count, the 5.5 MM has 85 more stat blocks than the ToV MV. So if you are looking for the most number of monsters you can’t go wrong with the 5.5 MM. It doesn’t have monster stats for Orcs, Drow or Duerger but you can still use your old Monster Manual for those. The other creatures that were humanoid in the 5E MM have changed to a different creature type. Refer to my post 5.5 Monster Manual Review for more of my thoughts on the 5.5 MM.
ToV MV
ToV MV suffers from not being able to use any of Wizards of the Coast’s proprietary monsters, so you will need to continue using your 5.5 MM for those. But it does have a much larger number of new monsters to surprise your players with. Kobold Press has been publishing great monsters for several years and they are very good at it. I think you will love these new monsters. Also, I personally think that they did a better job in the changes they made to the existing monsters. ToV MV does a good job explaining how to create a balanced encounter. It even has a table that shows, for each creature, its common allies. This is a great tool for coming up with a boss monster and its minions. It also has a lot of small things that are useful, such as a pronunciation guide for every creature. ToV MV has not changed the creature type of the humanoid creatures. I prefer the organization of the ToV MV to the 5.5 MM. For instance, I like having all the dragons together.
If you are staying with the 2014 version of D&D there is no reason you couldn’t just stick with the 2014 Monster Manual. But adding either the 5.5 MM or the ToV MV (or both) would not be a mistake. They both offer improvements to the old stat blocks and many new monsters.
If you are switching to the 2024 version of D&D you don’t have to switch monster books. The 2014 Monster manual still works just fine with D&D 5.5. If you decide to switch to the 5.5 MM I recommend that you keep your old MM handy, you may want to still use some of the older monster stats. You could just as easily add the ToV MV for its new monsters and updates to most of the monsters found in the 5E MM.
If you are switching to Tales of the Valiant you will probably want the ToV MV, but you can use the 5E MM if you already have that. It will work seamlessly with ToV. If you do get the ToV MV you might be tempted to also get the new 5.5 MM for updated stats for the WotC proprietary monsters but it’s probably not worth it for just that, especially if you already have access to the 5E MM.
Comparing the new (2025) Monster Manual to the old (2014) one.
How many Monster and NPC stat blocks does it have and how are they organized?
NOTE: the following counts are my own. I apologize in advance for any inaccuracies.
2014 Monster Manual. (I’ll be referring to this as the 5E MM.) The 5E MM contains 392 stat blocks. They are divided up like this: The main section of the 5E MM contains 276 creature stat blocks. Appendix A: Miscellaneous Creatures contains 95 stat blocks for animals and fantastic variants of animals. Appendix B: Nonplayer Characters contains 21 stat blocks for humanoid opponents.
2024 Monster Manual. (I’ll be referring to this as the 5.5 MM.) The 5.5 MM contains 504 stat blocks. That’s 112 moremonsters than in the 5E MM. They are divided up like this: The main section of the 5.5 MM contains 408 creature stat blocks. Appendix A: Animals contains 96 stat blocks for animals including and fantastic variants of animals. Note that dinosaurs have been moved out of the main section of the book and into this appendix where they are listed alphabetically, mixed in with the other animals. Appendix B: Nonplayer Characters– Has been removed. Each NPC is now listed, grouped by type and those groups sorted alphabetically, in the main section of the book. For example, all the Cultists are grouped together and found with the monster names that start with “C”. These NPC groups (although they aren’t called NPCs in this MM) contain every Humanoid that is in the 5,5 MM other than the “Vampire Familiar.”
If Appendix B still existed it might look something like this:
Missing Appendix B: Nonplayer Characters
Berserkers
Guards
Performers
Scouts
Berserker Commander
Guard
Performer
Scout
Berserker
Guard Captain
Performer Maestro
Scout Captain
Cultists
Knights
Performer Legend
Spies
Cultist
Knight
Pirates
Spy
Cultist Fanatic
Questing Knight
Pirate
Spy Master
Cultist Hierophant
Mages
Pirate Captain
Toughs
Aberrant Cultist
Mage Apprentice
Pirate Admiral
Tough
Death Cultist
Mage
Priests
Tough Boss
Elemental Cultist
Archmage
Priest Acolyte
Warriors
Fiend Cultist
Nobles
Priest
Warrior Infantry
Noble
Archpriest
Warrior Veteran
Noble Prodigy
Warrior Commander
This is a welcome expansion. There are 54 NPC stat blocks, 33 more than in the 5E MM. By the way, none of these are required to be humanoid. They could easily be any other creature type, but there isn’t any guidance in that regard.
What happened to all the other Humanoids?
There were 29 other humanoid stat blocks in the 5E MM. Most of them are still there but their creature type has been changed! The 5E MM Humanoid Description: includes this: “The most common humanoid races are the ones most suitable as player characters: humans, dwarves, elves, and halflings. Almost as numerous but far more savage and brutal, and almost uniformly evil, are the races of goblinoids (goblins, hobgoblins, and bugbears), orcs, gnolls, lizardfolk, and kobolds.” The 5.5 MM Humanoid Description: in total is: “Humanoids are people defined by their roles and professions, such as mages, pirates, and warriors. They include members of varied species.”
So the monsters that are no longer a humanoid creature type are: Aarakocra are all Elementals. All Goblinoids (Goblins, Hobgoblins, and Bugbears) and Bullywugs are Fey. Githyanki, Githzerai, Grimlocks, and Kuo-toa are Aberrations. Gnolls and Jackalwere are Fiends. Kenku are Monstrosities. Kobolds are Dragons. Lizardfolk are Elementals.
Note that this change means that the spells Charm Person, Dominate Person, and Hold Person will no longer work on these creatures. They can only be effected by the higher level spells Charm Monster, Dominate Monster, and Hold Monster. But there may be other magical effects than can affect these other creature types.
Removed from the 5.5 MM: Orcs are still Huminoid and Drow are still Elves but neither of them have stat blocks in the 5.5 MM. Duergar are still, presumably, Dwarves although they are not mentioned in the 5.5 MM. Half-Elves and Half-Dragons are not mentioned. Evidently, they no longer exist.
How easy is it to find the monster you are looking for?
For a comparison, let’s say I am looking for a Dinosaur, specifically an Allosaurus. The 5E MM contains stat blocks for 6 Dinosaurs and the 5.5 MM contains 7.
Finding an Allosaurus in the 5E Monster Manuel: The Allosaurus is not listed in the Contents (in the front of the book). It is listed in the Index of Stat Blocks (in the back of the book). Just thumbing through the book, I eventually find it under “D”, in the Dinosaur section. Description: “Thick armor plating covers the body of the plant-eating ankylosaurus, which defends itself against predators with a knobbed tail that delivers a devastating strike. Some varieties of ankylosaurus have spiked tails that deal piercing damage instead of bludgeoning damage.” The 5E MM groups several different creature types into their own separate sections such as Animated Objects, Beholders, Demons, Devils, Dragons, and many others. It has been criticized for making it hard to find a monster if you don’t know what creature type it belongs to. You could be forgiven if you didn’t know to look for Black Pudding in the Oozes section. But many who are familiar with the book like having all of the different creatures of the same type in the same section of the book. This makes it more convenient if you are looking to find just the right Dinosaur or Devil for tonight’s adventure, for instance.
Finding the Allosaurus in the 5.5 Monster Manuel: In the back of the book there is a Monsters by Creature Type table where it can be found in the “Beast” section (it doesn’t have a “Dinosaur” section) but there are no page numbers. There is also a Monsters by Group table that also has a “Dinosaur” section. The Allosaurus is also listed there, but there are still no page numbers. There is also a Monsters by Challenge Rating table which is great to have, but it also doesn’t have page numbers. Going to the front of the book, the Allosaurus is listed in the Index of Stat Blocks just under the very short Contents. Finally, a page number! Just thumbing through the book, I don’t find it with the “A” creatures, and there is no “Dinosaur” section. I eventually found it in Appendix A, Animals. All the dinosaurs are found here, listed alphabetically mixed in with all other animals of the Beast type. Description: In the introduction of Appendix A: Animals it says: “You can find descriptions of these creatures in dictionaries or other educational sources, or you can create new roles for them in your D&D worlds.” In the 5.5 MM all of the other monsters are in the main portion of the book listed alphabetically by creature name, but there are several exceptions. The good thing is that “Black Pudding” is in with the other monsters whose names start with “B” and no longer in the “Oozes” section. But let’s say you are looking for an Adult Blue Dragon. You may have noticed when you were earlier thumbing through the book that in the Index of Stat Blocks all “Adult” dragons were listed together, and there was no listing for simply “Blue Dragons”. So you start looking through the book, flipping through pages that contain creatures whose names start with “A” but you don’t find the Adult dragons. You turn a few more pages and you do find “Blue Dragons” where it has the stat blocks for “Blue Dragon Wormling,” “Young Blue Dragon”, ”Adult Blue Dragon,” and “Ancient Blue Dragon.” Each dragon type has a septate entry that contains all of that dragon’s stat blocks. Other monsters are listed together and I started making a list: Animated Objects, Awakened Plants, Azers, Blights, Bugbears, Buletts, Bullywugs, … then I realized that most of these are where new monsters of existing monster types have been added with different CRs. This is a good thing. You will just have to remember that to find a “Twig Blight” you need to look under “B” for Blights.
What is missing from the 5.5 MM?
Other than what I have already mentioned, there is quite a bit of lore in the 5E MM that is missing from the 5.5 MM.
What’s new in the 5.5 MM?
There is a lot new and different. Here are some of the major changes (in my opinion). 1) It’s bigger. The page count has increased from 352 to 384 and the font is larger. 2) There is more and better artwork. By better I mean that almost all of them show the monster in a typical combat situation, which can inspire the DM. 3) Many of the monsters include a table for inspiration on why the creature might be there or what it may be doing. 4) There is a new Appendix B: Monster lists. These are great. I was surprised to realize that the 5E MM doesn’t include any of these. My dig disappointment is that none of them include page numbers. Stat Block Conversions: Lists every monster that was in the 5E MM that isn’t in the 5.5 MM. Even if it was just a name change, this list tells you the name of the monster in this book you can substitute for the old one. Monster by Habitat: Contains 13 tables of different habitats with a list of monsters that might be found there. Monsters by Creature Type: List each creature type and all of the different monsters that belong to that type. Monsters by Group: Lists each monster group and each of the monsters that belong to that group. Monsters by Challenge Rating: List each CR from CR 0 to CR 30 and every monster of that CR.
The stat block format has improved.
This “New DnD Stat Block Unveiled in 2025 Monster Manual” post on the “DUNGEONS & DRAGONS FANATICS” site does an excellent job of describing everything new about the stat blocks. Although it may take some time to get used to the way that ability score modifiers and saving throws are now shown, I think the new 5.5 stat block format is a major improvement over the 5E stat blocks.
What I would have done differently.
My biggest criticism has to do with the many changes that, it seems to me, were made to avoid any accusation of racism. Of course they are no longer using the word “race” and are instead using the word “species,” but with the monster manual they have gone out of their way to attempt to remove any suggestion that any species or any creature type that could possibly be used by someone to represent a race in the real world be removed from the list of “monsters.” To accomplish this they removed all “Humanoid” creatures from the monster manual, with the exception of the “Vampire Familiar.” And they simultaneously reclassified many monsters that they wanted to keep as monsters to something other than “Humanoid.” In the 4th edition of D&D, the playable character races were included with their own separate monster statistics. This included the Dwarf, Eladrin (a playable Fey Humanoid character race in 4th edition), Elf, Halfling, Human, Dragonborn (not a playable character race in 4th edition), and Tiefling. This was every playable character race at that time other than the Half-Elf. For each of these races there were several different stat blocks representing different difficult levels (XP values). For instance, for Humans there was a Human Rabble, Human Lackey, Human Bandit, Human Guard, Human Berserker, and a Human Mage. I think that doing this again in the 5.5 MM, rather than going through all the gymnastics that they did would have worked perfectly well. On page 6 it says that the Alignment listed on the stat block is a “default suggestion” inspired by its “traditional role in the game.” Therefor no monster is necessarily always evil.
My overall opinion. I like it!
If you have read this so far, after all my criticisms you may be surprised at my overall opinion. I disagree with many of the decisions they made in creating this book but I will be using it. The revisions to existing monsters are an overall improvement. The DCs are more consistent. The monsters, especially at higher CRs, are more deadly. They were not difficult enough previously. The way they are presented make them easier to run. Many have new features which may surprise your party. In many instances, even if I am not using the 5.5 PHB, I will be switching out the old monsters and using these instead. The addition of different CR versions of old monsters a very useful. And the completely new monsters are all excellent. In my opinion, this is the best of the three new core rule books.
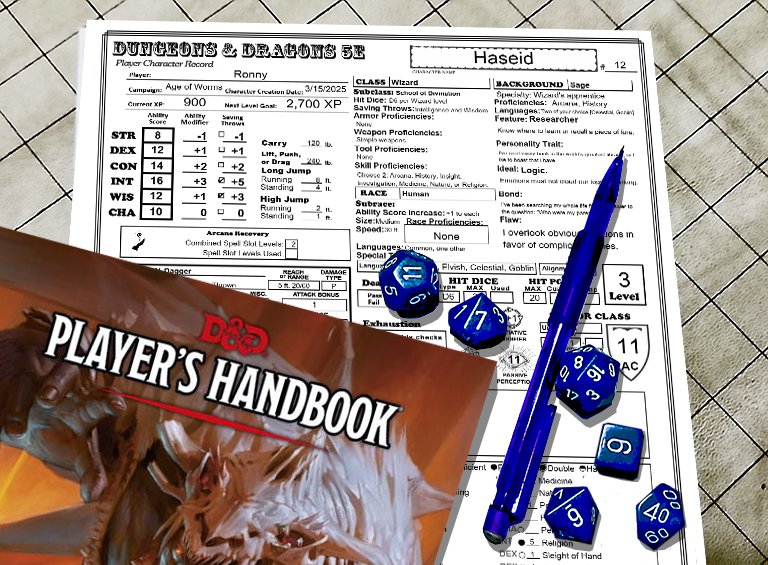
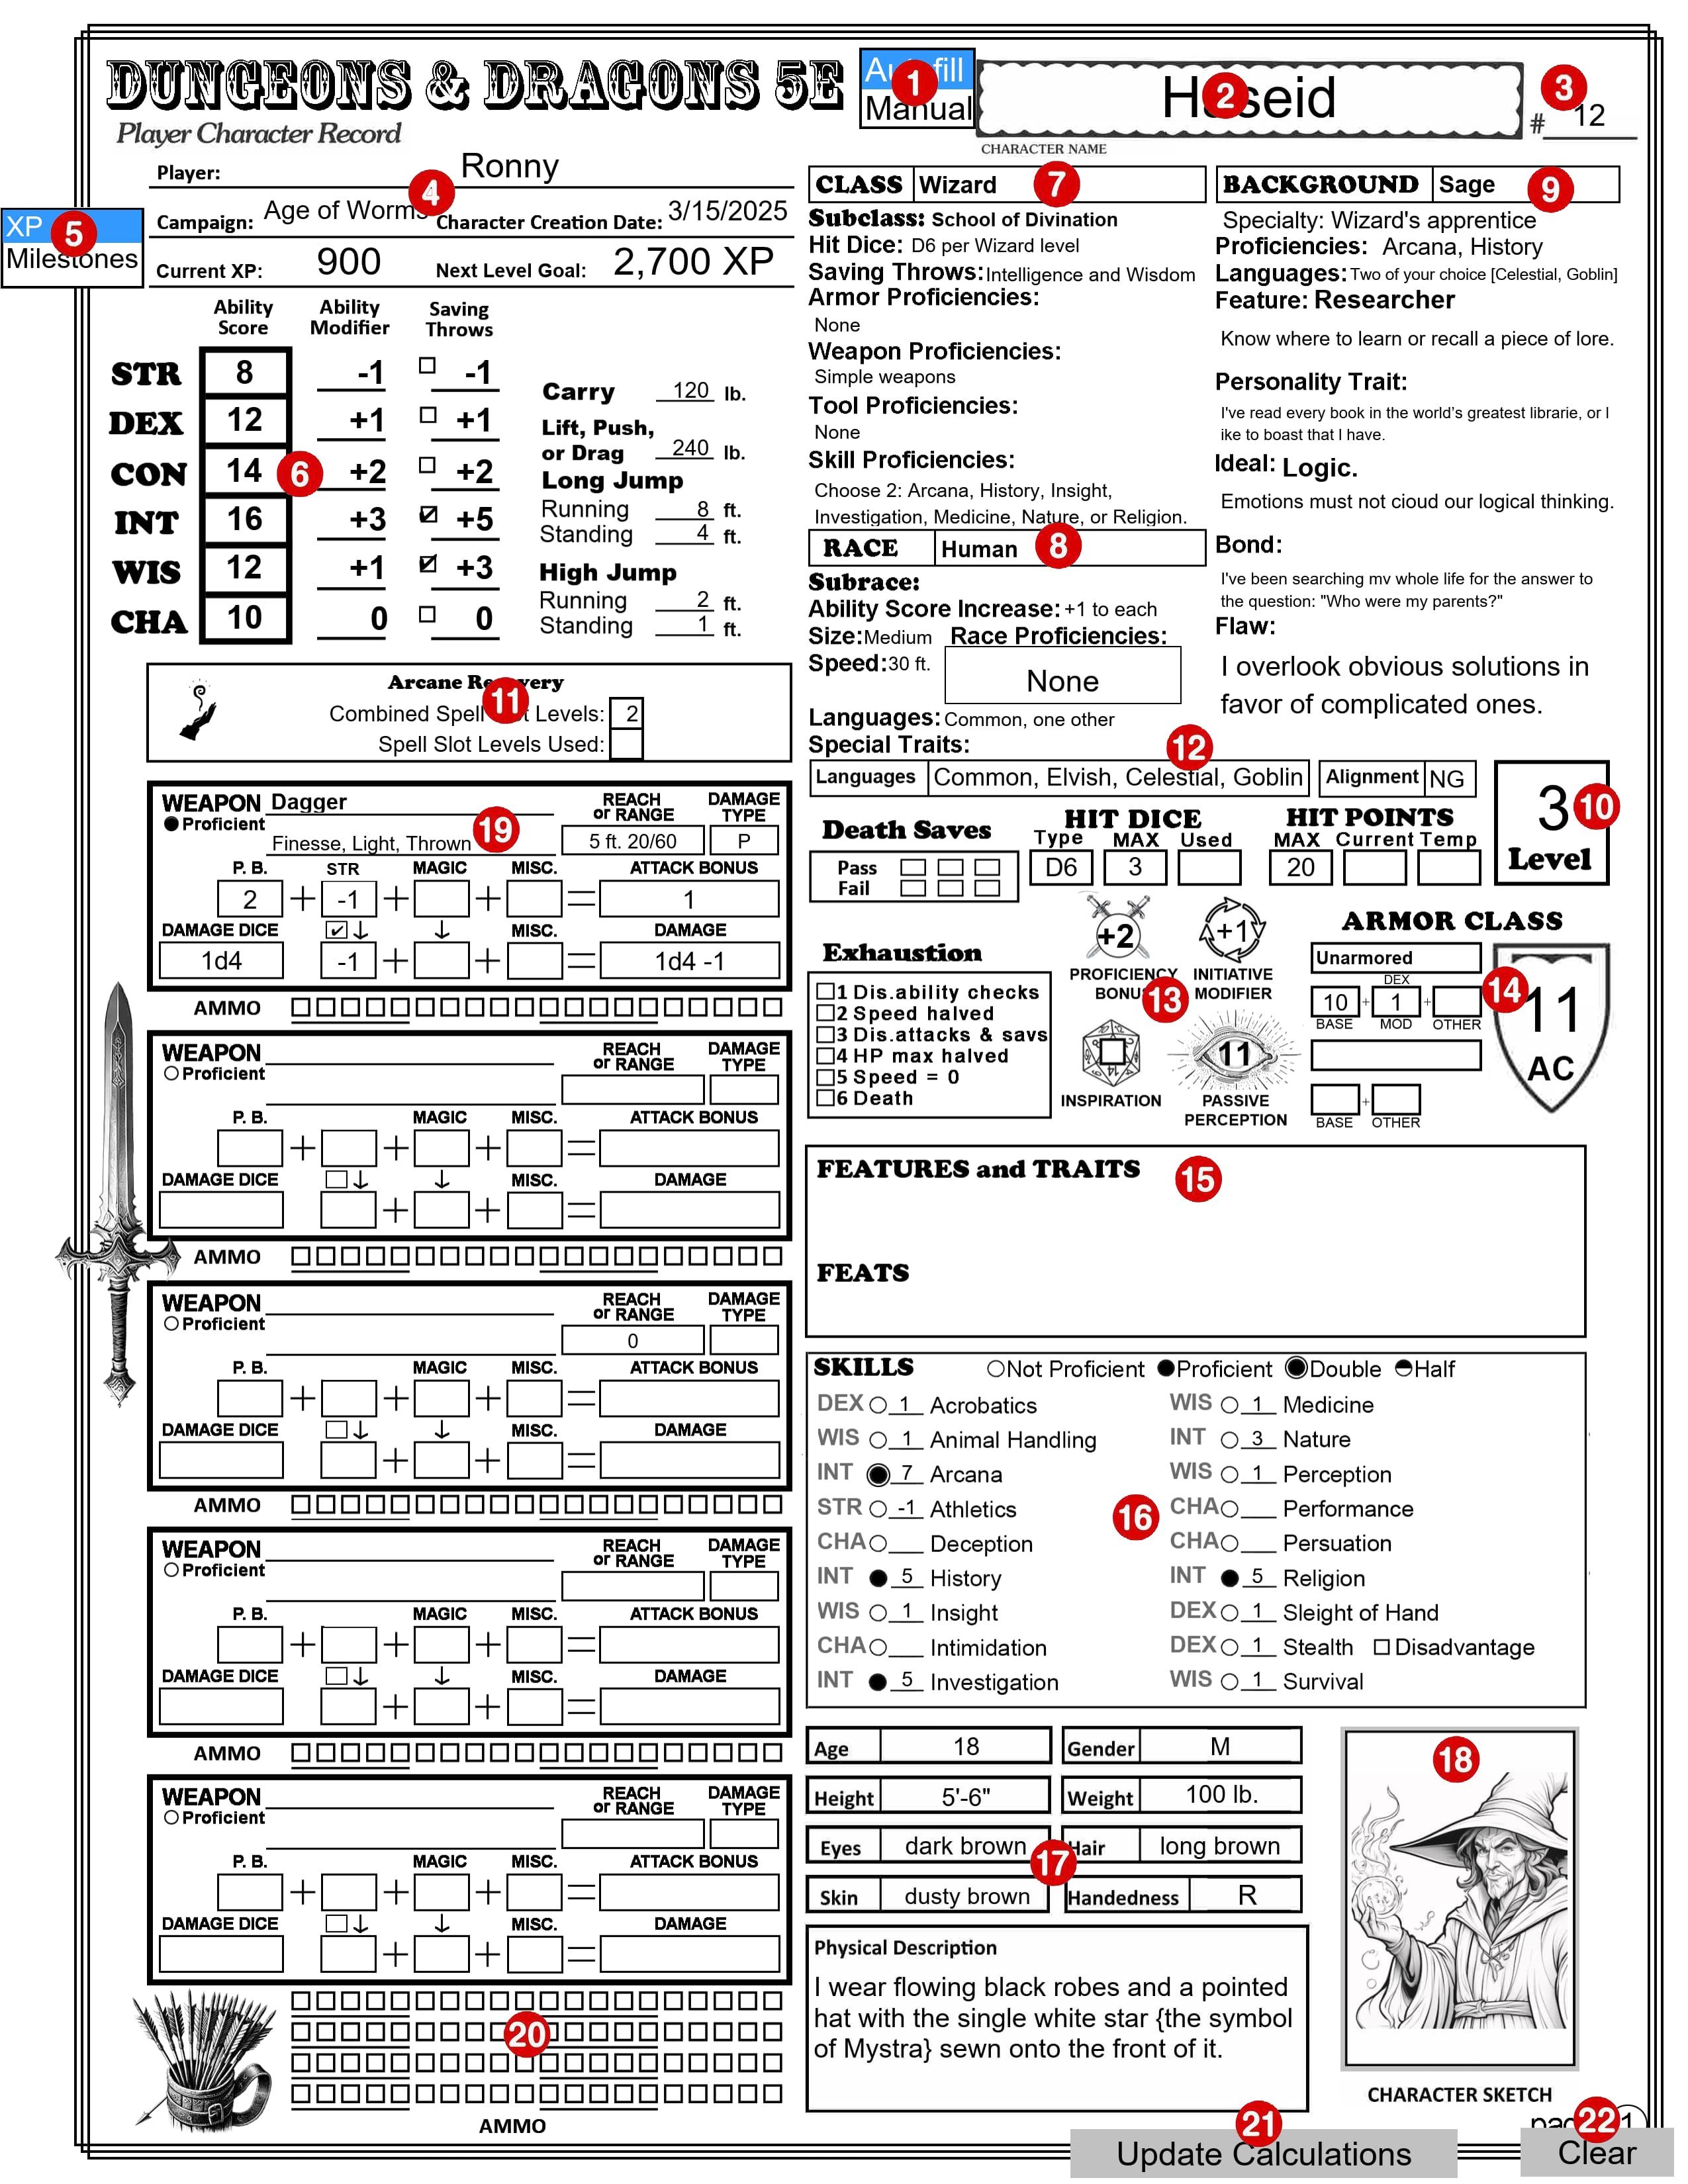
Many D&D fans are not switching from the previous version (D&D 5e) to the 2024 version (that I call D&D 5.5) and they could use a new, improved version of their character sheet. This is it.
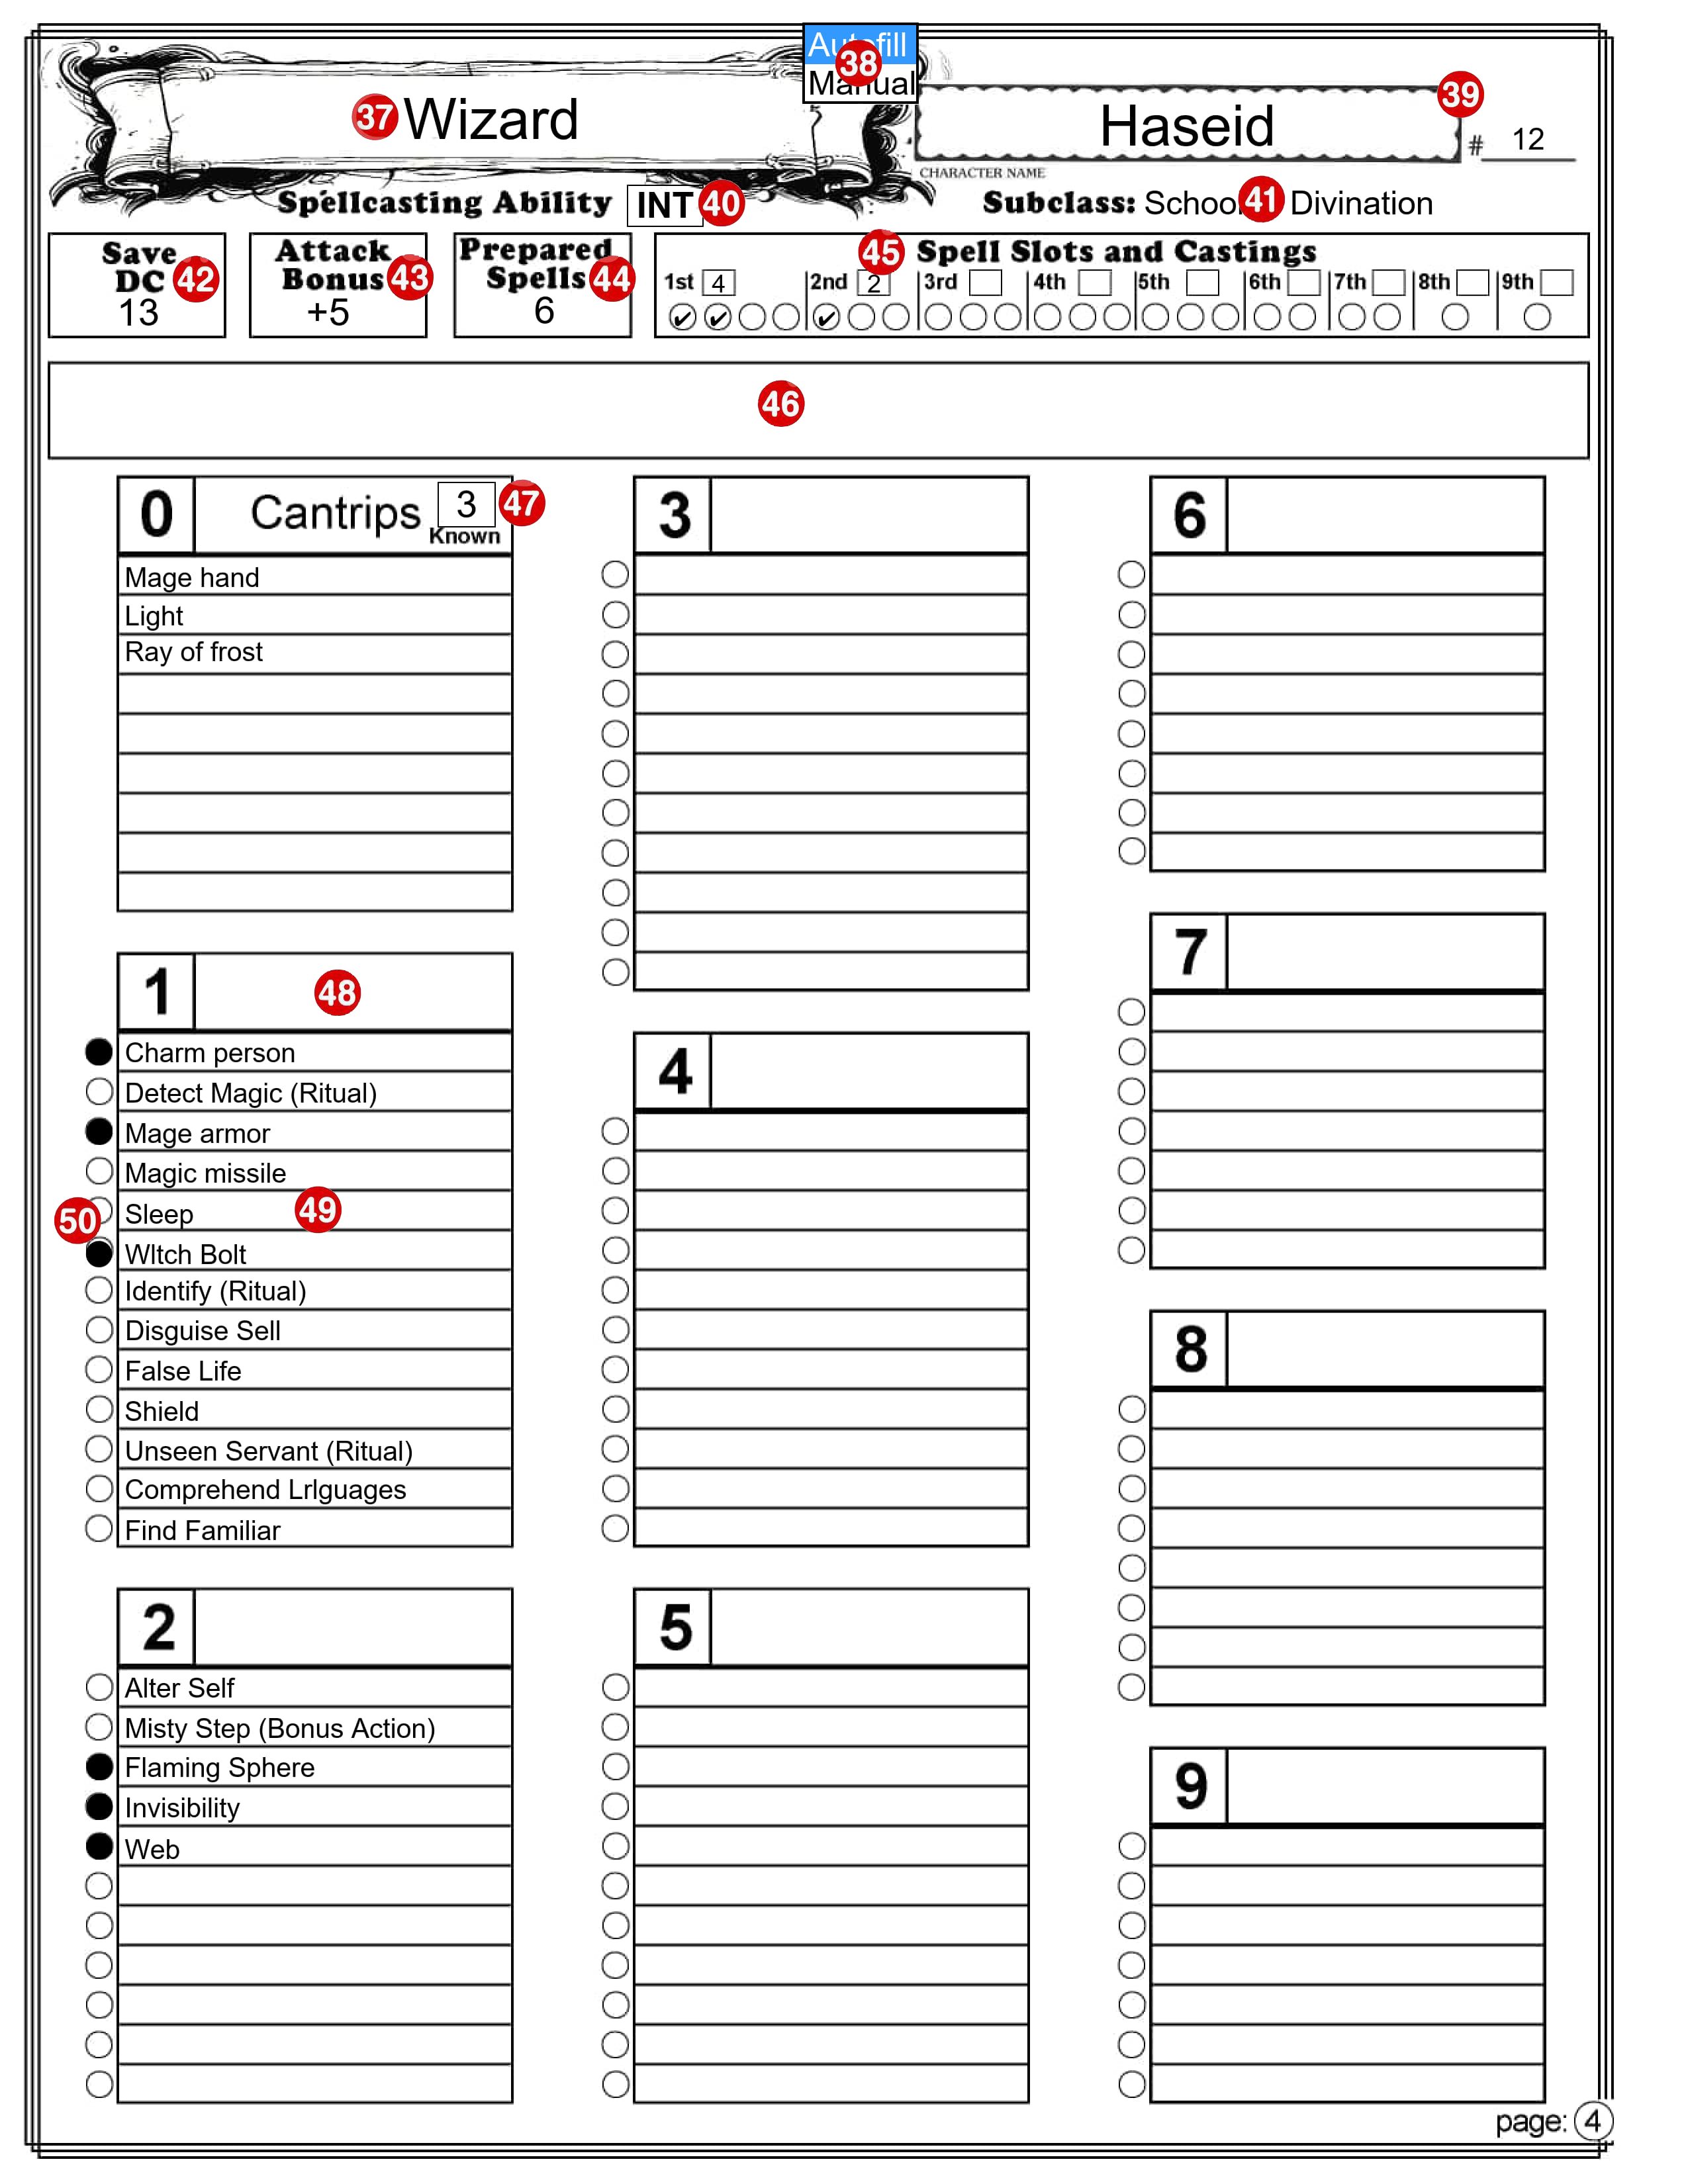
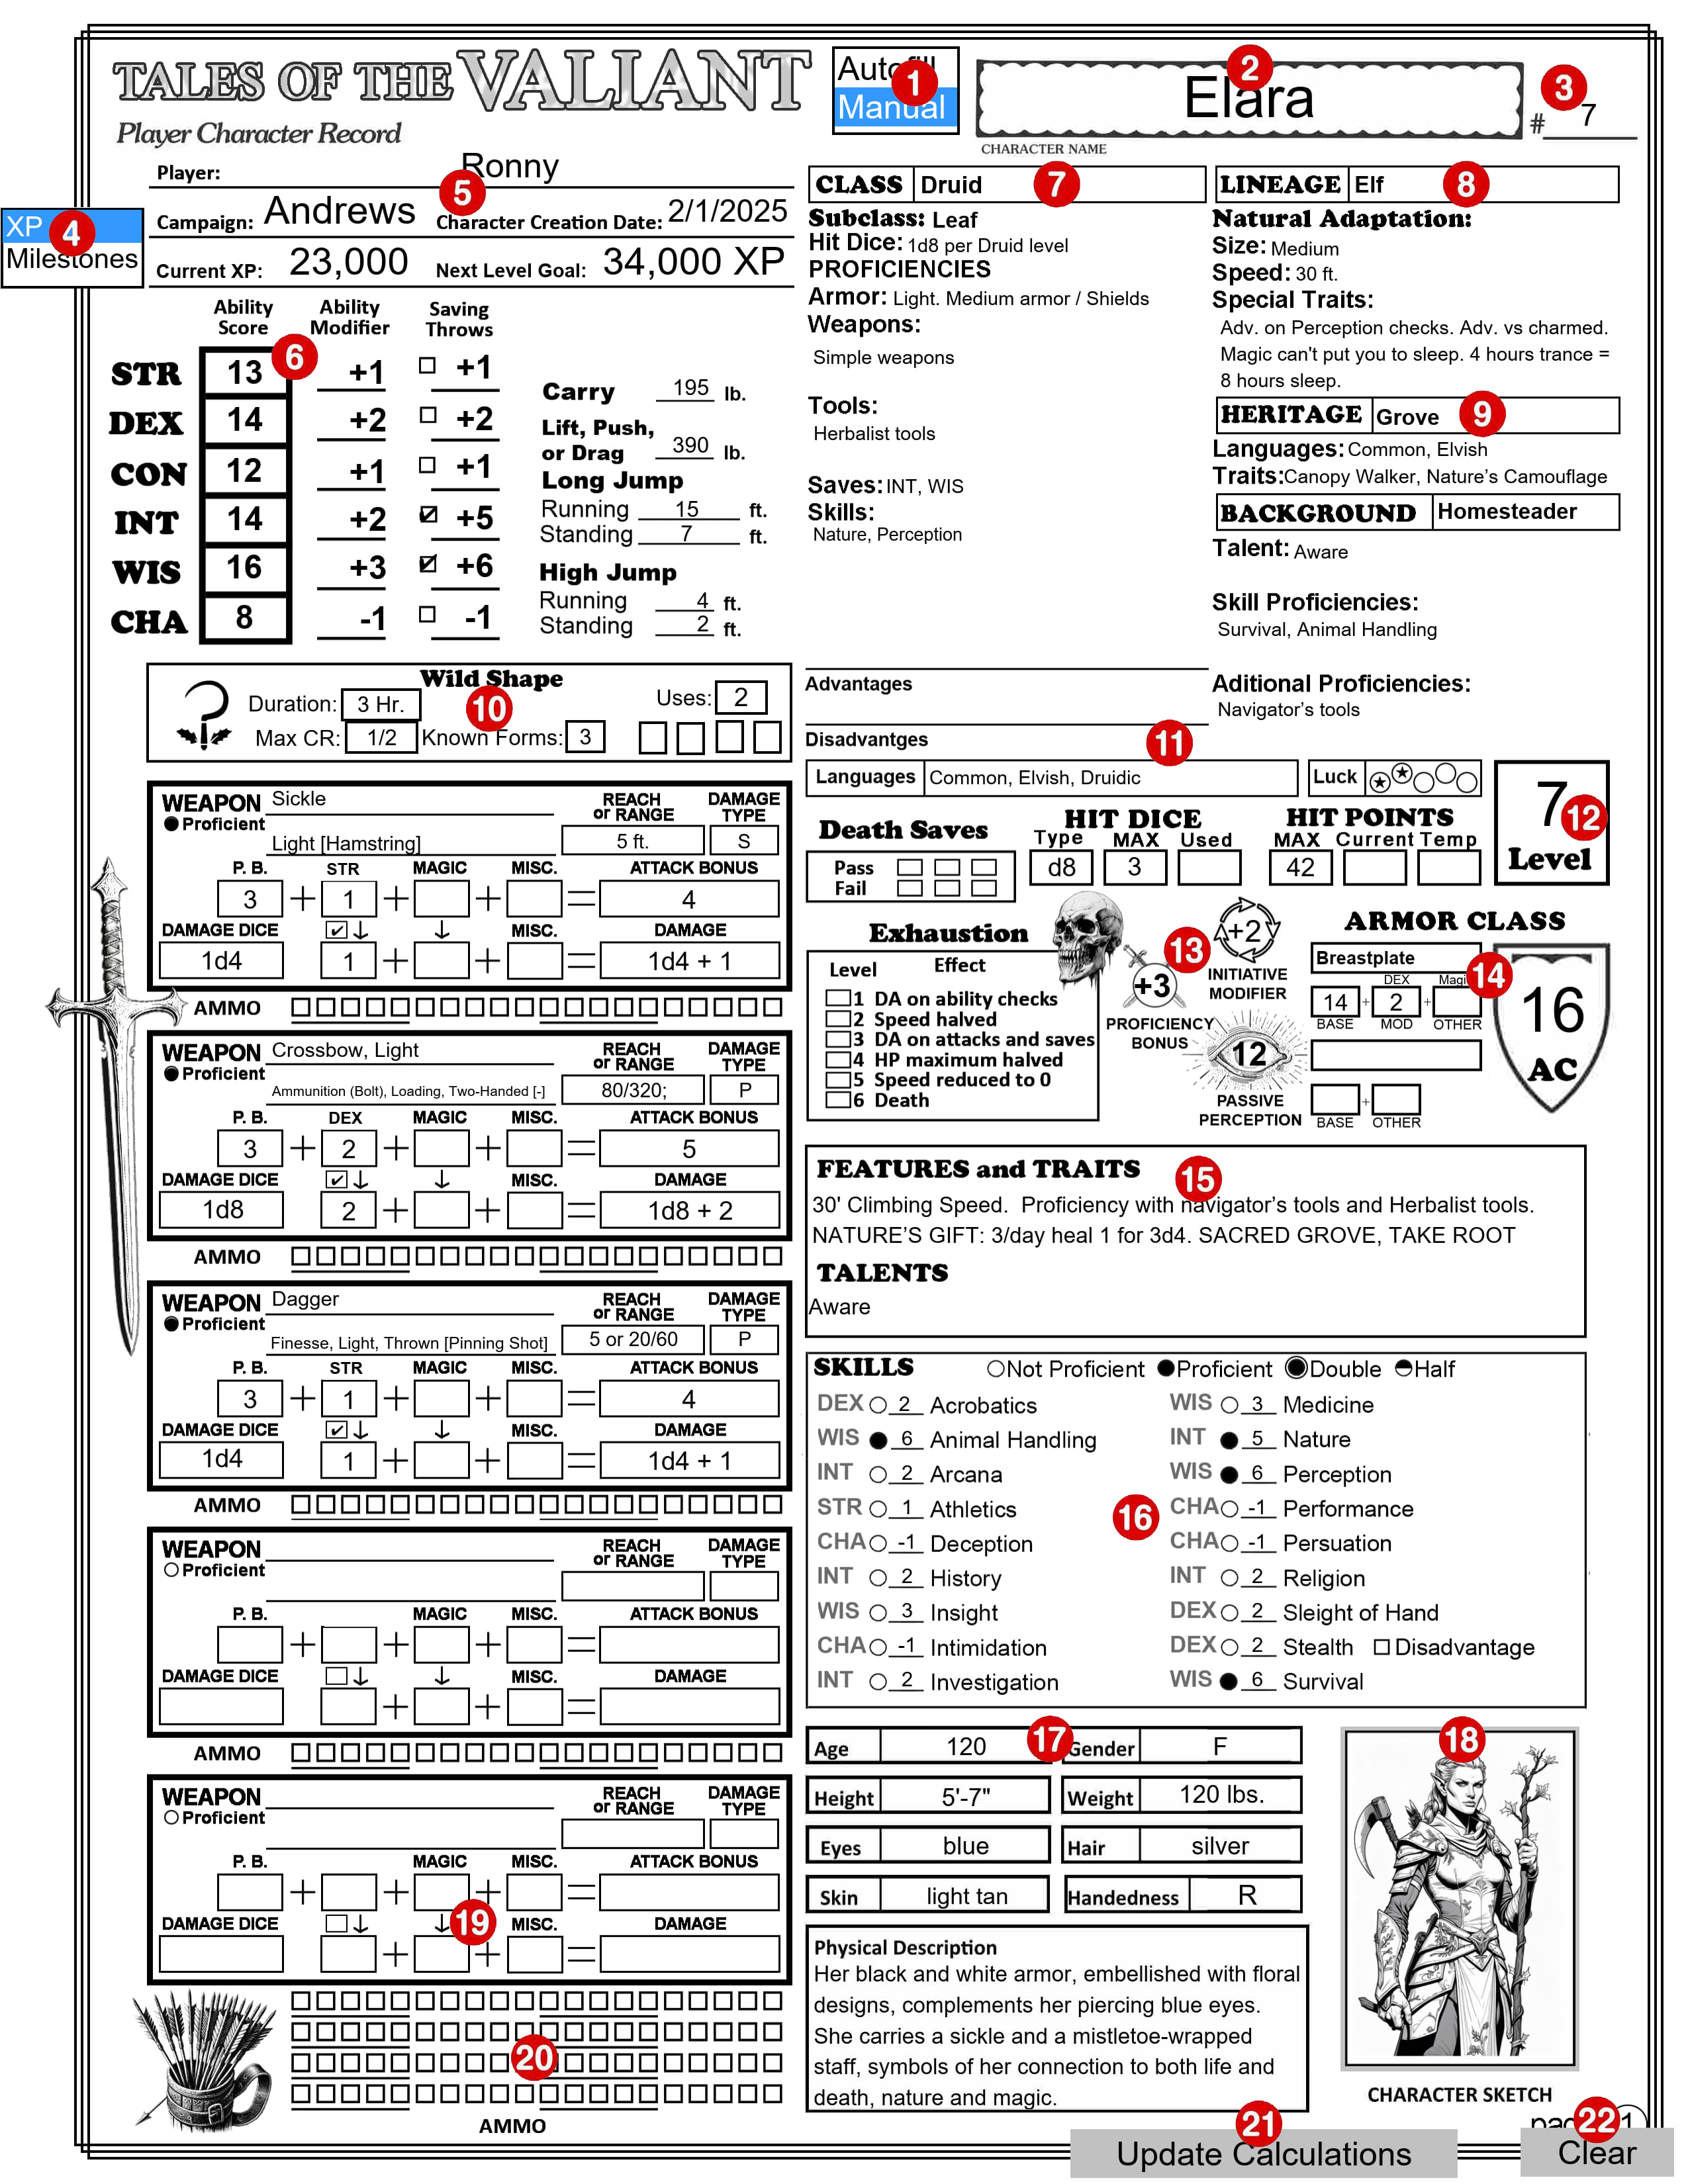
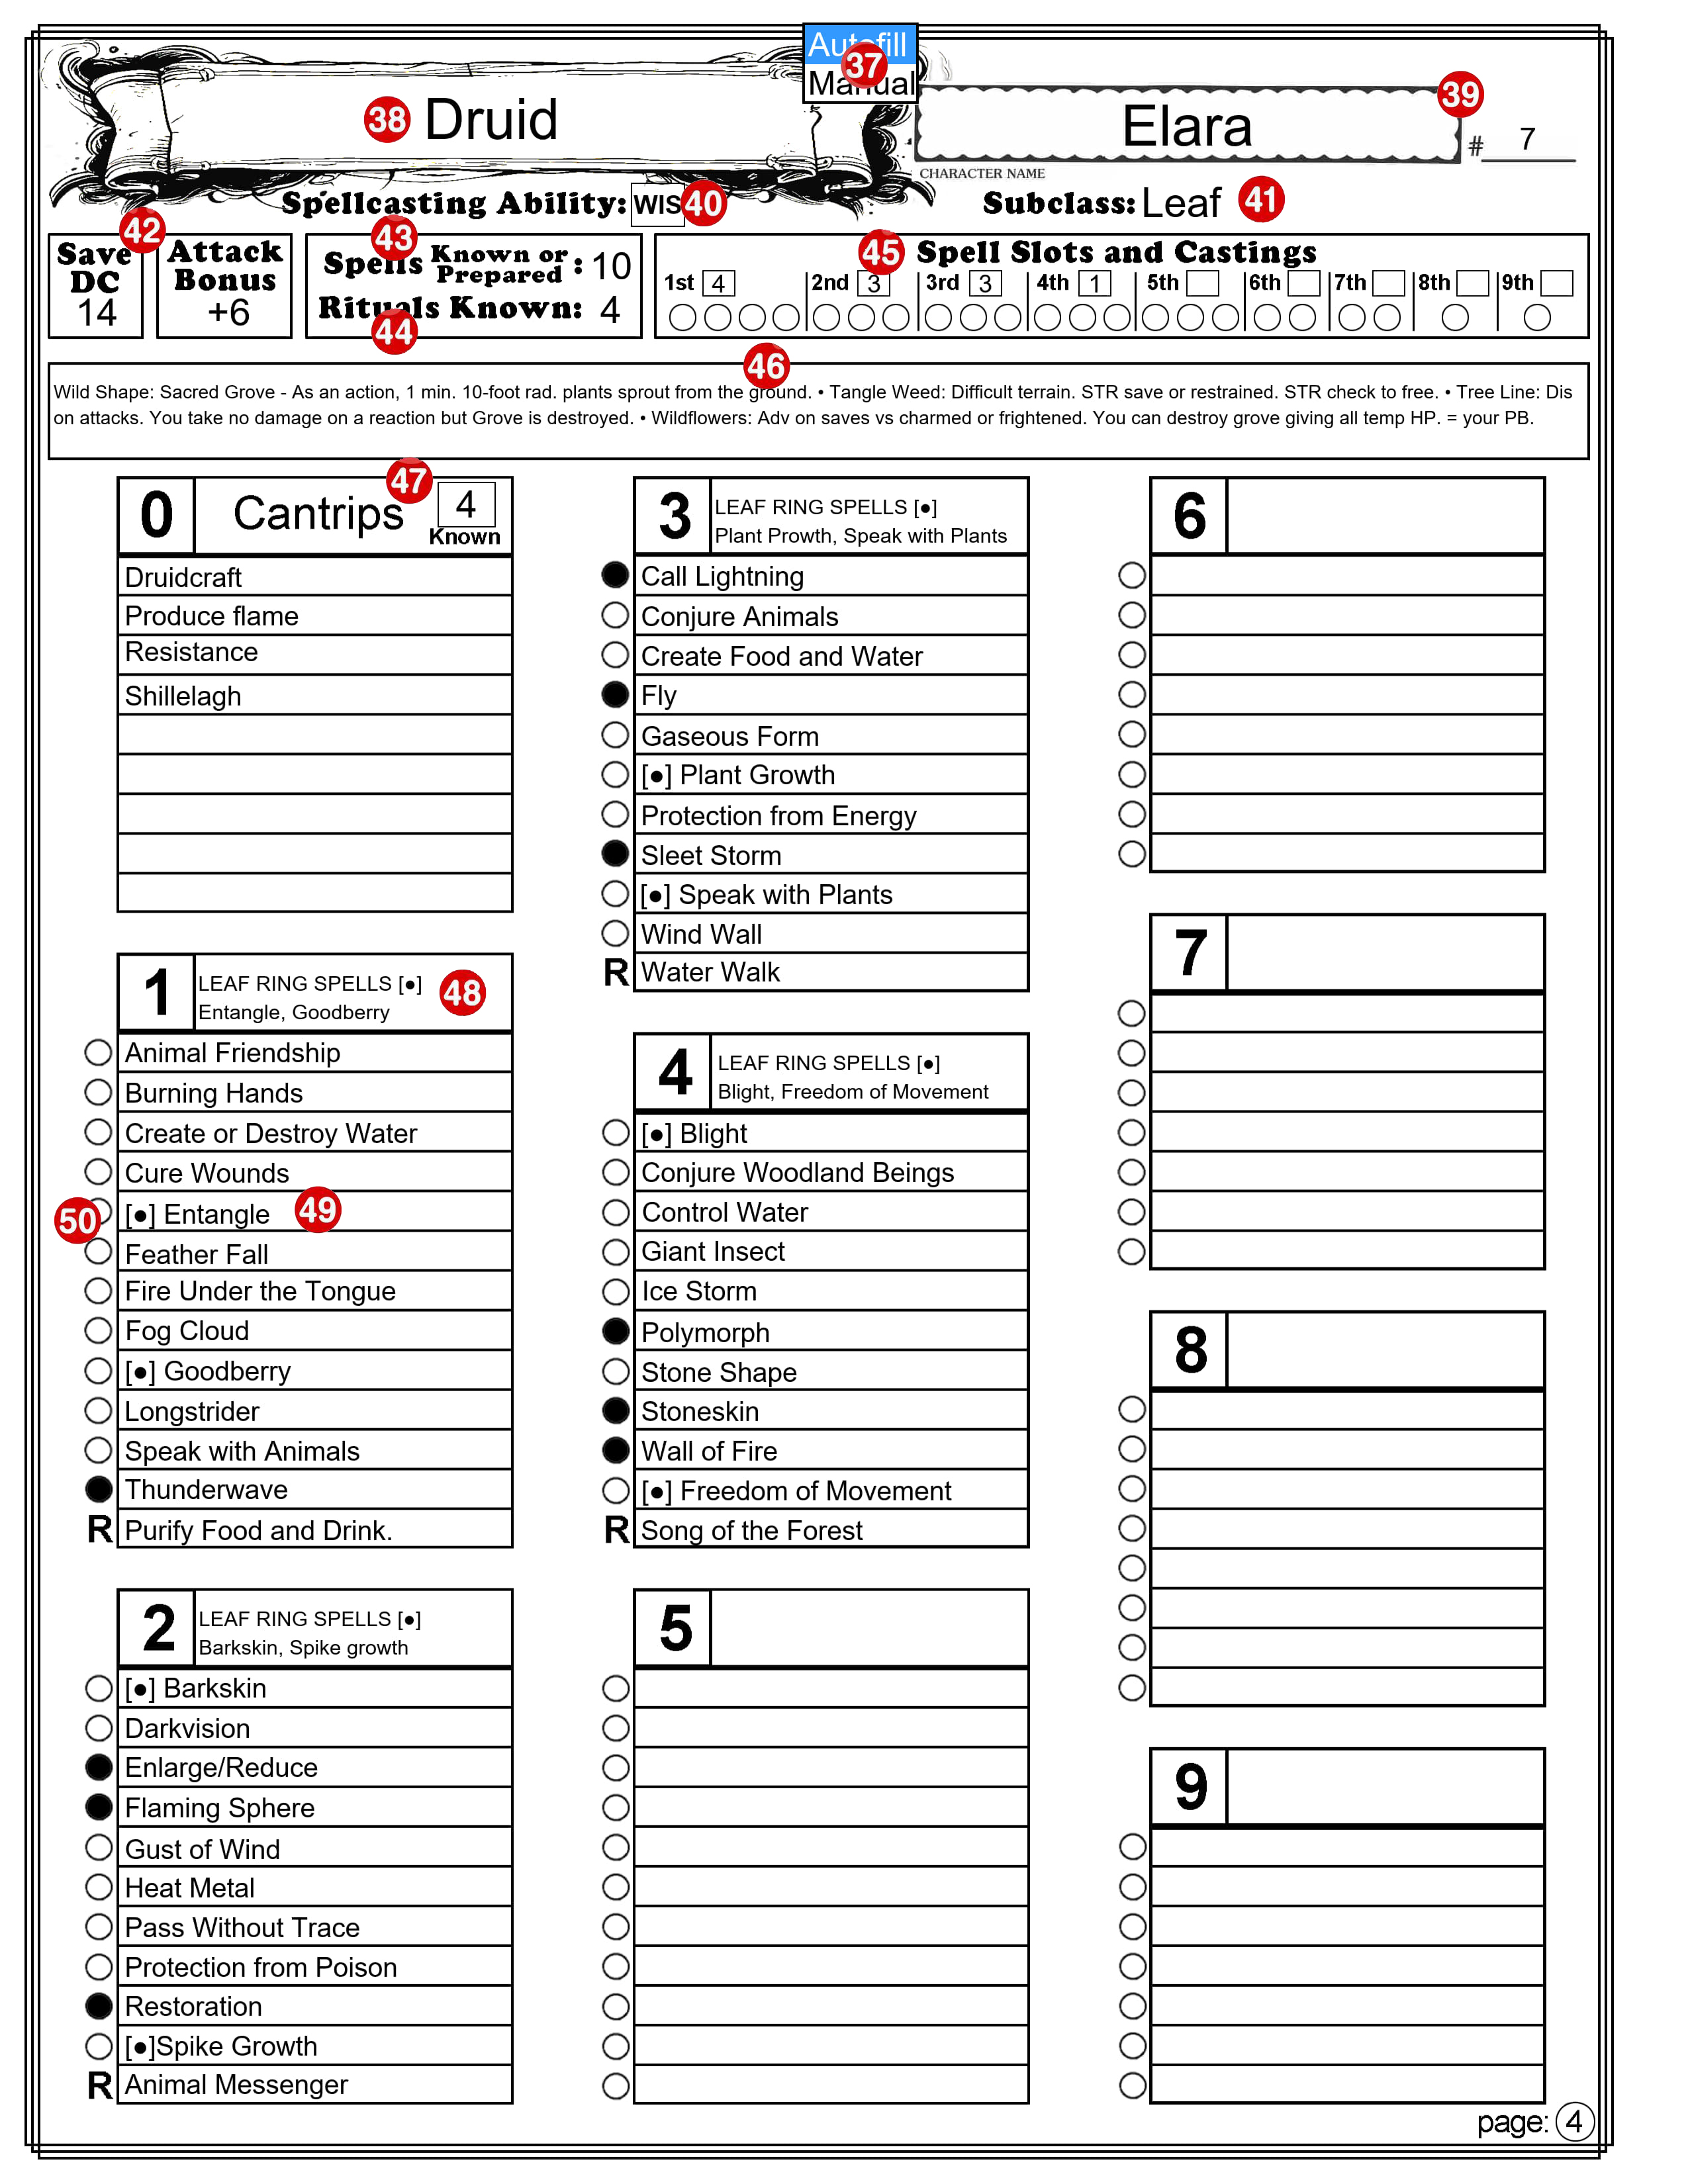
It has 4 pages, 2 sheets if printed on both sides. (Note that I will be referring to the set of all 4 pages in the singular, as the “character sheet”.) Page one has all of your character’s basic information and all you need for combat other than your spells. Page two is just for equipment and treasure. Page three is Character background and notes. Page four is for magic spells. It can be printed blank and filled out with a pencil, or you can fill in the forms on your device and most of the calculations will be done for you. It automatically calculates; ability and saving throw modifiers, carrying capacity and jump distances, Armor Class, Proficiency Bonus, Passive Perception, Skill check modifiers, Weapon attack bonus and damage, Equipment cost and weight, and more. It can fill in all the adventuring gear you get if you select an equipment pack (such as an “Explorer’s Pack”). In addition to that, it contains a new Autofill option that can fill in all the standard information based on your Class, Race, and Sub-race.
These instructions are for use with the character sheet you can download above. You can print a blank Character Sheet and fill it out by hand. If you fill it out on your device, many boxes will be filled in for you. There is information at the end of this on how to use this sheet for multi-class characters.
PAGE 1
1 – Autofill/Manual Selection Box
While in ‘Autofill’ mode all of the information regarding each of the Races and Classes in the PHB will be entered on this sheet in an abbreviated format. Switching to “Manual’ mode will allow you to make changes to any of that information. You will also need to be in ‘Manual’ mode to enter information regarding any Race or Class that isn’t found in the PHB. This selection box is independent of the similar one on page 4. Be aware that one page might be set to Autofill and the other one set to Manual. Select ‘Autofill’ mode to automatically fill in portions of this page based on your choices, as described below. Choose ‘Manual’ mode to keep existing information unchanged and make your own edits. CAUTION: If you switch to ‘Manual’ mode to make a few changes and then switch back to ‘Autofill’ mode, all your changes will be lost, replaced by the ‘Autofill’ information. I recommend you leave it in ‘Autofill’ mode until you are finished with Page 1, including your weapons and armor. You can then safely change to ‘Manual’ mode and make changes and additions. You may want to make a backup copy of your sheet before making changes. Each of the numbered sections below where this selection makes a difference will include a description for both Autofill mode and Manual mode. Note: This selection box will not appear on the printed page.
2 – Your Character’s Name
The text you enter here will also appear in the same location on the other pages. The text can be entered or changed on any page.
3 – #____
Character sheet version. If you make multiple copies of your character sheet enter the version number here. Like the Character Name, this text will also appear on the other pages.
4 – XP/Milestones Selection Box
If ‘XP’ is selected the Next Level Goal will be calculated and entered for you here based on your current character level (number 10 below). If “Milestones” is selected the text on this line will be replaced by a “Notes” section. Note: This selection box will not appear on printed pages
5 – Campaign Information
This is where you enter your name, the name of the campaign you are in and the date this character was created. Trust me, if you look back at this years from now, you will appreciate having this information.
6 – Ability Sores
Enter your ability scores in the boxes. All the data to the right of the ability scores will be filled in for you based on the ability scores, including your carrying and jumping stats based on your strength score. Check the little box next to the Saving Throw modifier to indicate that you are proficient in that Save.
7 – Class
Enter your Class or select it from the drop-down menu. The Class Feature box (number 11) will display information relevant to this class. Subclass: Enter the name of your subclass or select it from the drop-down menu. Autofill mode: All the information from the Class Features section in the PHB for this Class will be filled in, except for Starting Equipment. If there is any current text in any of these areas it will be removed and replaced if you select a different class. If you enter a Class name that doesn’t exactly match one of the selections on the drop-down box, all the class information below will be removed. Manual mode: No matter what you select or enter into the “Class’ box, existing text in this section will remain unchanged. You can change or add any text in the ‘Class’ box or any of the information below it.
8 – Race
Enter your Race or select it form from the drop-down menu. Subrace: Enter your Subrace or select it from the drop-down menu. Autofill mode: An abbreviated version of all the information in the PHB regarding your Race and Subrace will be filled in for you. If you enter a Race name that doesn’t exactly match one of the selections on the drop=down box, all the race information below will be removed. Manual mode: No matter what you select or enter into the ‘Race’ box, existing text in this section will remain unchanged. You can change or add any text in the ‘Race’ box or any of the information below it.
9 – Background
Enter your Background or select one from the drop-down menu. The drop-down menu contains all the Backgrounds from the PHB. All of the Backgrounds are sample backgrounds, and you are encouraged to create your own. Because of this and of all the different options that are presented, none of the information in this section or the Character Sheet will be filled in for you.
10 – Level
You must enter your character’s current level in this box.
11 – Class Feature box
The content of this box will change depending on your character’s Class (number 7). It shows certain traits for the selected class that change based on class level and/or abilities and provides check boxes to track uses of limited use features. If no class is selected, or anything is entered into the Class box (number 7) other than what can be selected from its drop-down box, this will show the default Class Feature box which only shows a stylized die and contains an empty text box where you can enter any notes you may want.
12 – Languages and Alignment
Enter all languages your character knows and their Alignment.
13 – Proficiency Bonus, Initiative Modifier, Inspiration, Passive Perception, Death Saves, Exhaustion, Hit Dice, and Hit Points
Hit Dice Type, Proficiency Bonus, Initiative Modifier and Passive Perception will be calculated and filled in for you. The check boxes in Inspiration, Death Saves, and Exhaustion are for you to check off as needed during play. You should enter your MAX Hit Dice. The Used Hit Dice, Current and Temp Hit points are for you to use to track them during play.
14 – Armor Class
Select the type of armor you are wearing, or “Unarmored” and select “Shield” or “No Shield” from the drop-down menus. Your Armor Class (AC) is displayed in the shield symbol. It is your Basic AC + the bonus you get if you have a Shield. The Basic AC is calculated by adding together the values in the three boxes under your armor type (or “No Armor”). Your shield bonus is +2 but if you have a magic shield you can select the bonus from the drop-down menu in the OTHER box under the Shield/No Shield box. Autofill mode: Armor: When you select an armor type the BASE value will be entered in the first box. The MOD value will be filled in with your DEX Modifier if it is Light armor, and your DEX Modifier (max 2) if it is Medium armor, and “None” if it is Heavy armor. The OTHER box is for you to enter any magical + it may have. Unarmored: If you have selected “Unarmored” the BASE will be 10 and MOD will be your DEX Modifier. If your Class is Barbarian the BASE will be 10 and MOD will be your DEX Modifier and OTHER will be your CON modifier. If your Class is Monk the BASE will be 10, MOD will be your DEX Modifier and OTHER will be your WIS Modifier. If not used otherwise, you can use the OTHER box to enter any other modifier you may get to your AC when unarmored. Manual mode: All of these boxes are to be filled in by you. The totals are still added up and show as your AC in the big armor class shield.
15 – Features, Traits and Feats
You can enter any information you want in these text boxes. They are intended for you to list your characters Features, Traits, Feats and any reminders you may want to include.
16 – Skills
The ability modifier to use for each different skill check is listed here. Empty circles indicate your character is not proficient in that skill. Click once on an empty circle to fill that circle, indicating that you are proficient in that skill. Your Proficiency Bonus will be added to your ability modifier for that skill check. Click on the filled circle and a slightly larger circle will be added around the filled one, indicating that you can add double your proficiency bonus to this skill check, and the number will change to reflect this change. Click on this same circle again and it will change to a half-filled circle, indicating that you add only half your proficiency bonus to this skill check and the number will change again. Click on it one more time and it will change back to not proficient. Stealth: To the right of the stealth skill is a checkbox in front of the word “Disadvantage”. This box will automatically be checked as a reminder to you if the type of armor you are wearing gives you Disadvantage on DEX (Stealth) checks.
17 – Physical Description
Refer to the information on your Race, but within those general guidelines your character can look any way that you want.
18 – Character Sketch
If your PDF reader supports it, you can click on the image area and it will pop-up a “Select Icon” menu where you can select an image you have access to. Or just draw a picture of your character on your printed charter sheet.
19 – Weapons
Select a weapon from the drop-down menu.
Select an Ability from the drop-down above the second column of boxes to will apply that ability’s modifier to the attack bonus. This should typically be STR for melee weapons and DEX for ranged weapons.
Click on the check box between the two boxes below that to also apply that modifier to the damage calculation. You don’t add your ability modifier to the damage when attacking with second weapon in your other hand unless the modifier is negative.
If you have proficiency in the use of this weapon, click on the circle next to “Proficient”. (This will fill in the circle and replace the word “None” in the attack bonus row with the value of your Proficiency Bonus.)
If this is a magic weapon select the magical bonus from either of the drop-downs in that column. The magic bonus will show up in both boxes and be applied to the attack bonus and to the damage.
To add additional modifiers to the attack bonus or to the damage select the modifier from the box in the MISC. column. Autofill mode: The Weapon Properties, Reach and/or Range, and Damage Dice will be filled in for you. On the line under the weapons name, it will list the weapon’s properties. Manual mode: You will have to fill in the Weapon Properties, Reach and/or Range, Damage Type, and Damage Dice boxes.
20 – Ammo Check boxes
For weapons that use ammunition, you can use these boxes to check off your ammunition as it is used.
21 – Update Calculations
All of the information filled in automatically for you should update whenever you make any change. Sometimes it doesn’t. You can press this button to force the form to update all of the calculated fields on all pages. Note: This selection box will not appear on the printed page.
22 – Clear
Be careful to not press this unless you want to erase everything from all of the fields on all pages. If you press it by accident, you may be able to recover the lost information if you press CTRL Z. This button is useful for clearing all fields and starting over, or before printing a blank form to fill out by hand. Note: This selection box will not appear on the printed page.
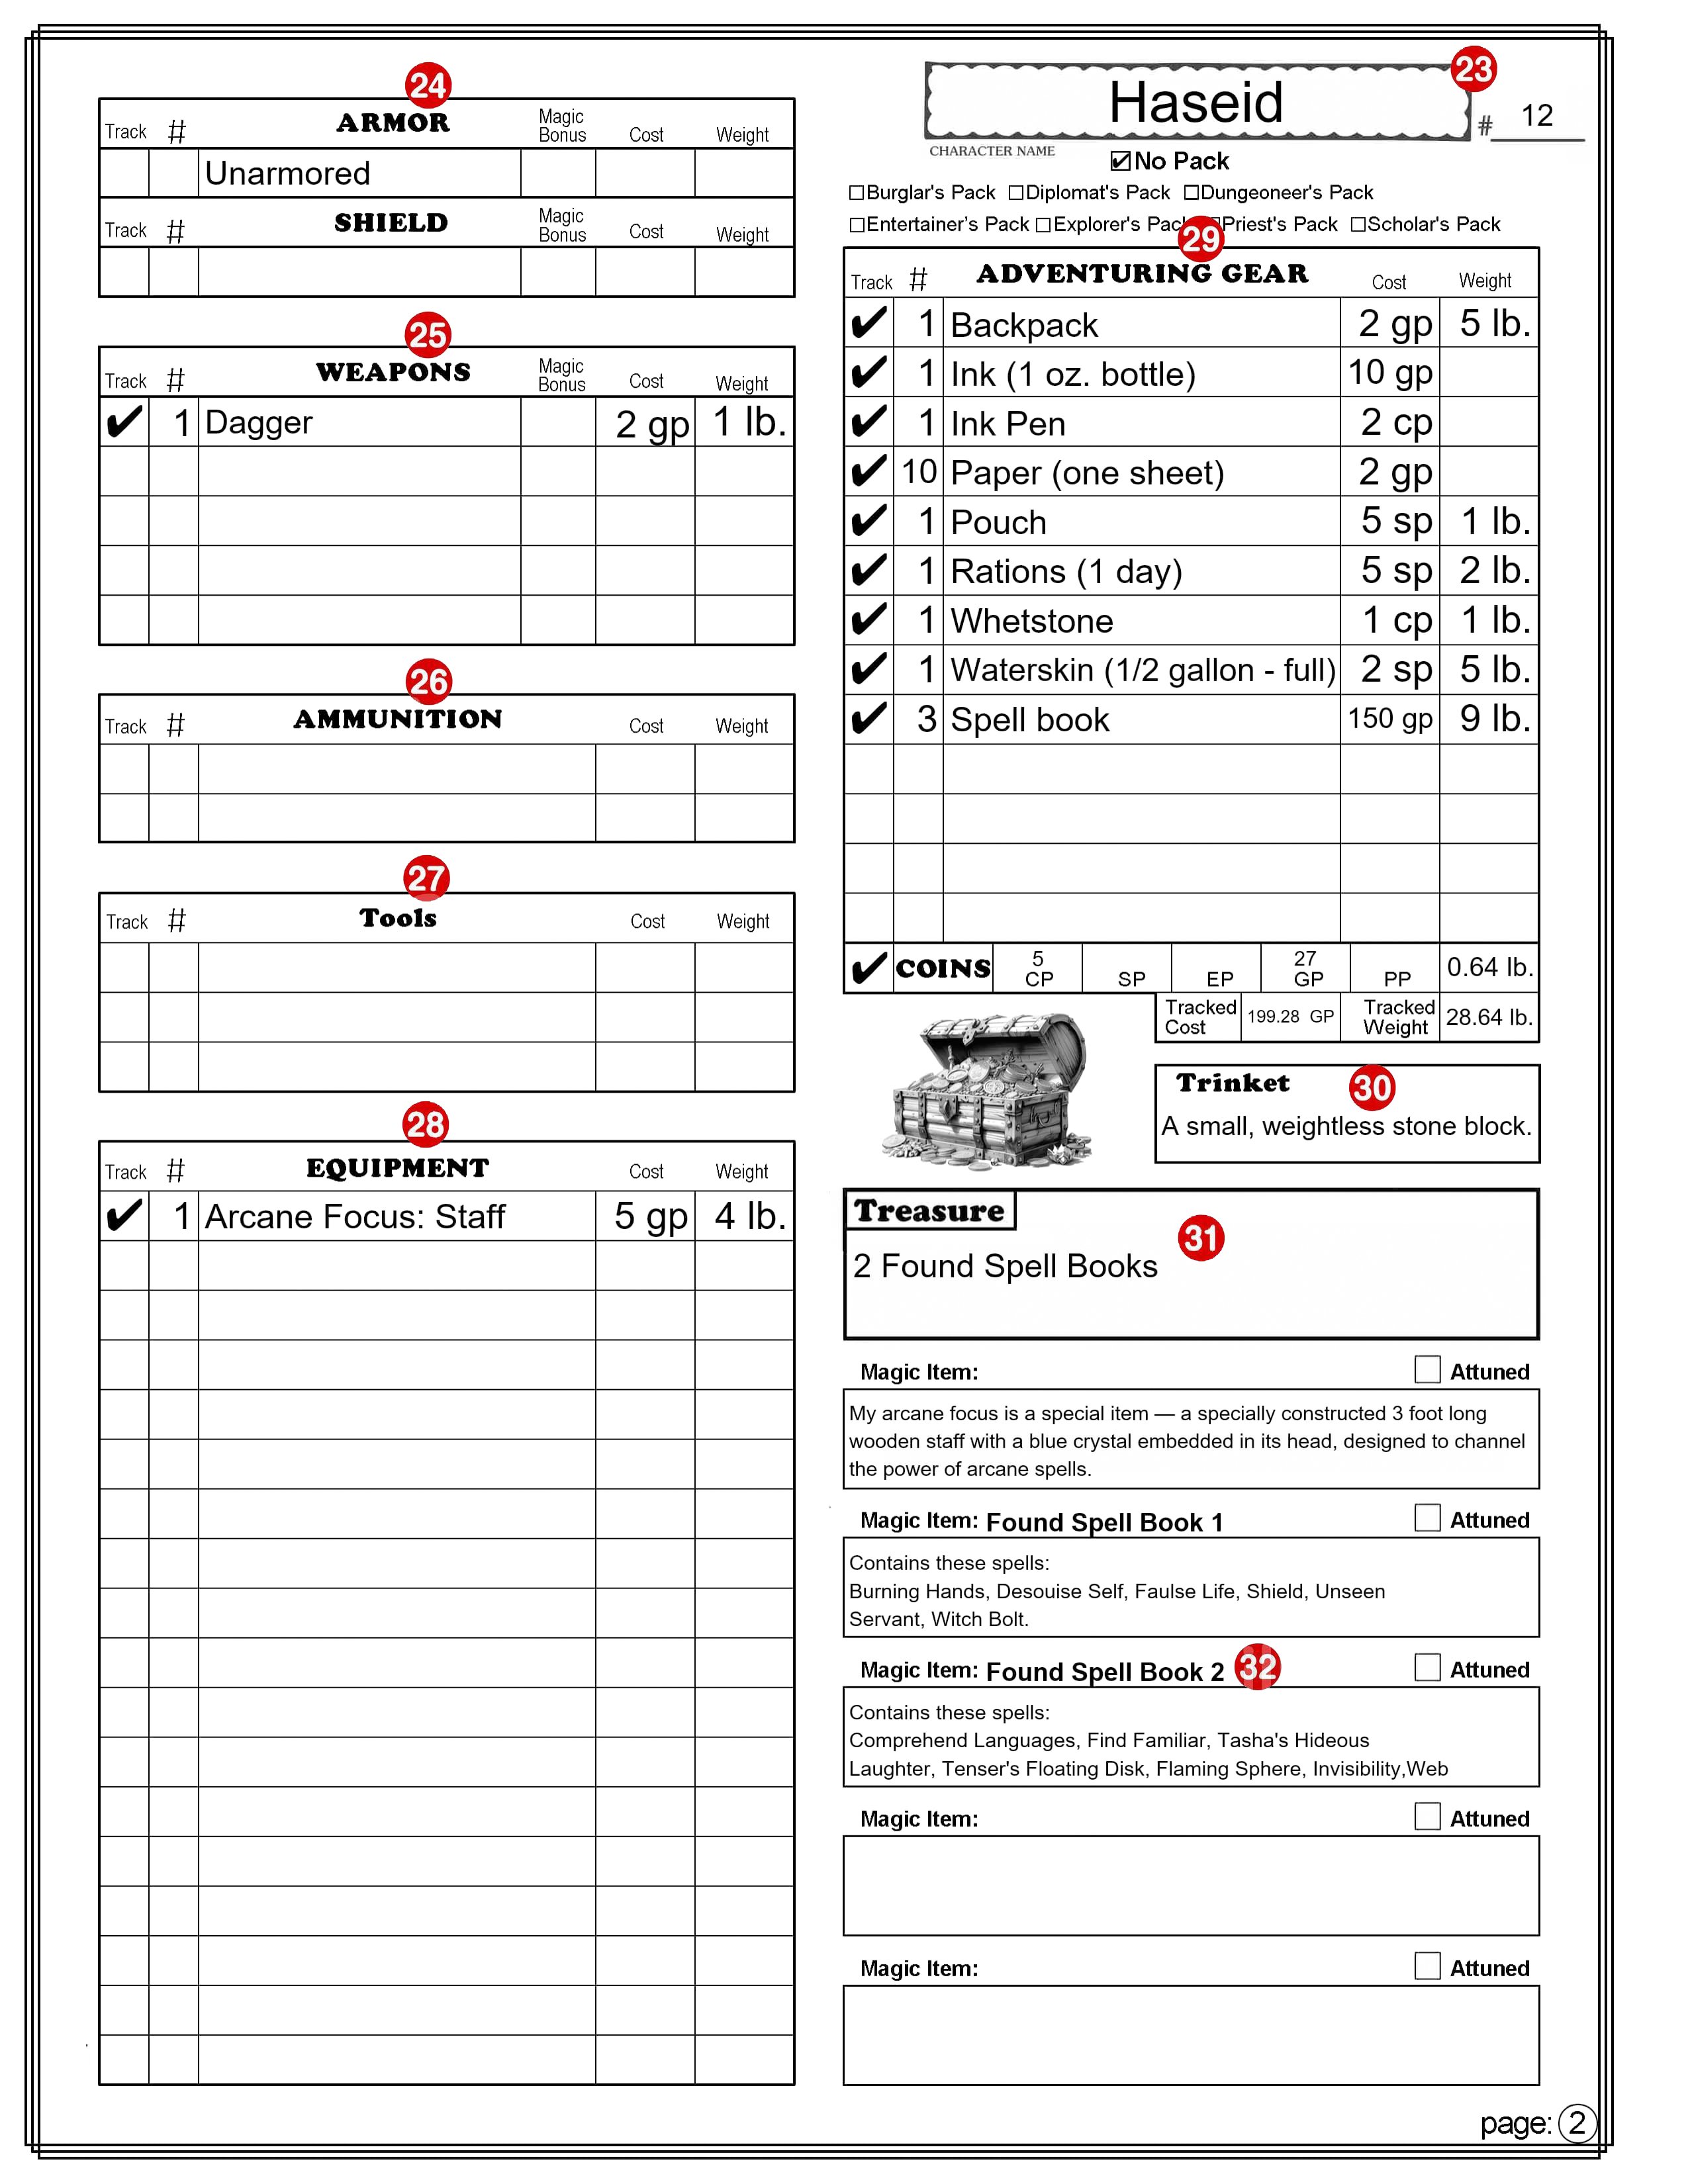
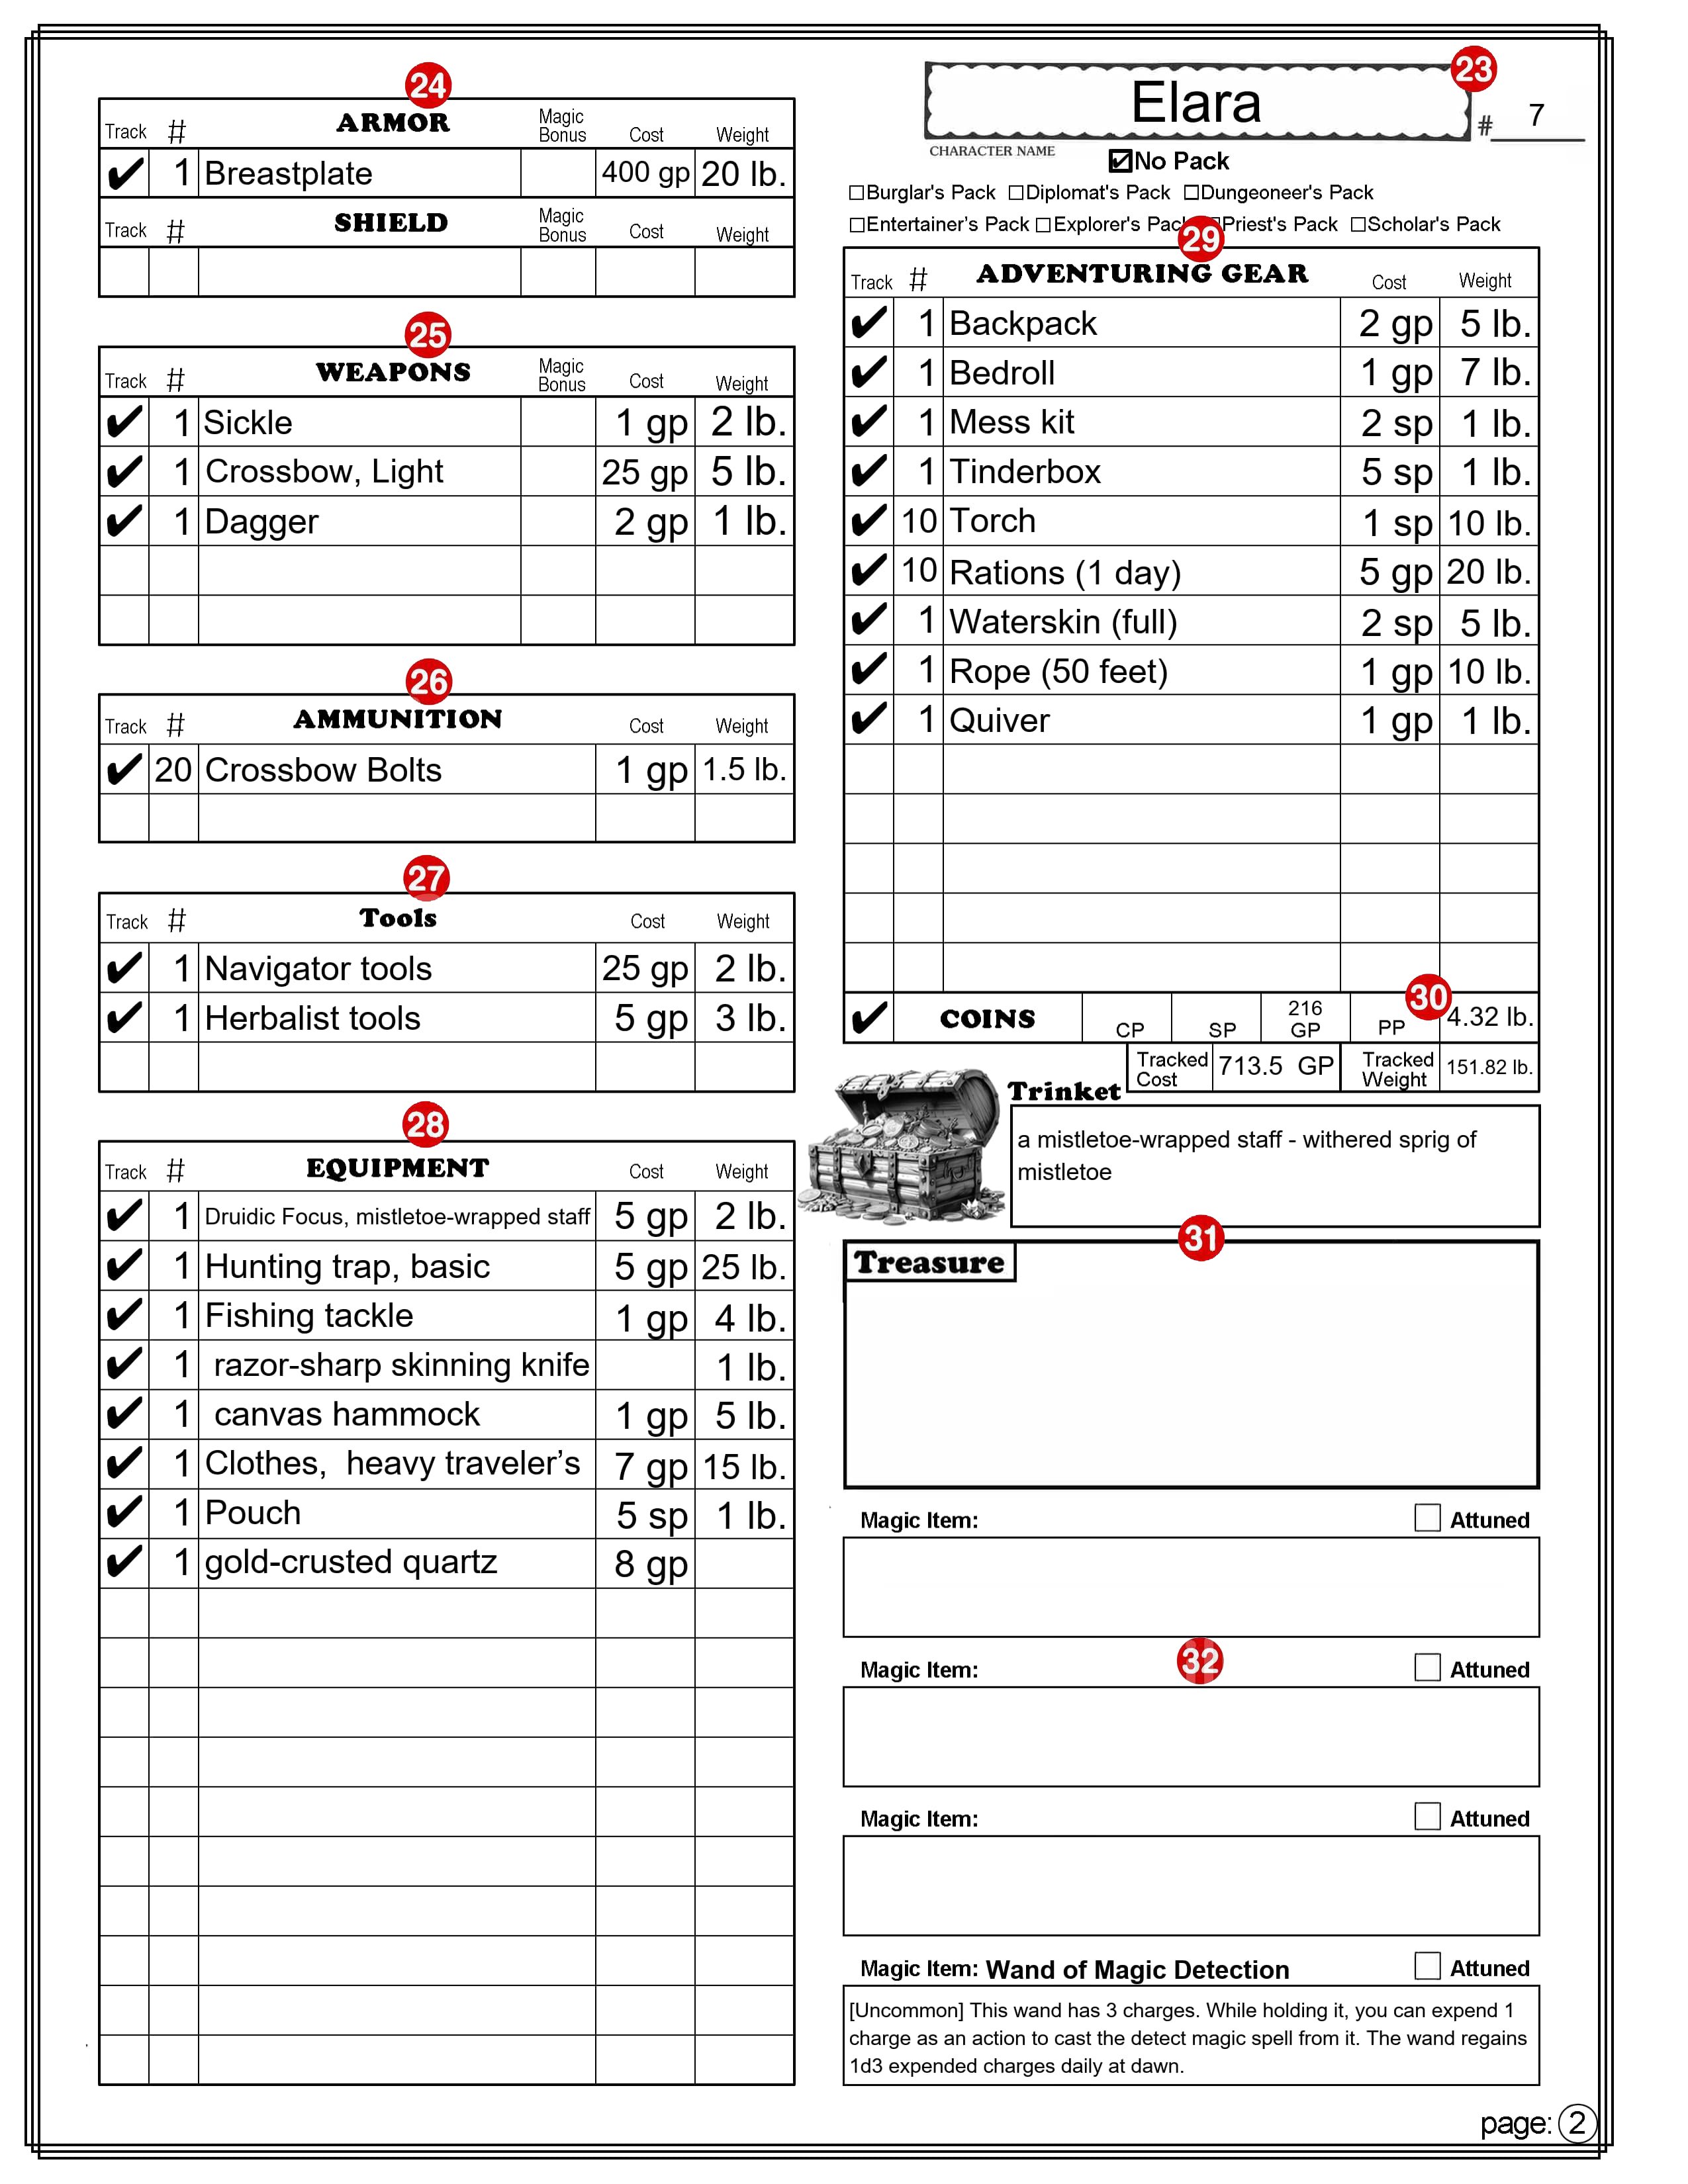
PAGE 2
Note: There is no Autofill or Manual mode for this sheet, although the Adventuring Gear section (number 29) has a “No Pack” option that is similar to Manual mode that only applies to the Adventuring Gear section.
All Equipment Lists
For all items in the Armor, Shield, Weapons, Ammunition, Equipment, and Adventuring Gear sections.
Item Selection: The drop-down will only lists items of the appropriate type. For example: Item selection in the Tools section will only list tools. If you have an item that is not on the drop-down menu, or you want to modify a name, you can type anything you want in the box. (Refer to number 29 for exceptions.) Track: If this box is selected a check mark will appear in the box and the cost and weight of this item will be included in the boxes labeled “Tracked Cost” and “Tracked Weight,” found at the bottom of the “Adventuring Gear” section. #: Number, or quantity. You will need to enter a number in this box for how many of this item you have. If you leave this box empty (it will not display the number 0) the Cost and Weight boxes will remain empty. Magic Bonus: (Only found on the Armor, Shield, and Weapons sections.) You can select a magic modifier to apply to the item from the drop-down menu. Cost: This box will contain the cost of the item. It takes the cost from the PHB and multiplies that by the number of items. If the text in the item box doesn’t match exactly any option on the drop-down, no calculations are made and you can enter or change the cost. You can’t enter the cost in cp, sp, or pp. You will need to convert the cost into its value in gold pieces, or fractions of a gp. 1 CP = 0.01 GP, 1 SP = 0.1 GP , 1 PP = 10 GP. Note: If the text in the item box isn’t on the drop-down list, the cost you enter here will ignore the number in the # column. Also note that this is the price of the item. If you later sell the item you will typically only be able to sell it for a maximum of 1/2 its original value. There are some exceptions, such as for gems and coins. Weight: This box will contain the weight of the item (in pounds). It takes the weight from the PHB and multiplies that by the number of items. If the text in the item box doesn’t match exactly any option on the drop-down, no calculations are made and you can enter or change the weight. Note: If the text in the item box isn’t on the drop-down list, it will ignore the number in the # column.
23 – Character’s Name and #____
Character’s Name and Character sheet version (see 2 & 3 on page 1).
24 – Armor & Shield
ARMOR: Select the armor you are wearing (or select “No Armor”). The text here will also appear on page 1 (number 14), and used to calculate your armor class. The text can be entered or changed on either page. If the text here doesn’t match exactly what is on the drop-down menu the AC calculation on Page 1 may be inaccurate. Magic Bonus: This will appear on page 1 as a magic + for any armor, or as OTHER if unarmored. Exception: This value will be ignored when unarmored if your class is Monk. SHIELD: Select “Shield” or “No Shield”. The text here will also appear on page 1 (number 14), and used to calculate your armor class. The text can be entered or changed on either page. If the text here doesn’t match exactly what is on the drop-down menu the AC calculation on Page 1 may be inaccurate. Magic Bonus: This is added as a bonus to your armor class with or without a shield. (It can be changed here or on page 1.)
25 – Weapons
Select your Weapons from the drop down menu. They will appear in the same order here and on page 1 (number 19). The text can be entered or changed on either page. If the text here doesn’t match exactly what is on the drop-down menu the Attack Bonus and Damage for this weapon on Page 1 may be inaccurate. Magic Bonus: This will appear on page 1 as a magic + for the weapon and can be selected on either page.
26 – Ammunition
Select your Ammunition from the drop down menu. Note that the Cost and Weight are calculated based on the cost and weight of one item and most ammunition is sold in bundles of multiple items. So if, for example, you purchase 20 arrows, be sure to enter 20 in the number column to get an accurate cost and weight calculation.
27 – Tools
Select any Tools from the drop down menu.
28 – Equipment
Select Equipment from the drop down menu. You may want to first enter your starting Equipment in the Adventuring Gear section. Both sections contain the same drop-down list of items.
29 – Adventuring Gear
This section is to automate the selection of bundles of items that are available as “Equipment Packs” in the PG, many of which are available options with your chosen class. Selecting a Pack: When you select a pack (by checking the box by the name of the pack) all of the Number, Name, Cost, and Weight boxes in this section will be cleared and replaced with the items available in that pack. As long as one of the packs is selected you can’t make any changes to this list. Selecting “No Pack”: When you select “No Pack” the “Adventuring Gear” section will function exactly the same as the “Equipment” section. It is important to note that this does not clear any of the current information in this section so you could, for example, select the Explorer’s Pack and then select No Pack, leaving all the items that came with the Explorer’s Pack. You could then remove, add or change items as you choose. COINS: The coins section at the bottom of the “Adventuring Gear” section is unaffected by the selection of any Pack. This row is where you can track your money, in the form of CP (Coper Pieces), SP (Silver Pieces), EP (Electrum Pieces), GP (Gold Pieces), and PP (Platinum Pieces). Tracked Cost & Tracked Weight: These show the Totals (in GP and pounds) of all the items you have checked for tracking. This is an easy way to see how much weight you are carrying. You could easily choose to not track items that you have in a bag of holding for example, or items you own but are not currently carrying. Another tip; if you are on a shopping spree, you can select the items you are thinking of buying and only select them to track. That will give you a quick cost total.
30 – Trinket
This is a section where you may want to enter the description of a unique item. It’s cost and quantity will not be tracked.
31 – Treasure
This has two text fields, one for a name like “Treasure from the Dragon’s hoard.” And a larger area for listing multiple items. These will not be tracked.
32 – Magic Items
There is space here to list 4 magic items. There is a field above the box for the item’s name and a larger text field in the box for a description. The check box beside the word “Attuned” can be checked if you are attuned to the magic item. (You can be attuned to no more than a 3 magic items at any one time.)
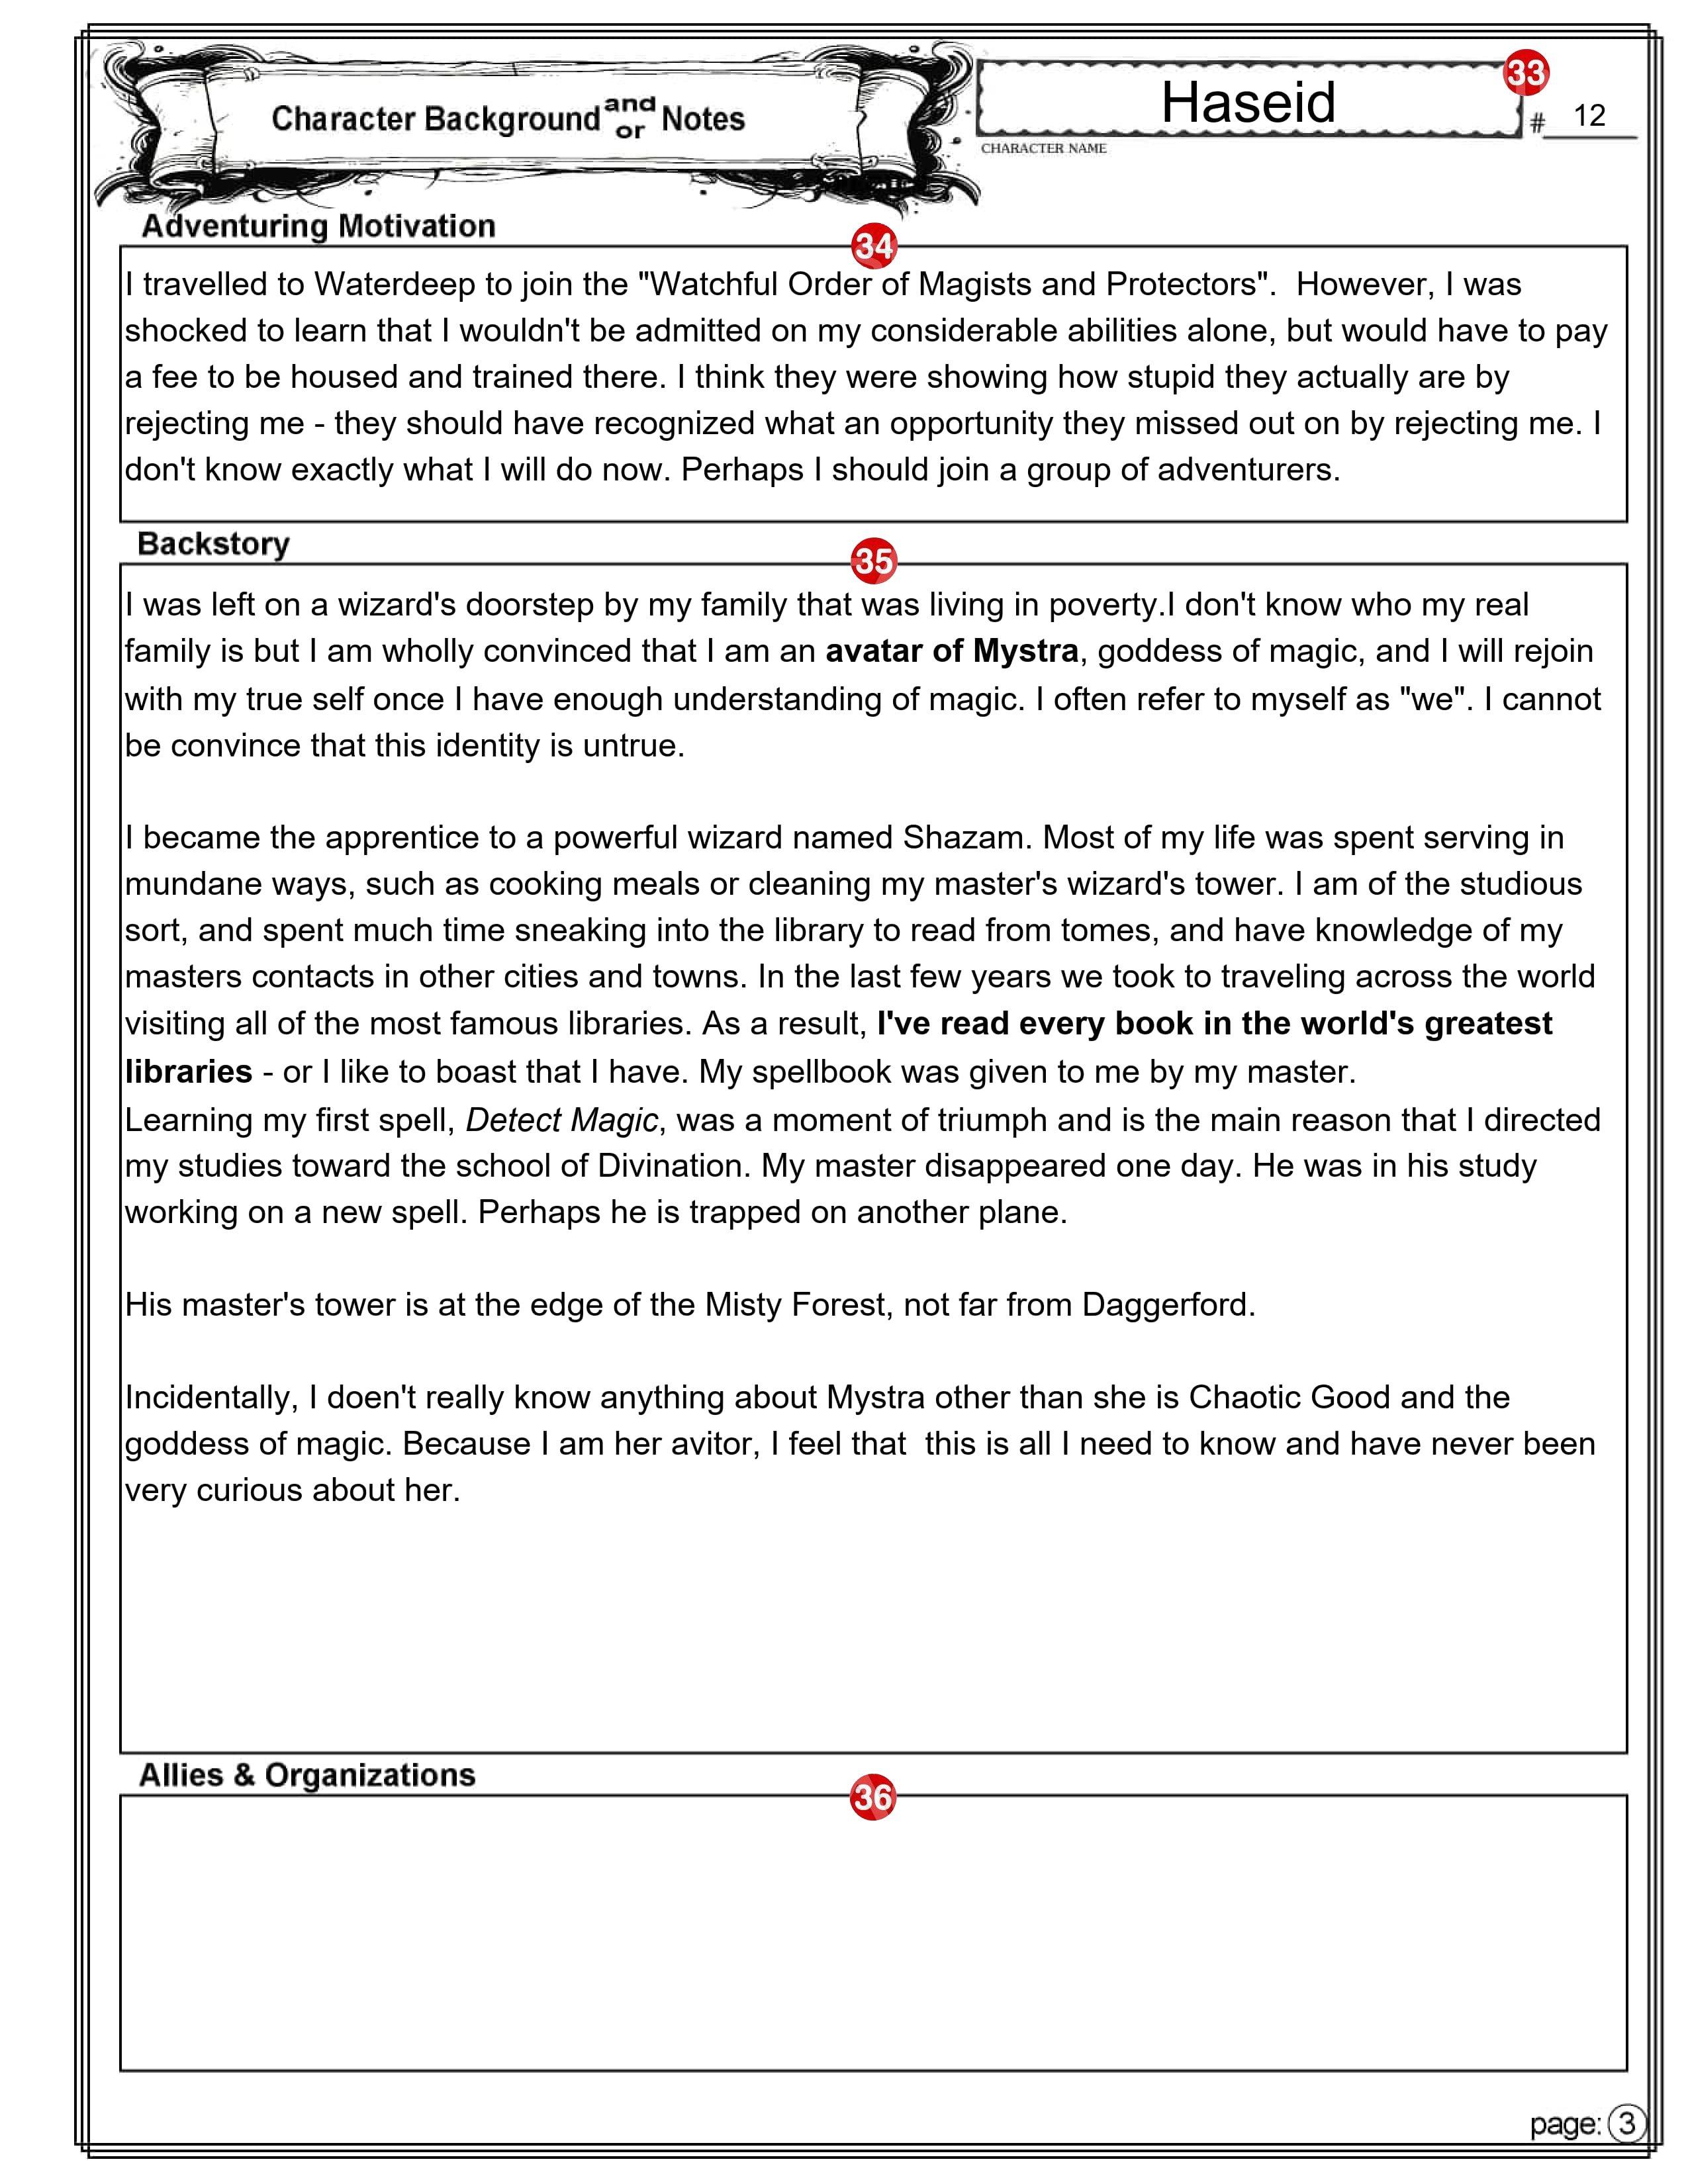
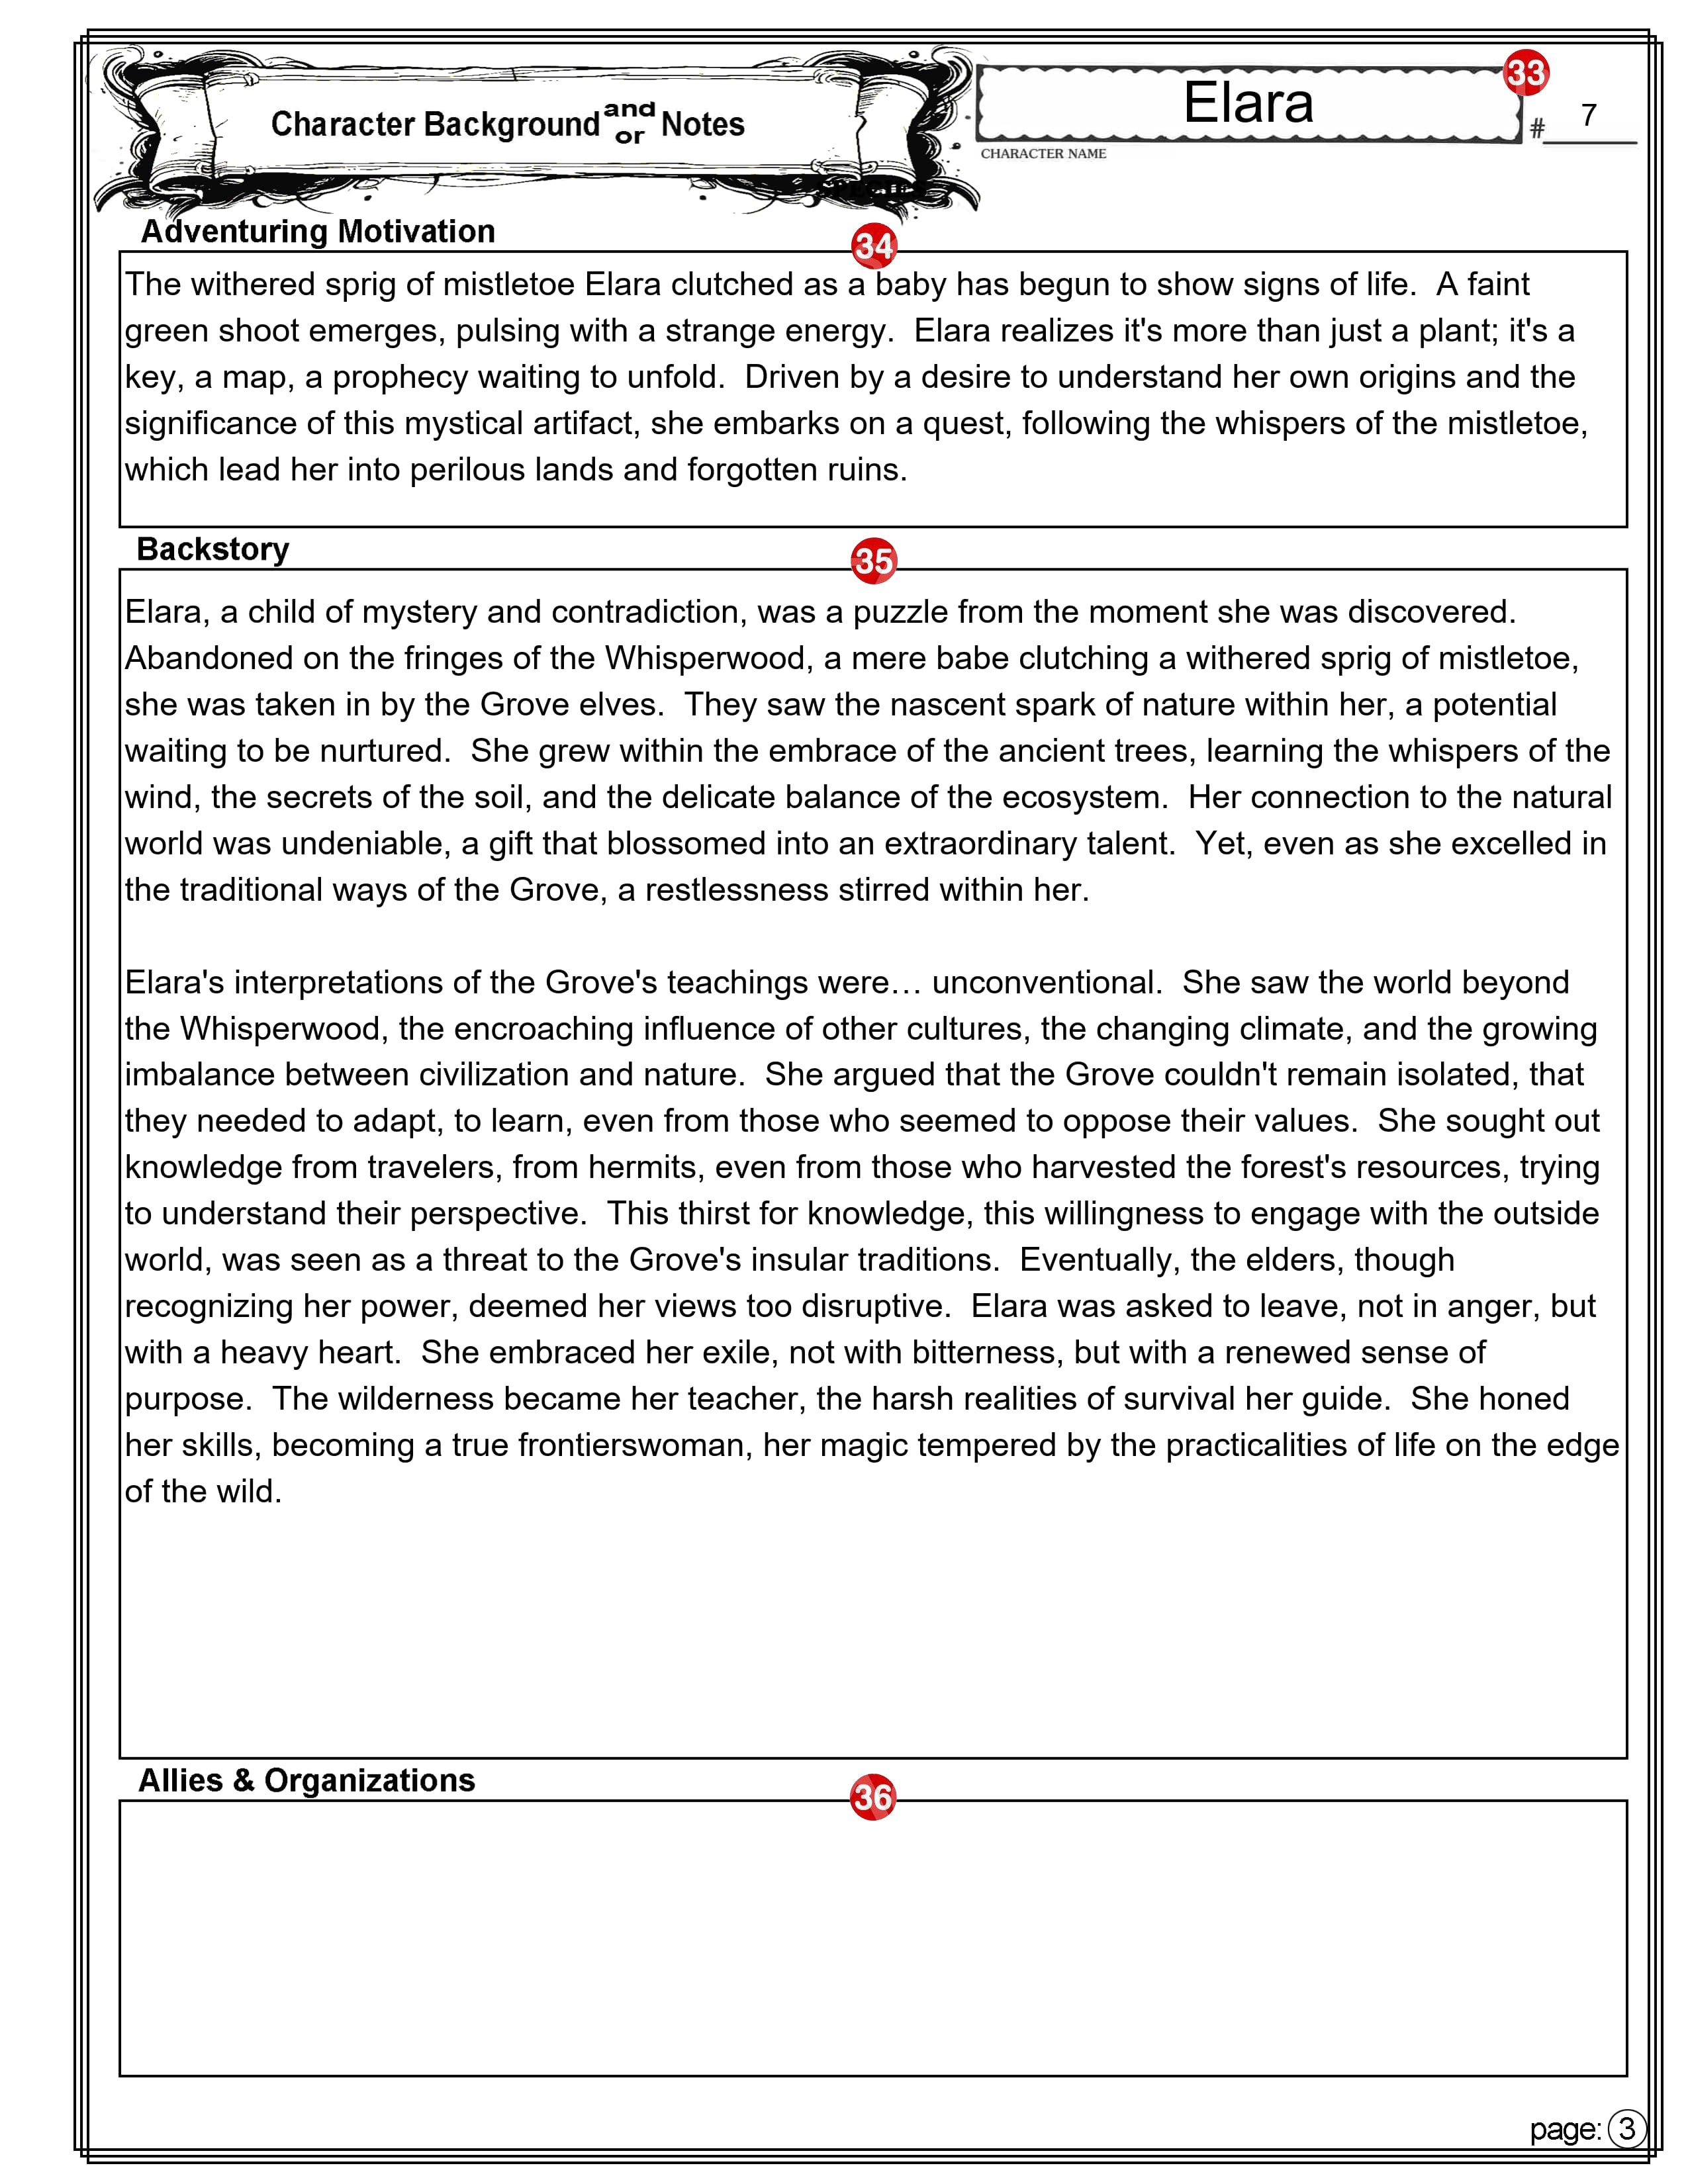
PAGE 3
33 – Character’s Name and #____
Character’s Name and Character sheet version (see numbers 2 & 3).
34 – Adventure Motivation
This is where you can enter the reason your character decided to become an adventurer.
35 – Backstory
Many players like (and some DMs require you) to come up with a character backstory. Players create backstories for their D&D characters to add depth, motivation, and personality to their roles in the game. A well-crafted backstory can enhance roleplaying, provide plot hooks for the DM, and make the character more engaging for both the player and the party.
There is plenty of room here to also add any notes about your character that don’t easily fit elsewhere on the character sheet.
36 – Allies and Organizations
A place to list the names and something about the other Player Characters (PCs) in the game, along with who the character belongs to. There may be organizations in the game world that you want to remember. Some may be friendly and some not.
PAGE 4
37 – Your Character’s Class
Autofill mode: Your Character’s Class as it appears on page 1, will be copied here. Manual mode: When you switch this to Manual mode, any text here remains, but you can edit, delete or change it.
38 – Autofill/Manual Selection Box
This selection box is independent of the similar one on page 1. Be aware that one page might be set to Autofill and the other one set to Manual. Select ‘Autofill’ mode to automatically fill in portions of this page based on your choices, as described below. Choose ‘Manual’ mode to keep existing information unchanged and make your own edits. Note: This selection box will not appear on the printed page.
39 – Character’s Name and #____
Character’s Name and Character sheet version (see numbers 2 & 3).
40 – Spellcasting Ability
Autofill mode: This will show the ability used by this class of spellcaster. You can’t change the text. Manual mode: You can change the text,
41 – Subclass
Autofill mode: This will reflect the sub-class that is on page 1. Manual mode: The text in this field is fully editable.
42 – Save DC
Autofill mode: The spellcaster’s save DC and attack bonus is calculated and displayed here. Manual mode: You can change the number.
43 – Attack Bonus
Autofill mode: The attack bonus to add to spell attacks is calculated and displayed here. Manual mode: You can change the number.
44 – Prepared Spells
Autofill mode: If the spellcaster has a limited number of spells they know or that they can prepare, that number is displayed here. You cannot change the number. Manual mode: You can change the number.
45 – Spell Slots and Castings
Autofill mode: The spellcaster’s number of spell slots is calculated for each spell level and displayed here. You cannot change the numbers. Manual mode: You can change the numbers. Castings: The check boxes are for you to use during your game to check off the spell slots as you use them.
46 – A space for notes
This area is where you can enter notes specific to your spellcasting features and abilities.
47 – Known Cantrips
Autofill mode: The number of cantrips you can know is calculated based on your class level is calculated and displayed here. You cannot change this number. Manual mode: You can change the number.
48 – Another space for notes
This space at the top of the list of spells of each level is for any notes you may want to keep regarding spells of this level.
49 – Spell List
You can enter the name of the spells you have access to for each spell level. You can enter anything you want here. You might want to include the page number where the spell can be found in the PG. I like to include things [C] for concentration.
50 – Prepared Spells
If your Class has you prepare a certain number of spells from your list of spells, you can indicate the prepared spells by filling in the circle (by clicking on it). Clicking on it a second time returns it to a circle.
Multiclass
To use this character sheet for a multiclass character there are two options.
Option 1. One way is to simply switch to ‘Manual’ mode and enter everything any way you want. Option 2. To take full advantage of the features available on this character sheet I recommend the following:
Create a level 1 character in ‘Autofill’ mode. Enter all its weapons, armor, and equipment.
When you are ready to add a second class switch to ‘Manual’mode (if you haven’t already).
In the Class box (number 7) add the level for the current class and the name of the second class and its level. For example, if you have a third level Barbarian and add two levels of Sorcerer you might enter its class as: Barbarian,3 Sorcerer,2.
Make changes as required to the other class related features on this section. You can delete anything that no longer applies or that you don’t need to reference.
The Class Feature box (number 11) will change to allow several lines of text. You can use this area to enter information you want to keep track of, or that won’t easily fit in other places on the sheet.
Enter the combined level of all of your classes in the “Level” box (number 10). This is important because many calculated values are based on this.
On page 4, select “Manual” mode and make any needed changes.
Final Comments
The main thing to remember is that the character sheet is yours. Use it in any way that makes sense to you. You can write outside the boxes, use circles and arrows, scribble in the margins, or use it in any way that you choose. Also, you don’t have to completely fill out every box before you start playing. If you never decide on your character’s eye color, it won’t affect the game. [As a DM, I do strongly recommend that you give your character a name before your second gaming session. I have played too many times with one or more “no name” characters. This can be a distraction.]
Here are a couple of tips. First, if you are using a printed character sheet, use pencil instead of ink. Many things can happen during an adventure that can cause things to change so keep an eraser handy. Second, if you can cast spells, you might want to use one or more weapon boxes on page 1 for quick reference to your favorite offensive spells.
Having problems? Occasionally users of my previous Character Sheet would report issues with getting everything to work. The problem has typically been with the PDF reader they are using. Problems with the PDF reader in their browser were common. If you have access to a desktop computer running Windows, I recommend you first download a copy of the file to your hard drive. Then open the file using your preferred PDF reader. The most popular one is the free “Adobe Acrobat” PDF Reader. This Character Sheet has been tested on that and it all appears to work. If you are curious, I created this using PDF-XChange Editor.
Call to action. I’m always looking to improve my resources for the D&D community! I would love to hear your feedback on this new character sheet. Let me know what you think in the comments below. If you encounter any issues using the sheet, please report them so I can address them. And if you have any suggestions for improvement, I’m all ears! Your input helps me create the best possible tools for fellow Dungeon Masters and players.
Here is the form fillable ToV Character Sheet you have been waiting for!
In 2015 Wizards of the Coast published the current version of Dungeons and Dragons (D&D 5E). Last year they published an update to the game that they refer to as the 2025 version (I call it D&D 5.5). Last year Kobold Press published “Tales of the Valiant” (ToV). It is also based on D&D 5E and is also an update to that game. If you aren’t familiar with it you should go over to koboldpress.com and get a free copy of the 385 page “Black Flag Reference Document” PDF. It contains everything you need to play ToV. If you like it you can get their equivalent to WotC’s “Player’s Handbook” (PHB), “Dungeon Master’s Guide” (DMG), and “Monster Manual” (MM). ToV calls them the “Player’s Guide” (PG), “Game Master’s Guide” (GMG), and “Monster Vault” (MV).
Last month I posted my updated character sheet for D&D 5.5. This is a similar character sheet specifically for “Tales of the Valiant”.
This incorporates the changes to D&D 5E found in ToV’s “Players Guide”. It is 4 pages, 2 sheets if printed on both sides. (Note that I will be referring to the set of all 4 pages in the singular, as the “character sheet”.) Page one has all of your character’s basic information and all you need for combat other than your spells. Page two is just for equipment and treasure. Page three is Character background and notes. Page four is for magic spells. It can be printed blank and filled out with a pencil, or you can fill in the forms on your device and most of the calculations will be done for you. It automatically calculates; ability and saving throw modifiers, carrying capacity and jump distances, Armor Class, Proficiency Bonus, Passive Perception, Skill check modifiers, Weapon attack bonus and damage, Equipment cost and weight, and more. It can fill in all the adventuring gear you get if you select an equipment pack (such as an “Explorer’s Pack”). In addition to that, it contains a new Autofill option that can fill in all the standard information based on your class, Lineage, Heritage, and Background.
Update #1: 2/9/2025 Minor item cost display fix for Adobe Acrobat For items whose cost is in copper pieces or silver pieces it was displaying their cost in fractions of a gold piece. It now displays their cost in cp or sp if their total cost is less than the next more valuable coin. Adobe Acrobat wasn’t displaying this correctly.
Filling in the ToV Character Sheet
These instructions are for use with the character sheet you can download above. You can print a blank Character Sheet and fill it out by hand. If you fill it out on your device, many boxes will be filled in for you. There is information at the end of this on how to use this sheet for multi-class characters.
PAGE 1
1 – Autofill/Manual Selection Box
This selection box is independent of the similar one on page 4. Be aware that one page might be set to Autofill and the other one set to Manual. Select ‘Autofill’ mode to automatically fill in portions of this page based on your choices, as described below. Choose ‘Manual’ mode to keep existing information unchanged and make your own edits. CAUTION: If you switch to ‘Manual’ mode to make a few changes and then switch back to ‘Autofill’ mode, all your changes will be lost, replaced by the ‘Autofill’ information. I recommend you leave it in ‘Autofill’ mode until you are finished with Page 1, including your weapons and armor. You can then safely change to ‘Manual’ mode and make changes and additions. You may want to make a backup copy of your sheet before making changes. Each of the numbered sections below where this selection makes a difference will include a description for both Autofill mode and Manual mode. Note: This selection box will not appear on the printed page.
2 – Your Character’s Name
The text you enter here will also appear in the same location on the other pages. The text can be entered or changed on any page.
3 – #____
Character sheet version. If you make multiple copies of your character sheet enter the version number here. Like the Character Name, this text will also appear on the other pages.
4 – XP/Milestones Selection Box
If ‘XP’ is selected the Next Level Goal will be calculated and entered for you here based on your current character level (see below). If “Milestones” is selected the text on this line will be replaced by a “Notes” section. Note: This selection box will not appear on printed pages
5 – Campaign Information
This is where you enter your name, the name of the campaign you are in and the date this character was created. Trust me, if you look back at this years from now, you will appreciate having this information.
6 – Ability Sores
Enter your ability scores in the boxes. All the data to the right of the ability scores will be filled in for you based on the ability scores, including your carrying and jumping stats based on your strength score. Because your long jump distances are based on your walking speed, and there are several ways it might change, I don’t calculate that for you. Check the little box next to the Saving Throw modifier to indicate that you are proficient in that Save.
7 – Class
Select your Class from the drop-down box. The Class Feature box (number 10 below) will display information relevant to this class. Subclass: You can select a subclass from the drop-down menu. Autofill mode: All the information from the Class Features section in the PG for this Class will be filled in, down to (but not including) Starting Equipment. If there is any current text in any of these areas it will be removed. You can also type text into this ‘Class’ box, but if it differs in any way from one of the selections in the drop-down box any text below will be removed. Manual mode: No matter what you select or enter into the “Class’ box, existing text in this section will remain unchanged. You can change or add any text in the ‘Class’ box or any of the information below it.
8 – Lineage
Select your Lineage from the drop-down box. Natural Adaption: Some call this a Sub Lineage. Some lineages (such as the Dwarf) don’t have one. You can type in the name of a Natural Adaption or select one from the drop-down. Autofill mode: An abbreviated version of the size, speed, and special traits for this lineage will be filled in. If there is any current text in any of these areas it will be removed. You can also type text into the ‘Lineage’ box, but if it differs in any way from one of the selections in the drop-down box any text below will be removed. Manual mode: No matter what you select or enter into the ‘Lineage’ box, existing text in this section will remain unchanged. You can change or add any text in the ‘Lineage’ box or any of the information below it.
9 – Heritage and Background
Select your Heritage and Background from the drop-down boxes. Autofill mode: The Languages and Traits for your Heritage will be filled in. Your Talent, Skill Proficiencies and Additional Proficiencies from your Background will be filled in. Manual mode: No matter what you select or enter into the ‘Heritage’ or ‘Background’ box, existing text in these sections will remain unchanged. You can change or add any text in either box or any of the information below them.
10 – Class Feature box
The content of this box will change depending on your character’s Class (number 7). It shows certain traits for the selected class that change based on class level and/or abilities and provides check boxes to track uses of limited use features. If no class is selected, or anything is entered into the Class box (number 7) other than what can be selected from its drop-down box, this will show the default Class Feature box which only shows a stylized die and contains an empty text box where you can enter any notes you may want.
11 – Advantages, Disadvantages, Languages and Luck Points
Enter any types of checks where you get advantage or disadvantage on the role, your known languages and track your luck points.
12 – Level
You must enter your character’s current level in this box.
13 – Proficiency Bonus, Initiative Modifier, Heroic Inspiration, Passive Perception, Death Saves, and Exhaustion, Hit Dice, and Hit Points
Hit Dice Type, Proficiency Bonus, Initiative Modifier and Passive Perception will be calculated and filled in for you. The check boxes in Heroic Inspiration, Death Saves, and Exhaustion are for you to check off as needed during play. You should enter your MAX Hit Dice. The Used Hit Dice, Current and Temp Hit points are for you to use to track them during play.
14 – Armor Class
Select the type of armor you are wearing, or “Unarmored” and select “Shield” or “No Shield”. Your Armor Class (AC) is displayed in the shield symbol. It is your Basic AC + the bonus you get if you have a Shield. The Basic AC is calculated by adding together the values in the three boxes under your armor type (or “No Armor”). Your shield bonus is +2 but if you have a magic shield you can select the bonus from the drop-down menu in the OTHER box under the Shield/No Shield box. Autofill mode: Armor: When you select an armor type the BASE value will be entered in the first box. The MOD value will be filled in with your DEX Modifier if it is Light armor, and your DEX Modifier (max 2) if it is Medium armor, and “None” if it is Heavy armor. The OTHER box is for you to enter any magical + it may have. Unarmored: If you have selected “Unarmored” the BASE will be 10 and MOD will be your DEX Modifier. If your Class is Barbarian the BASE will be 13 and MOD will be your CON Modifier. If your Class is Monk the BASE will be 10, MOD will be your DEX Modifier and OTHER will be your WIS Modifier. If not used otherwise, you can use the OTHER box to enter any other modifier you may get to your AC when unarmored. (If your character is a Sorcerer, the third level feature “Draconic Resilience” gives you an unarmored AC of 13 + your DEX Modifier. This is the only one that isn’t done for you. You will need to switch to Manual Mode to enter that. CAUTION: later switching back to Autofill Mode will replace anything you have entered anywhere on this page while in Manual Mode back to its autofill status. Manual mode: All of these boxes are to be filled in by you. The totals are still added up and show as your AC in the big armor class shield.
15 – Features, Traits and Talents
You can enter any information you want in these text boxes. They are intended for you to list your characters Features, Traits, Talents and any reminders you may want to include.
16 – Skills
The ability modifier to use for each different skill check is listed here. Empty circles indicate your character is not proficient in that skill. Click once on an empty circle to fill that circle, indicating that you are proficient in that skill. Your Proficiency Bonus will be added to your ability modifier for that skill check. Click on the filled circle and a slightly larger circle will be added around the filled one, indicating that you can add double your proficiency bonus to this skill check, and the number will change to reflect this change. Click on this same circle again and it will change to a half-filled circle, indicating that you add only half your proficiency bonus to this skill check and the number will change again. Click on it one more time and it will change back to not proficient. Stealth: To the right of the stealth skill is a checkbox in front of the word “Disadvantage”. This box will automatically be checked as a reminder to you if the type of armor you are wearing gives you Disadvantage on DEX (Stealth) checks. It will automatically be checked if your armor has the “Noisy” property.
17 – Physical Description
Refer to the information on your Lineage, but within those general guidelines your character can look any way that you want.
18 – Character Sketch
If your PDF reader supports it, you can click on the image area and it will pop-up a “Select Icon” menu where you can select an image you have access to. Or just draw a picture of your character in the frame.
19 – Weapons
Select a weapon from the drop-down menu.
Select an Ability from the drop-down above the second column of boxes to will apply that ability’s modifier to the attack bonus. This should typically be STR for melee weapons and DEX for ranged weapons.
Click on the check box between the two boxes below that to also apply that modifier to the damage calculation. You don’t add your ability modifier to the damage when attacking with second weapon in your other hand unless the modifier is negative.
If you have proficiency in the use of this weapon, click on the circle next to “Proficient”. (This will fill in the circle and replace the word “None” in the attack bonus row with the value of your Proficiency Bonus.)
If this is a magic weapon select the magical bonus from either of the drop-downs in that column. The magic bonus will show up in both boxes and be applied to the attack bonus and to the damage.
To add additional modifiers to the attack bonus or to the damage select the modifier from the box in the MISC. column. Autofill mode: The Weapon Properties, Reach and/or Range, and Damage Dice will be filled in for you. On the line under the weapons name, it will list the weapon’s properties and the weapon options (if any) in square brackets. Manual mode: You will have to fill in the Weapon Properties, Reach and/or Range, Damage Type, and Damage Dice boxes.
20 – Ammo Check boxes
For weapons that use ammunition, you can use these boxes to check off your ammunition as it is used.
21 – Update Calculations
All of the information filled in automatically for you should update whenever you make any change. Sometimes it doesn’t. You can press this button to force the form to update all of the calculated fields. Note: This selection box will not appear on the printed page.
22 – Clear
Be careful to not press this unless you want to erase everything from all of the fields on all pages. If you press it by accident, you may be able to recover the lost information if you press CTRL Z. This button is useful for clearing all fields and starting over, or before printing a blank form to fill out by hand. Note: This selection box will not appear on the printed page.
PAGE 2
Note: There is no Autofill or Manual mode for this sheet, although the Adventuring Gear section (number 29) has a “No Pack” option that is similar to Manual mode that only applies to the Adventuring Gear section.
All Equipment Lists
For all items in the Armor, Shield, Weapons, Ammunition, Equipment, and Adventuring Gear sections.
Item Selection: The drop-down will only lists items of the appropriate type. For example: Item selection in the Tools section will only list tools. If you have an item that is not on the drop-down menu, or you want to modify a name, you can type anything you want in the box. (Refer to number 29 for exceptions.) Track: If this box is selected a check mark will appear in the box and the cost and weight of this item will be included in the boxes labeled “Tracked Cost” and “Tracked Weight,” found at the bottom of the “Adventuring Gear” section. #: Number, or quantity. You will need to enter a number in this box for how many of this item you have. If you leave this box empty (it will not display the number 0) the Cost and Weight boxes will remain empty. Magic Bonus: (Only found on the Armor, Shield, and Weapons sections.) You can select a magic modifier to apply to the item from the drop-down menu. Cost: This box will contain the cost of the item. It takes the cost from the PG and multiplies that by the number of items. If the text in the item box doesn’t match exactly any option on the drop-down, no calculations are made and you can enter or change the cost. You can’t enter the cost in cp, sp, or pp. You will need to convert the cost into its value in gold pieces, or fractions of a gp. 1 CP = 0.01 GP, 1 SP = 0.1 GP , 1 PP = 10 GP. Note: If the text in the item box isn’t on the drop-down list, the cost you enter here will ignore the number in the # column. Also note that this is the price of the item. If you later sell the item you will typically only be able to sell it for a maximum of 1/2 its original value. There are some exceptions, such as for gems and coins. Weight: This box will contain the weight of the item (in pounds). It takes the weight from the PHB and multiplies that by the number of items. If the text in the item box doesn’t match exactly any option on the drop-down, no calculations are made and you can enter or change the weight. Note: If the text in the item box isn’t on the drop-down list, it will ignore the number in the # column.
23 – Character’s Name and #____
Character’s Name and Character sheet version (see 2 & 3 on page 1).
24 – Armor & Shield
ARMOR: Select the armor you are wearing (or select “No Armor”). The text here will also appear on page 1 (number 14), and used to calculate your armor class. The text can be entered or changed on either page. If the text here doesn’t match exactly what is on the drop-down menu the AC calculation on Page 1 may be inaccurate. Magic Bonus: This will appear on page 1 as a magic + for any armor, or as OTHER if unarmored. Exception: This value will be ignored when unarmored if your class is Monk. SHIELD: Select “Shield” or “No Shield”. The text here will also appear on page 1 (number 14), and used to calculate your armor class. The text can be entered or changed on either page. If the text here doesn’t match exactly what is on the drop-down menu the AC calculation on Page 1 may be inaccurate. Magic Bonus: This is added as a bonus to your armor class with or without a shield. (It can be changed here or on page 1.)
25 – Weapons
Select your Weapons from the drop down menu. They will appear in the same order here and on page 1 (number 19). The text can be entered or changed on either page. If the text here doesn’t match exactly what is on the drop-down menu the Attack Bonus and Damage for this weapon on Page 1 may be inaccurate. Magic Bonus: This will appear on page 1 as a magic + for the weapon and can be selected on either page.
26 – Ammunition
Select your Ammunition from the drop down menu. Note that the Cost and Weight are calculated based on the cost and weight of one item and most ammunition is sold in bundles of multiple items. So if, for example, you purchase 20 arrows, be sure to enter 20 in the number column to get an accurate cost and weight calculation.
27 – Tools
Select any Tools from the drop down menu.
28 – Equipment
Select Equipment from the drop down menu. You may want to first enter your starting Equipment in the Adventuring Gear section. Both sections contain the same drop-down list of items.
29 – Adventuring Gear
This section is to automate the selection of bundles of items that are available as “Equipment Packs” in the PG, many of which are available options with your chosen background. Selecting a Pack: When you select a pack (by checking the box by the name of the pack) all of the Number, Name, Cost, and Weight boxes in this section will be cleared and replaced with the items available in that pack. As long as one of the packs is selected you can’t make any changes to this list. Selecting “No Pack”: When you select “No Pack” the “Adventuring Gear” section will function exactly the same as the “Equipment” section. It is important to note that this does not clear any of the current information in this section so you could, for example, select the Explorer’s Pack and then select No Pack, leaving all the items that came with the Explorer’s Pack. You could then remove, add or change items as you choose. COINS: The coins section at the bottom of the “Adventuring Gear” section is unaffected by the selection of any Pack. This row is where you can track your money, in the form of CP (Coper Pieces), SP (Silver Pieces), GP (Gold Pieces), and PP (Platinum Pieces). Tracked Cost & Tracked Weight: These show the Totals (in GP and pounds) of all the items you have checked for tracking. This is an easy way to see how much weight you are carrying. You could easily choose to not track items that you have in a bag of holding for example, or items you own but are not currently carrying. Another tip; if you are on a shopping spree, you can select the items you are thinking of buying and only select them to track. That will give you a quick cost total.
30 – Trinket
This is a section where you may want to enter the description of a unique item. It’s cost and quantity will not be tracked.
31 – Treasure
This has two text fields, one for a name like “Treasure from the Dragon’s hoard.” And a largr area for listing multiple items. These will not be tracked.
32 – Magic Items
There is space here to list 4 magic items. There is a field above the box for the item’s name and a larger text field in the box for a description. The check box beside the word “Attuned” can be checked if you are attuned to the magic item. (You can be attuned to no more than a number of items equal to its proficiency bonus (PB) at any one time.)
PAGE 3
33 – Character’s Name and #____
Character’s Name and Character sheet version (see numbers 2 & 3).
34 – Adventure Motivation
This is where you can enter the Adventuring Motivation you selected from those suggested by your background, for one you created.
35 – Backstory
Many players like (and some GMs require you) to come up with a character backstory. Players create backstories for their D&D characters to add depth, motivation, and personality to their roles in the game. A well-crafted backstory can enhance roleplaying, provide plot hooks for the GM, and make the character more engaging for both the player and the party.
There is plenty of room here to also add any notes about your character that don’t easily fit elsewhere on the character sheet.
36 – Allies and Organizations
A place to list the names and something about the other Player Characters (PCs) in the game, along with who the character belongs to. There may be organizations in the game world that you want to remember. Some may be friendly and some not.
PAGE 4
37 – Autofill/Manual Selection Box
This selection box is independent of the similar one on page 1. Be aware that one page might be set to Autofill and the other one set to Manual. Select ‘Autofill’ mode to automatically fill in portions of this page based on your choices, as described below. Choose ‘Manual’ mode to keep existing information unchanged and make your own edits. Note: This selection box will not appear on the printed page.
38 – Your Character’s Class
Autofill mode: Your Character’s Class as it appears on page 1, will be copied here. Manual mode: When you switch this to Manual mode, any text here remains, but you can edit, delete or change it.
39 – Character’s Name and #____
Character’s Name and Character sheet version (see numbers 2 & 3).
40 – Spellcasting Ability
Autofill mode: This will show the ability used by this class of spellcaster. You can’t change the text. Manual mode: You can change the text,
41 – Subclass
Autofill mode: This will reflect the sub-class that is on page 1. Manual mode: The text in this field is fully editable.
42 – Save DC and Attack Bonus
Autofill mode: The spellcaster’s save DC and attack bonus is calculated and displayed here. Manual mode: You can change the number.
43 – Spells Known or Prepared
Autofill mode: If the spellcaster has a limited number of spells they know or that they can prepare, that number is displayed here. You cannot change the number. Manual mode: You can change the number.
44 – Rituals Known
Autofill mode: If the spellcaster can cast Rituals, the number they have available is displayed here. You cannot change the number. Manual mode: You can change the number.
45 – Spell Slots and Castings
Autofill mode: The spellcaster’s number of spell slots is calculated for each spell level and displayed here. You cannot change the numbers. Manual mode: You can change the numbers. Castings: The check boxes are for you to use during your game to check off the spell slots as you use them.
46 – A space for notes
This area is where you can enter notes specific to your spellcasting features and abilities.
47 – Known Cantrips
Autofill mode: The number of cantrips you can know is calculated based on your class level is calculated and displayed here. You cannot change this number. Manual mode: You can change the number.
48 – Another space for notes
This space at the top of the list of spells of each level is for any notes you may want to keep regarding spells of this level.
49 – Spell List
You can enter the name of the spells you have access to for each spell level. You can enter anything you want here. You might want to include the page number where the spell can be found in the PG. I like to include things [C] for concentration. Note: The example character sheet is for a Druid that can cast Leaf Ring spells without preparing them. I have indicated that with this symbol: [●]. This is a standard text filled circle, feel free to copy it from here and past it into any text field on this character sheet.
50 – Prepared Spells
If your Class has you prepare a certain number of spells from your list of spells, you can indicate the prepared spells by filling in the circle (by clicking on it). If you click on it a second time it will be replaced by the letter “R” Use this to indicate a Ritual spell that you know. You don’t have to have a Ritual Spell prepared to cast it. Clicking it a third time returns it to a circle.
Multiclass
To use this character sheet for a multiclass character there are two options.
Option 1. One way is to simply switch to Manual mode and enter everything any way you want. Option 2. To take full advantage of the features available on this character sheet I recommend the following:
Create a level 1 character in Autofill mode. Enter all its weapons, armor, and equipment.
When you are ready to add a second class switch to Manualmode (if you haven’t already).
In the Class box (number 7) add the level for the current class and the name of the second class and its level. For example, if you have a third level Barbarian and add two levels of Sorcerer you might enter its class as: Barbarian,3 Sorcerer,2.
Make changes as required to the other class related features on this section. You can delete anything that no longer applies or that you don’t need to reference.
The Class Feature box (number 11) will change to allow several lines of text. You can use this area to enter information you want to keep track of, or that won’t easily fit in other places on the sheet.
Enter the combined level of all of your classes in the “Level” box (number 12). This is important because many calculated values are based on this.
On page 4, select “Manual” mode and make any needed changes.
Final Comments
The main thing to remember is that the character sheet is yours. Use it in any way that makes sense to you. You can write outside the boxes, use circles and arrows, scribble in the margins, or use it in any way that you choose. Also, you don’t have to completely fill out every box before you start playing. If you never decide on your character’s eye color, it won’t affect the game. [As a DM, I do strongly recommend that you give your character a name before your second gaming session. I have played too many times with one or more “no name” characters. This can be a distraction.]
Here are a couple of tips. First, if you are using a printed character sheet, use pencil instead of ink. Many things can happen during an adventure that can cause things to change so keep an eraser handy. Second, if you can cast spells, you might want to use one or more weapon boxes on page 1 for quick reference to your favorite offensive spells.
Having problems? Occasionally users of my previous Character Sheet would report issues with getting everything to work. The problem has typically been with the PDF reader they are using. Problems with the PDF reader in their browser were common. If you have access to a desktop computer running Windows, I recommend you first download a copy of the file to your hard drive. Then open the file using your preferred PDF reader. The most popular one is the free “Adobe Acrobat” PDF Reader. This Character Sheet has been tested on that and it all appears to work. If you are curious, I created this using PDF-XChange Editor.
Call to action. I’m always looking to improve my resources for the D&D community! I would love to hear your feedback on this new character sheet. Let me know what you think in the comments below. If you encounter any issues using the sheet, please report them so I can address them. And if you have any suggestions for improvement, I’m all ears! Your input helps me create the best possible tools for fellow Dungeon Masters and players.